App registrations
To enable your app to sign in with Microsoft Entra external ID you need to register the application in Microsoft Entra external ID directory. This page shows how we configured the Woodgrove Groceries application.
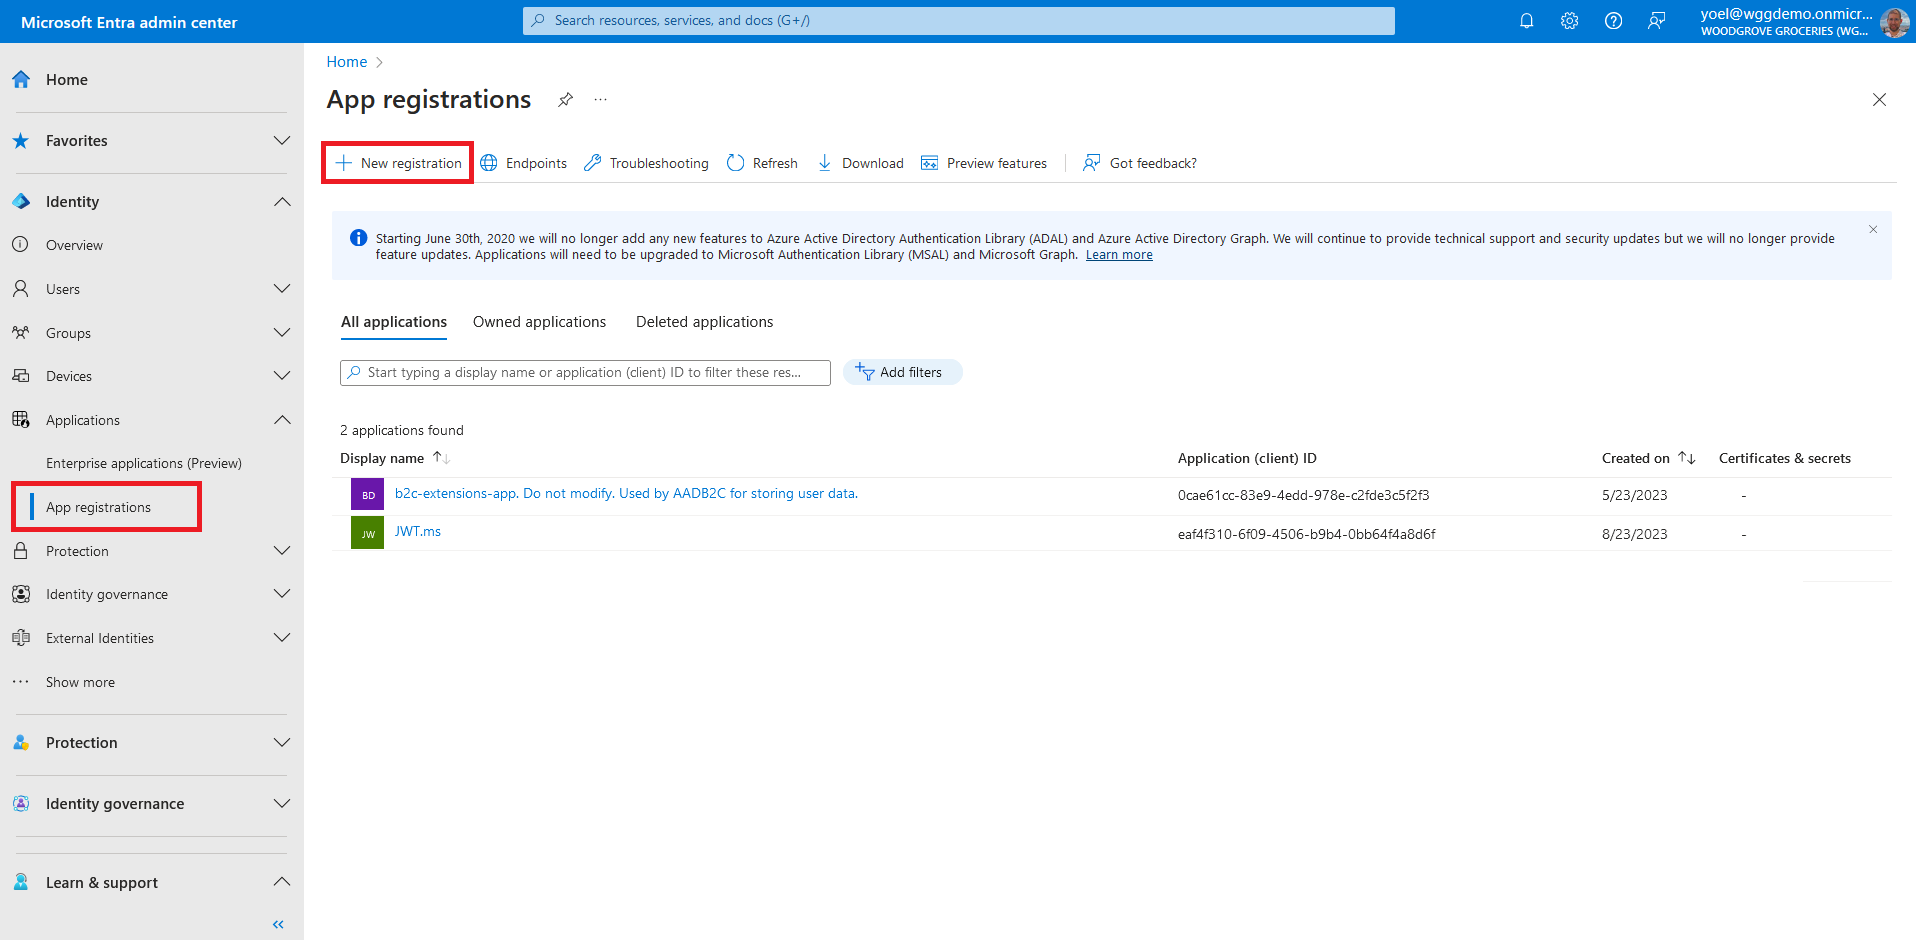
To register your own application, sign in to the Microsoft Entra admin center and browse to Applications > App registrations. Then, select + New registration.
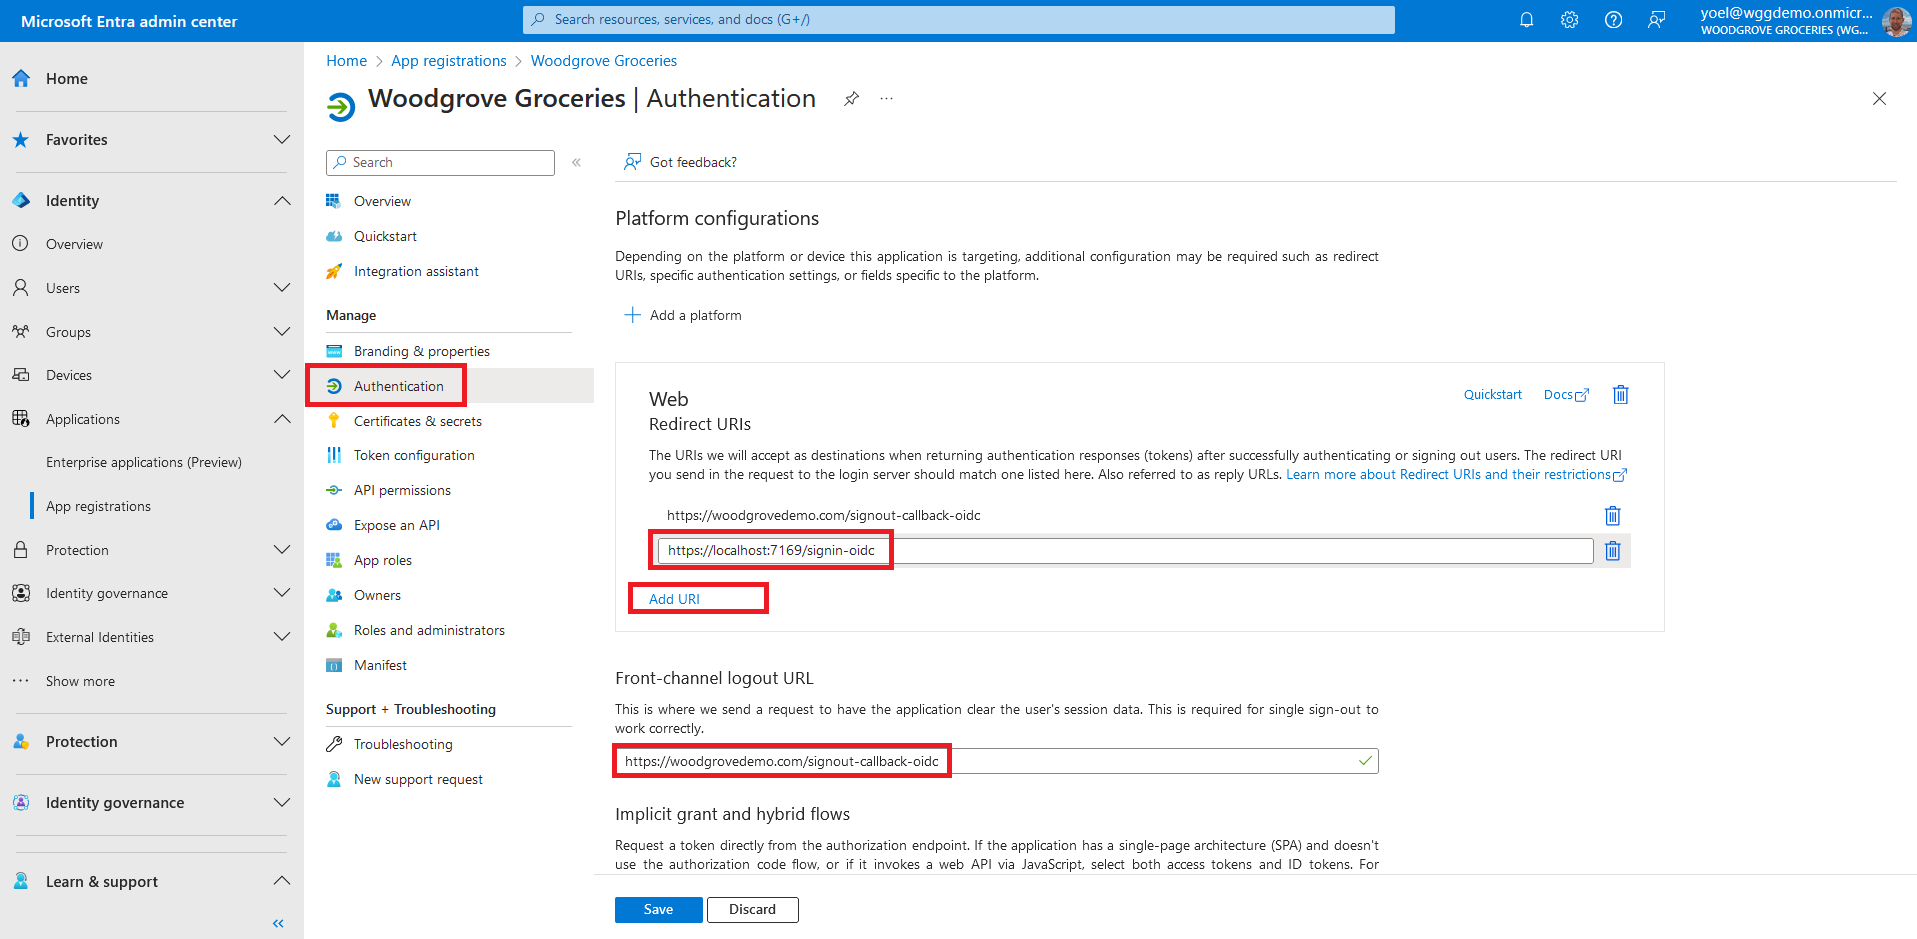
In the Register an application page that appears, enter a meaningful application Name that is displayed to users of the app, for example Woodgrove Groceries. Under Supported account types, select Accounts in this organizational directory only. In the Platform select the Web option and enter your app Redirect URI. The redirect URI is the endpoint to which users are redirected by Microsoft Entra external ID after their authentication with Microsoft Entra ID external is completed.

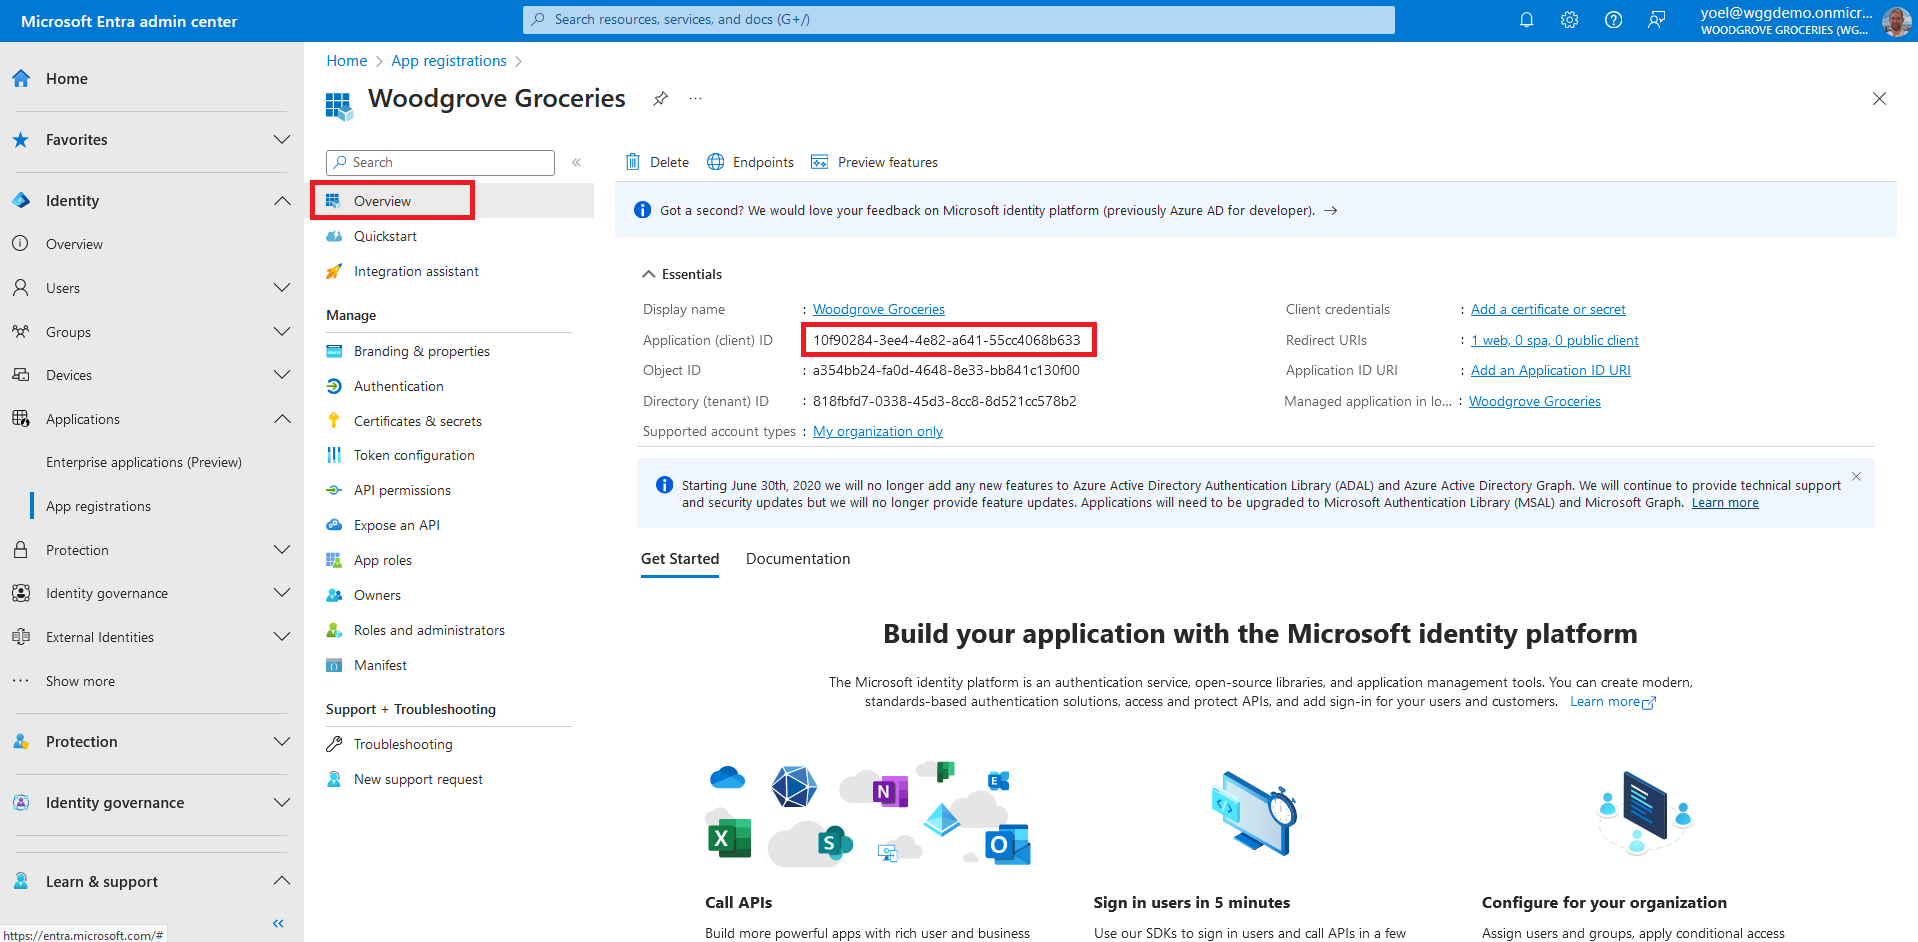
The application's Overview pane displays upon successful registration. Record the Application (client) ID to be used in your application source code.
To add more Redirect URIs, or Front-channel logout URL, under Manage select Authentication. The Front-channel logout URL is where we send a request to have the application clear the user's session data. This is required for single sign-out to work correctly.
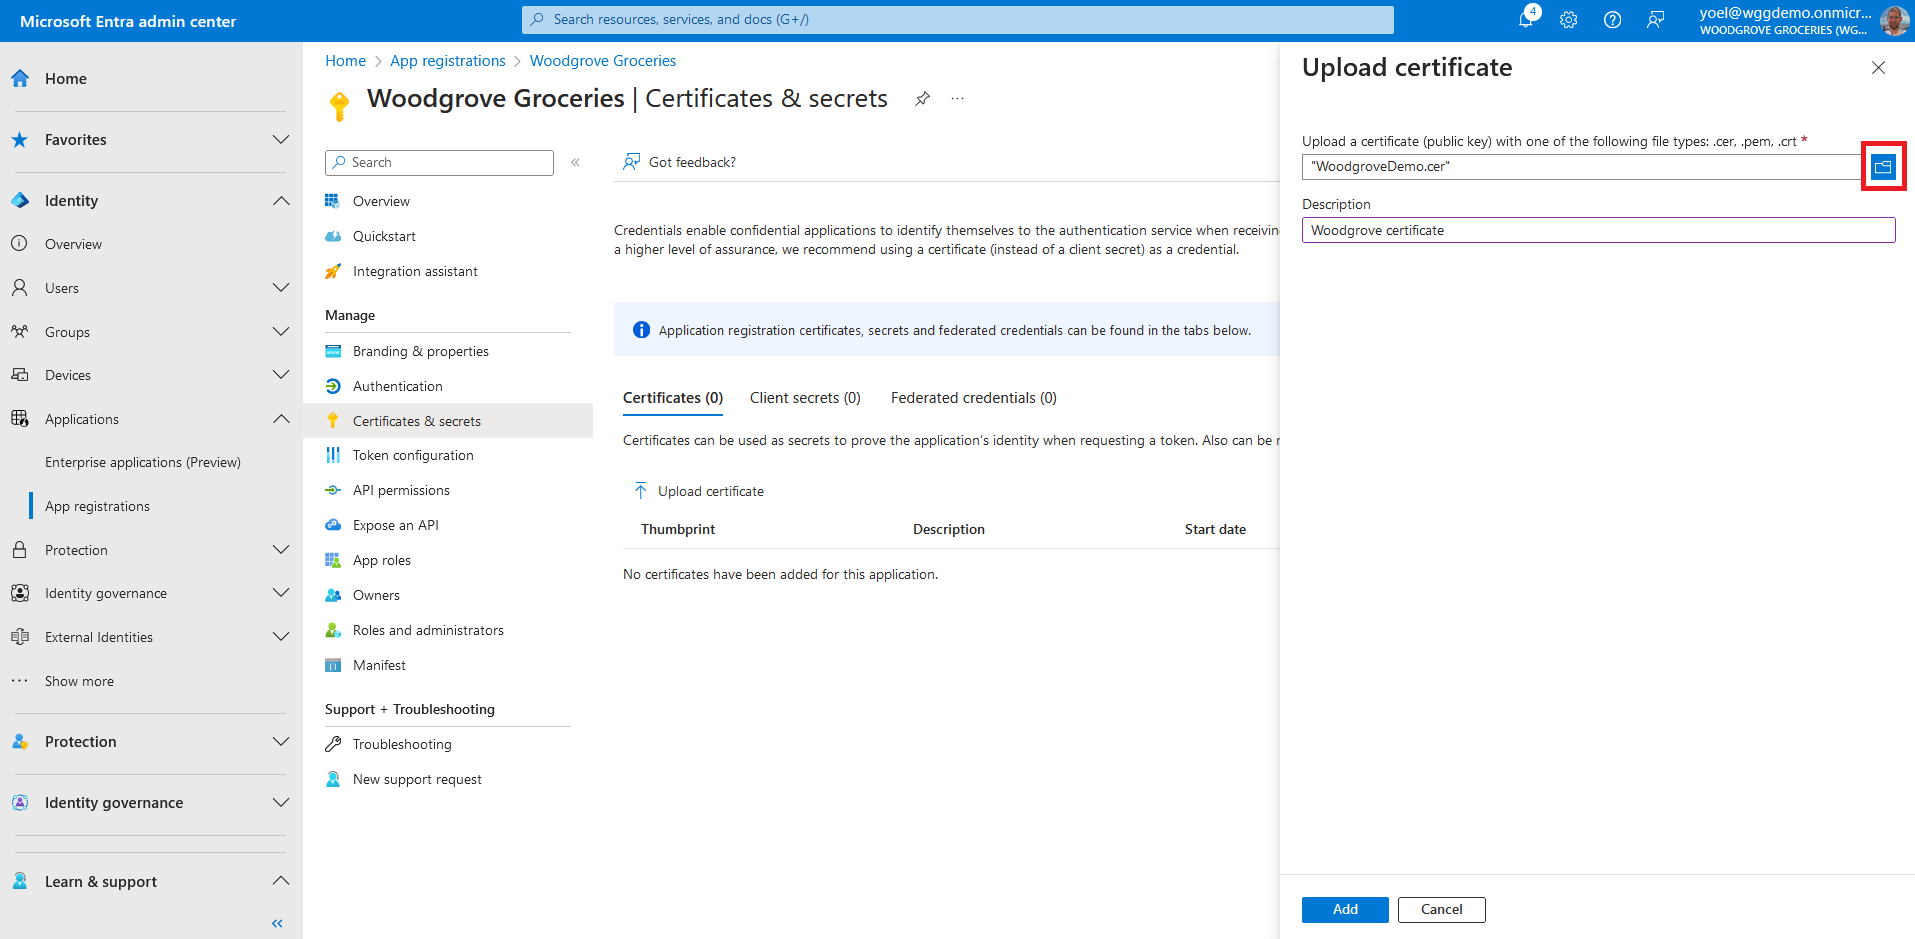
For a web application (Conditional client) to acquire an access token it needs a credential to prove its identity to Microsoft Entra ID. You can add certificates, client secrets (a string), or federated identity credentials as credentials to your confidential client app registration. In the Woodgrove live demo we use a certificate. To add a certificate, select Certificates & secrets > Certificates > Upload certificate.
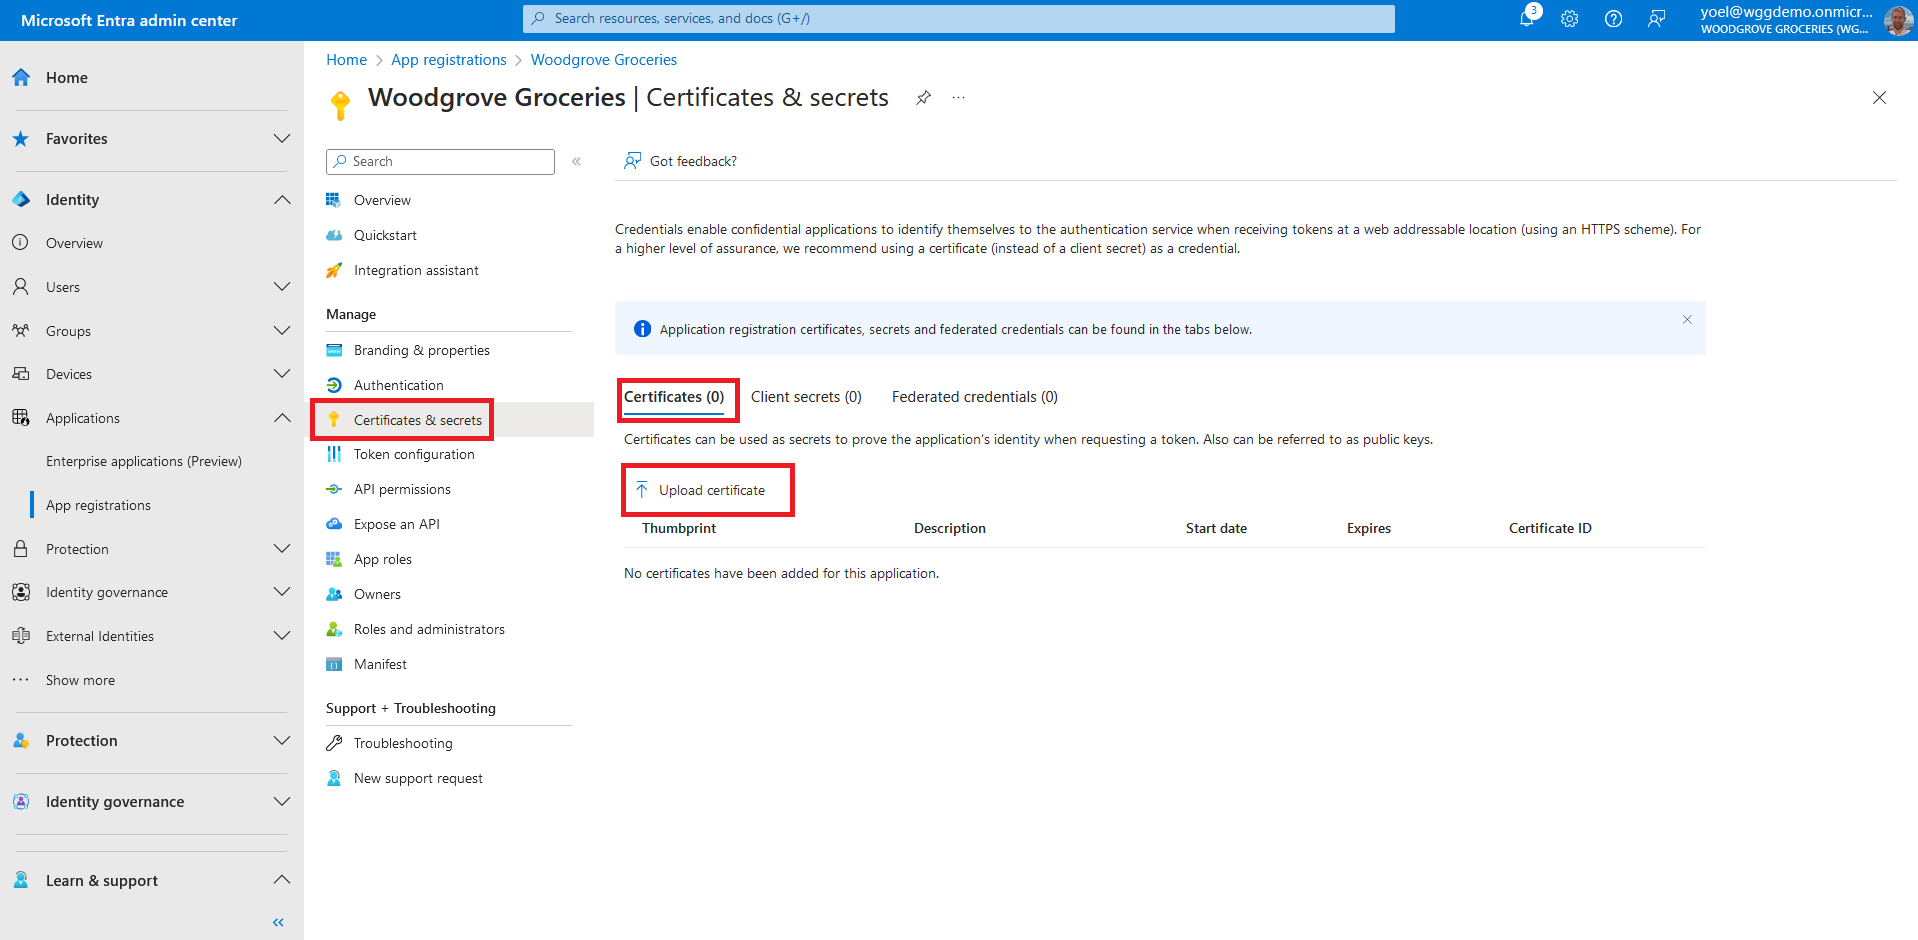
Select the file you want to upload. It must be one of the following file types: .cer, .pem, .crt. then select Add.
In the following steps you add the required permission for any web application. Under Manage, select API permissions then, select Add a permission.
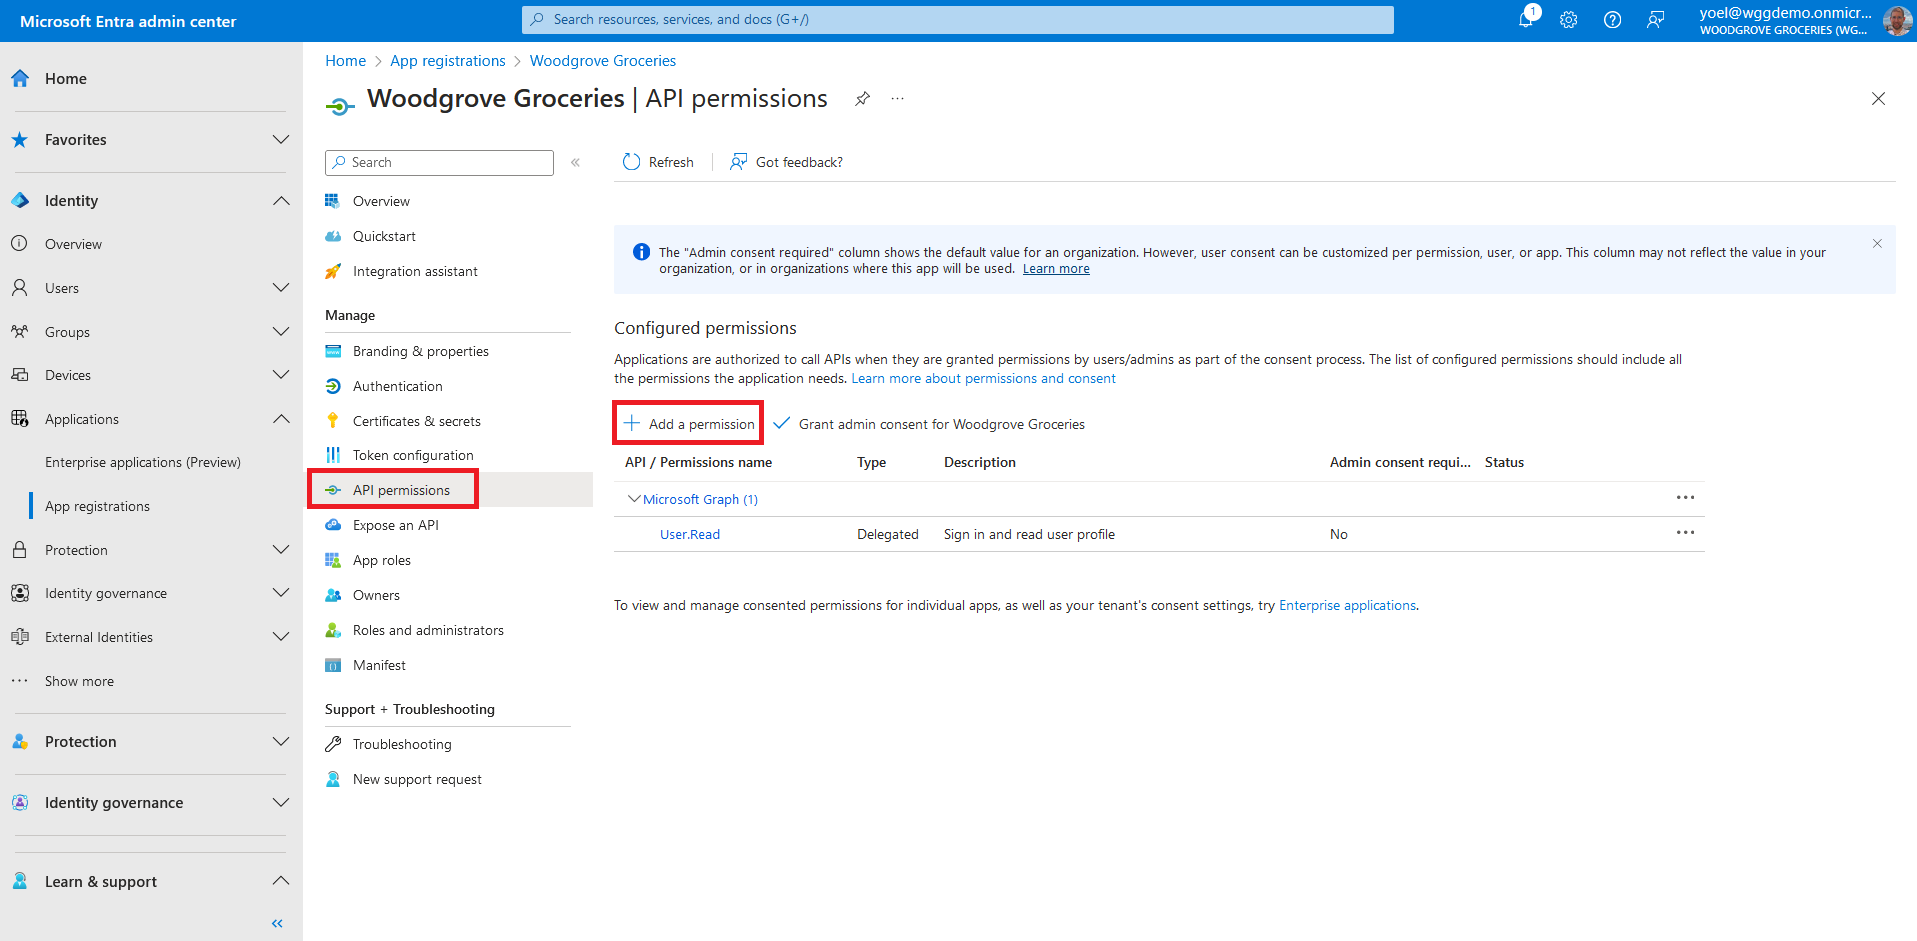
In the Request API permissions, select Microsoft APIs tab and then Microsoft Graph.

Select the Delegated permissions option. Then, under Select permissions section, search for and select both openid and offline_access permissions. To complete, select the Add permissions button..

At this point, you've assigned the permissions correctly. However, since the tenant is a customer's tenant, the consumer users themselves can't consent to these permissions. You as the admin must consent to these permissions on behalf of all the users in the tenant: Select Grant admin consent for <your tenant name>, then select Yes.
Well done!
Now your application is ready to use.

Dependencies
This script is self-contained.1. Register a web application
- {DisplayName} with your app displayed name. For example, Woodgrove Groceries
- {RedirectUris} with the redirect URI of your application. For example, https://woodgrovedemo.com/signin-oidc
POST https://graph.microsoft.com/v1.0/applications
Connect-MgGraph -Scopes "Application.ReadWrite.All"
{
    "displayName": "{DisplayName}",,
    "description": "Woodgrove Groceries live demo application",
    "signInAudience": "AzureADMyOrg",
    "api": {
        "acceptMappedClaims": true,
        "requestedAccessTokenVersion": 2
    },
    "requiredResourceAccess": [
        {
            "resourceAppId": "00000003-0000-0000-c000-000000000000",
            "resourceAccess": [
                {
                    "id": "37f7f235-527c-4136-accd-4a02d197296e",
                    "type": "Scope"
                },
                {
                    "id": "7427e0e9-2fba-42fe-b0c0-848c9e6a8182",
                    "type": "Scope"
                }
            ]
        }
    ],
    "web": {
        "redirectUris": [
            "{RedirectUris}"
        ],
        "implicitGrantSettings": {
            "enableAccessTokenIssuance": false,
            "enableIdTokenIssuance": false
        }
    }
}
New-MgApplication -BodyParameter $paramsPOST https://graph.microsoft.com/v1.0/applications
{
    "displayName": "Woodgrove Groceries",
    "description": "Woodgrove Groceries live demo application",
    "signInAudience": "AzureADMyOrg",
    "api": {
        "acceptMappedClaims": true,
        "requestedAccessTokenVersion": 2
    },
    "requiredResourceAccess": [
        {
            "resourceAppId": "00000003-0000-0000-c000-000000000000",
            "resourceAccess": [
                {
                    "id": "37f7f235-527c-4136-accd-4a02d197296e",
                    "type": "Scope"
                },
                {
                    "id": "7427e0e9-2fba-42fe-b0c0-848c9e6a8182",
                    "type": "Scope"
                }
            ]
        }
    ],
    "web": {
        "redirectUris": [
            "https://woodgrovedemo.com/signin-oidc"
        ],
        "implicitGrantSettings": {
            "enableAccessTokenIssuance": false,
            "enableIdTokenIssuance": false
        }
    }
}
New-MgApplication -BodyParameter $params1.1 Copy your application ID
From the response, copy the appId. To create app secret, copy also the id. For example:
{
    "@odata.context": "https://graph.microsoft.com/v1.0/$metadata#servicePrincipals/$entity",
    "id": "12345678-0000-0000-0000-000000000000",
    "appDisplayName": "Woodgrove partners portal",
    "appId": "11111111-0000-0000-0000-000000000000"
}
1.2 Create a service principal for your application
After you register you registered your application, create a service principal. The following Microsoft Graph creates a service principal. Replace the {app-ID} with the app ID from the previous call (not the object ID).
POST https://graph.microsoft.com/v1.0/servicePrincipals
Connect-MgGraph -Scopes "Application.ReadWrite.All"
{
    "appId": "{app-ID}"
}
New-MgServicePrincipal -BodyParameter $paramsPOST https://graph.microsoft.com/v1.0/servicePrincipals
{
    "appId": "11111111-0000-0000-0000-000000000000"
}
New-MgServicePrincipal -BodyParameter $params1.3 Copy your service principal ID
From the response, copy the id. For example:
{
    "@odata.context": "https://graph.microsoft.com/v1.0/$metadata#servicePrincipals/$entity",
    "id": "22222222-0000-0000-0000-000000000000",
    "appId": "11111111-0000-0000-0000-000000000000"
}
2. Consent to the required permissions
For user authentication in your application via Microsoft Entra external ID, it is necessary to grant admin consent for your application. This step ensures that users can seamlessly sign-in without individual authorization requirements.
2.1 Get the Microsoft Graph's service principal ID
Run the following command to get the Microsoft Graph service principal ID:
GET https://graph.microsoft.com/v1.0/servicePrincipals(appId='00000003-0000-0000-c000-000000000000')
Get-MgServicePrincipal -ServicePrincipalId appId='00000003-0000-0000-c000-000000000000' 2.2 Copy Microsoft Graph service principal ID
Copy the id from the response:
{
    "id": "33333333-0000-0000-0000-000000000000",
    "appDisplayName": "Microsoft Graph",
    "appId": "00000003-0000-0000-c000-000000000000"
}
2.3 Grant admin consent
- {service-principal-id} with the service-principal id you copied in the previous step.
- {graph-service-principal-id} with the Microsot Graph service-principal ID you created in the previous step.
POST https://graph.microsoft.com/v1.0/oauth2PermissionGrants
Connect-MgGraph -Scopes "DelegatedPermissionGrant.ReadWrite.All"
{
    "clientId": "{service-principal-id}",
    "consentType": "AllPrincipals",
    "resourceId": "{graph-service-principal-id}",
    "scope": "openid offline_access"
}
New-MgOauth2PermissionGrant -BodyParameter $paramsPOST https://graph.microsoft.com/v1.0/oauth2PermissionGrants
{
    "clientId": "22222222-0000-0000-0000-000000000000",
    "consentType": "AllPrincipals",
    "resourceId": "33333333-0000-0000-0000-000000000000",
    "scope": "openid offline_access"
}
New-MgOauth2PermissionGrant -BodyParameter $params3. [Optionally] Add a client secret
POST https://graph.microsoft.com/v1.0/applications(appId='{app-object-ID}')/addPassword
Connect-MgGraph -Scopes "Application.ReadWrite.All"
{
    "passwordCredential": {
        "displayName": "My app client secret"
    }
}
Add-MgApplicationPassword -ApplicationId {app-object-ID}
-BodyParameter $paramsPOST https://graph.microsoft.com/v1.0/applications(appId='12345678-0000-0000-0000-000000000000')/addPassword
{
    "passwordCredential": {
        "displayName": "My app client secret"
    }
}
Add-MgApplicationPassword -ApplicationId 12345678-0000-0000-0000-000000000000
-BodyParameter $params3.1 Get the app secret
From the response, copy the value of the secretText:
{
    "@odata.context": "https://graph.microsoft.com/v1.0/$metadata#microsoft.graph.passwordCredential",
    "displayName": "My app client secret",
    "endDateTime": "2026-07-23T15:16:42",
    "hint": "iqi",
    "keyId": "98765432-0000-0000-0000-000000000000",
    "secretText": "Copy this value",
    "startDateTime": "2024-07-23T15:16:42"
}
PowerShell script
function Add-WebApplication {

    # Create app registration
    $params =  @{
        displayName = "Woodgrove Groceries"
        description = "Woodgrove Groceries live demo application"
        signInAudience = "AzureADMyOrg"
        api =  @{
            acceptMappedClaims = $true
            requestedAccessTokenVersion = 2
        }
        requiredResourceAccess =  @(
            @{
                resourceAppId = "00000003-0000-0000-c000-000000000000"
                resourceAccess =  @(
                    @{
                        id = "37f7f235-527c-4136-accd-4a02d197296e"
                        type = "Scope"
                    }
                    @{
                        id = "7427e0e9-2fba-42fe-b0c0-848c9e6a8182"
                        type = "Scope"
                    }
                )
            }
        )
        web =  @{
            redirectUris =  @(
                "https://woodgrovedemo.com/signin-oidc"
            )
            implicitGrantSettings =  @{
                enableAccessTokenIssuance = $false
                enableIdTokenIssuance = $false
            }
        }
    }
    $appRegistration = New-MgApplication -BodyParameter $params
    Write-Host "App registration created with app ID"  $appRegistration.AppId

    # Create corresponding service principal
    $params =  @{
        appId = $appRegistration.AppId
    }
    $servicePrincipal = New-MgServicePrincipal -BodyParameter $params
    Write-Host "Service principal created with ID"  $servicePrincipal.Id

    # Get Microsoft Graph service principal
    $graphServicePrincipal = Get-MgServicePrincipal -ServicePrincipalId appId='00000003-0000-0000-c000-000000000000'

    # Grant admin consent
    $params =  @{
        clientId = $servicePrincipal.Id
        consentType = "AllPrincipals"
        resourceId = $graphServicePrincipal.Id
        scope = "openid offline_access"
    }
    New-MgOauth2PermissionGrant -BodyParameter $params | Out-Null

    # [Optionally] Add a client secret to the app
    $params =  @{
        passwordCredential =  @{
            displayName = "My app client secret"
        }
    }
    Add-MgApplicationPassword -ApplicationId $appRegistration.Id -BodyParameter $params | Format-List
}

# Connect to Microsoft Entra tenant with all the required scopes
Connect-MgGraph -Scopes "Application.ReadWrite.All DelegatedPermissionGrant.ReadWrite.All"

# Run the script
Add-WebApplication