Configure conditional access policy with Custom Security attributes
Custom security attributes in Microsoft Entra ID are business-specific attributes (key-value pairs) that you can define and assign to Microsoft Entra objects. For example, you can assign custom security attribute to filter your applications or to help determine who gets access to resources. This page shows how the Woodgrove live demo tenant is configured the Configure conditional access policy with Custom Security attributes.
Prerequisites
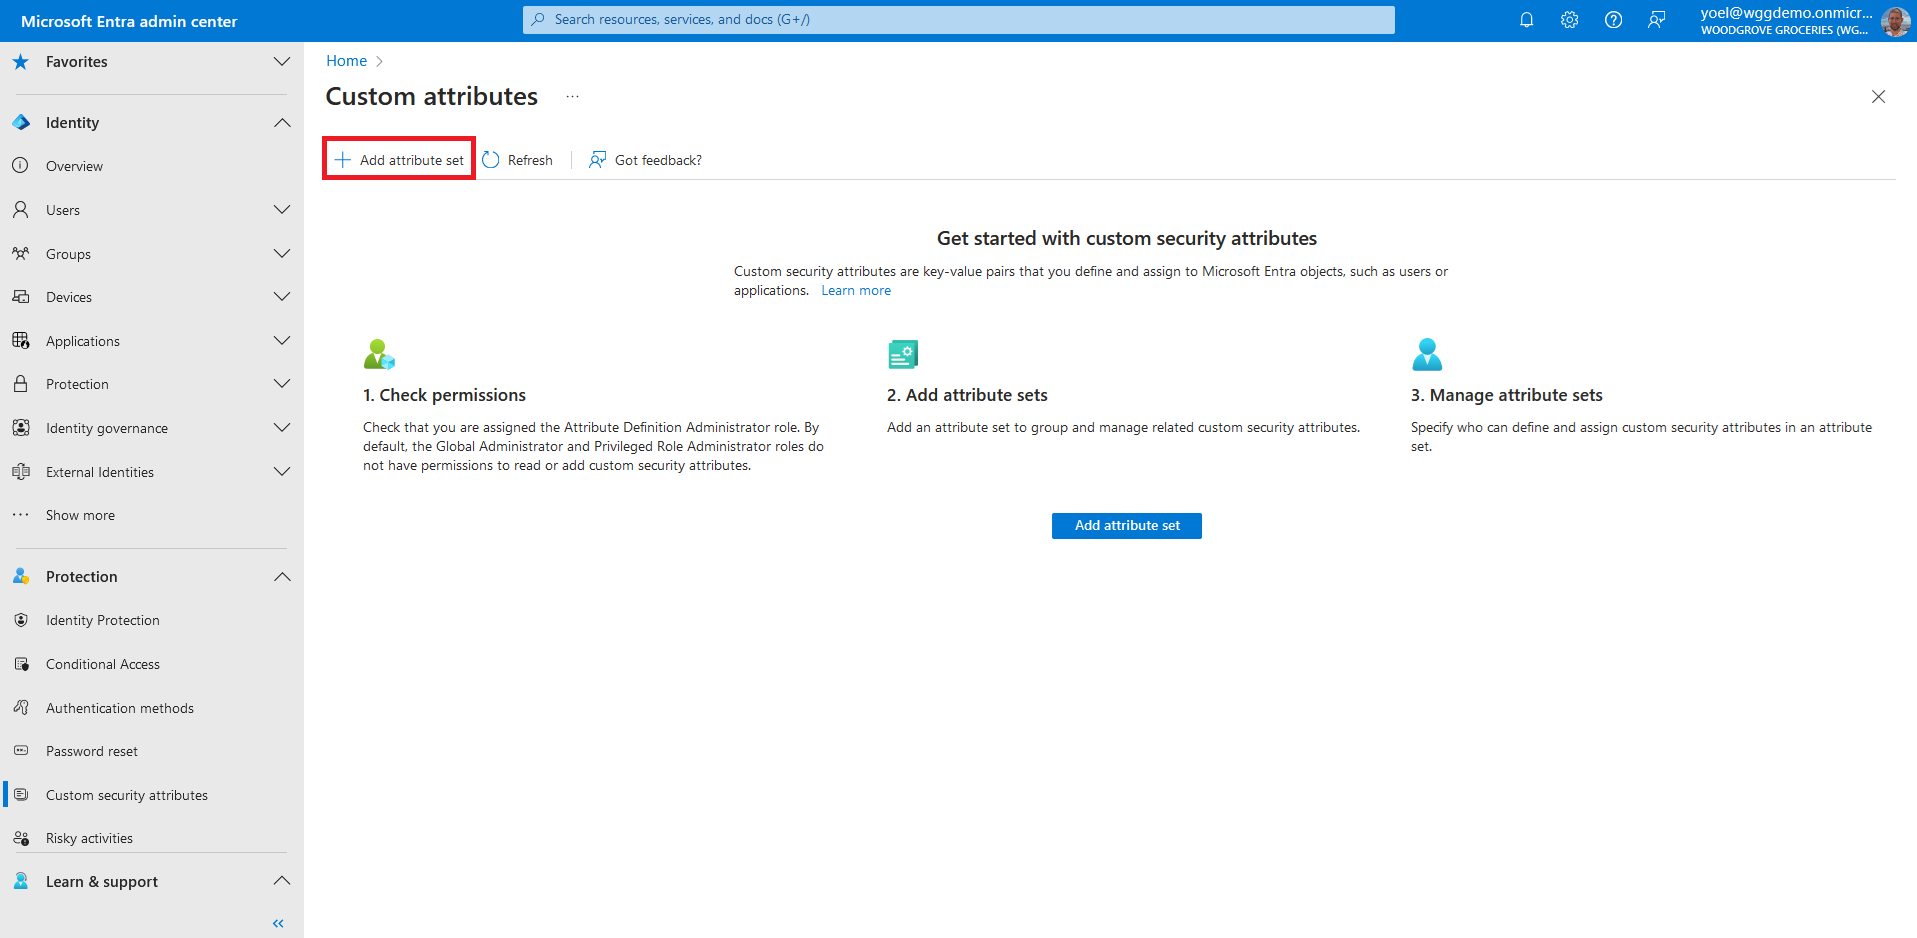
Before you start make sure you have configured the following:To start, sign in to the Microsoft Entra admin center and browse to Protection > Custom security attributes.

Click Add attribute set to add a new attribute set. More information.
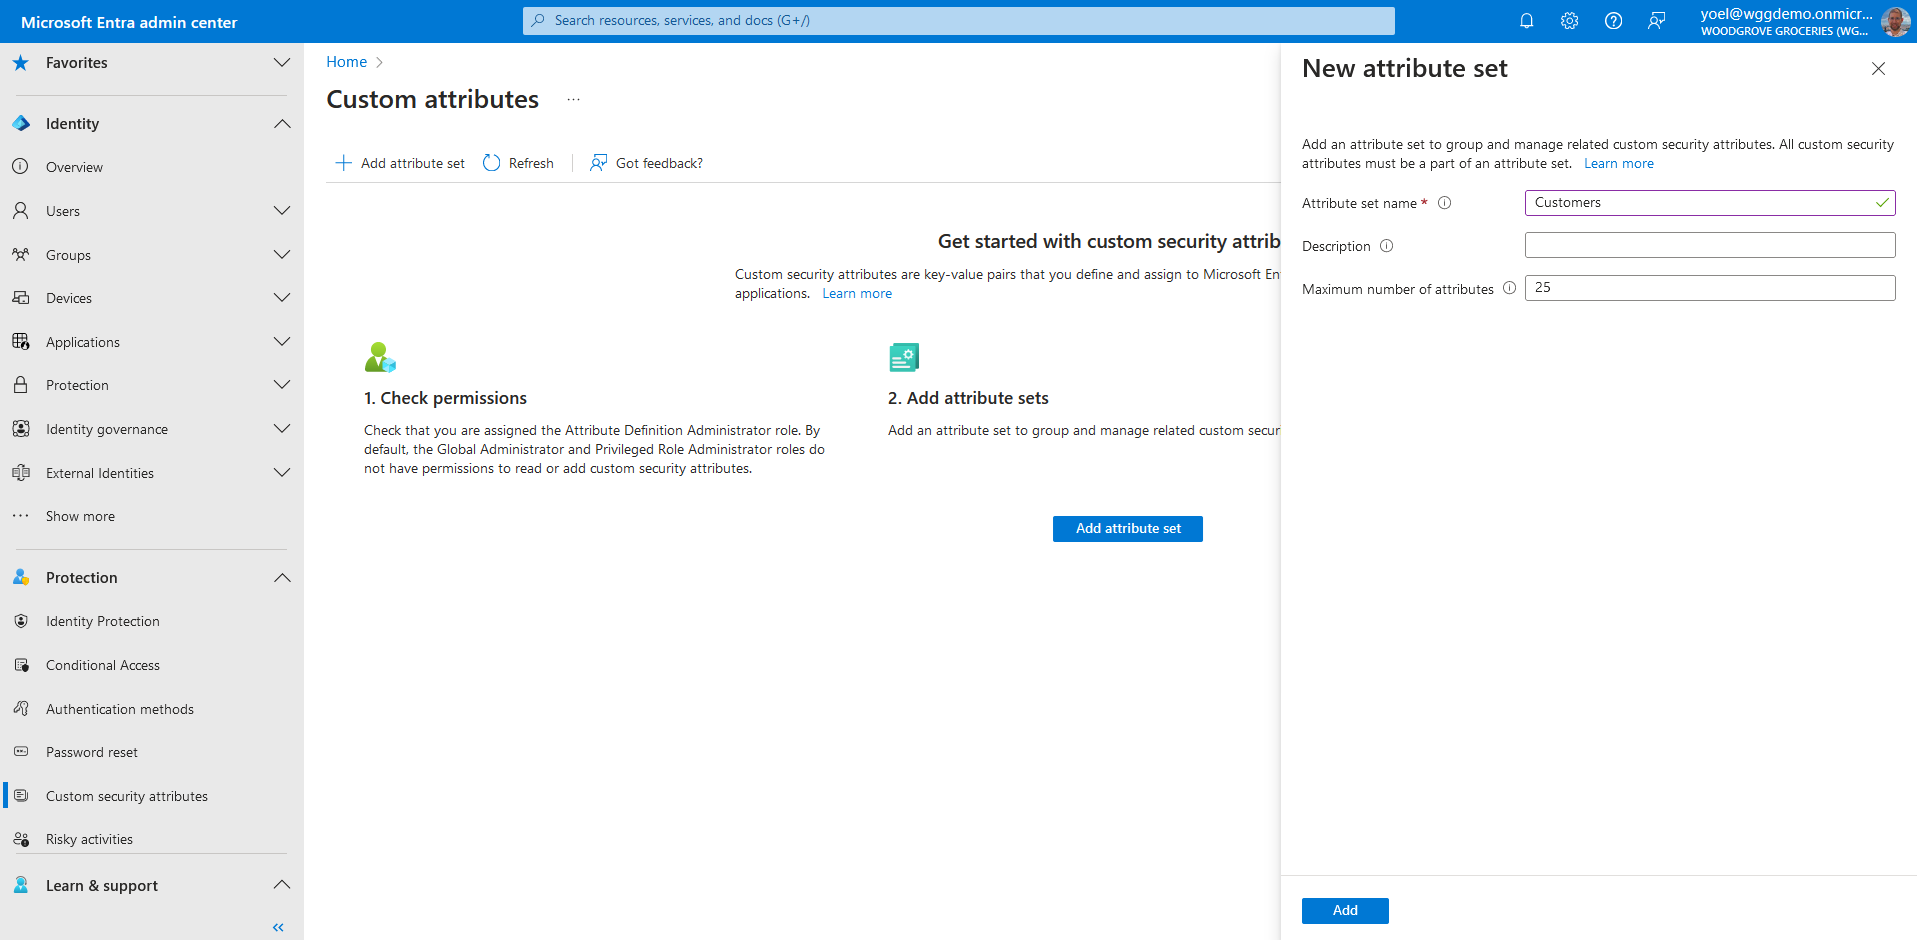
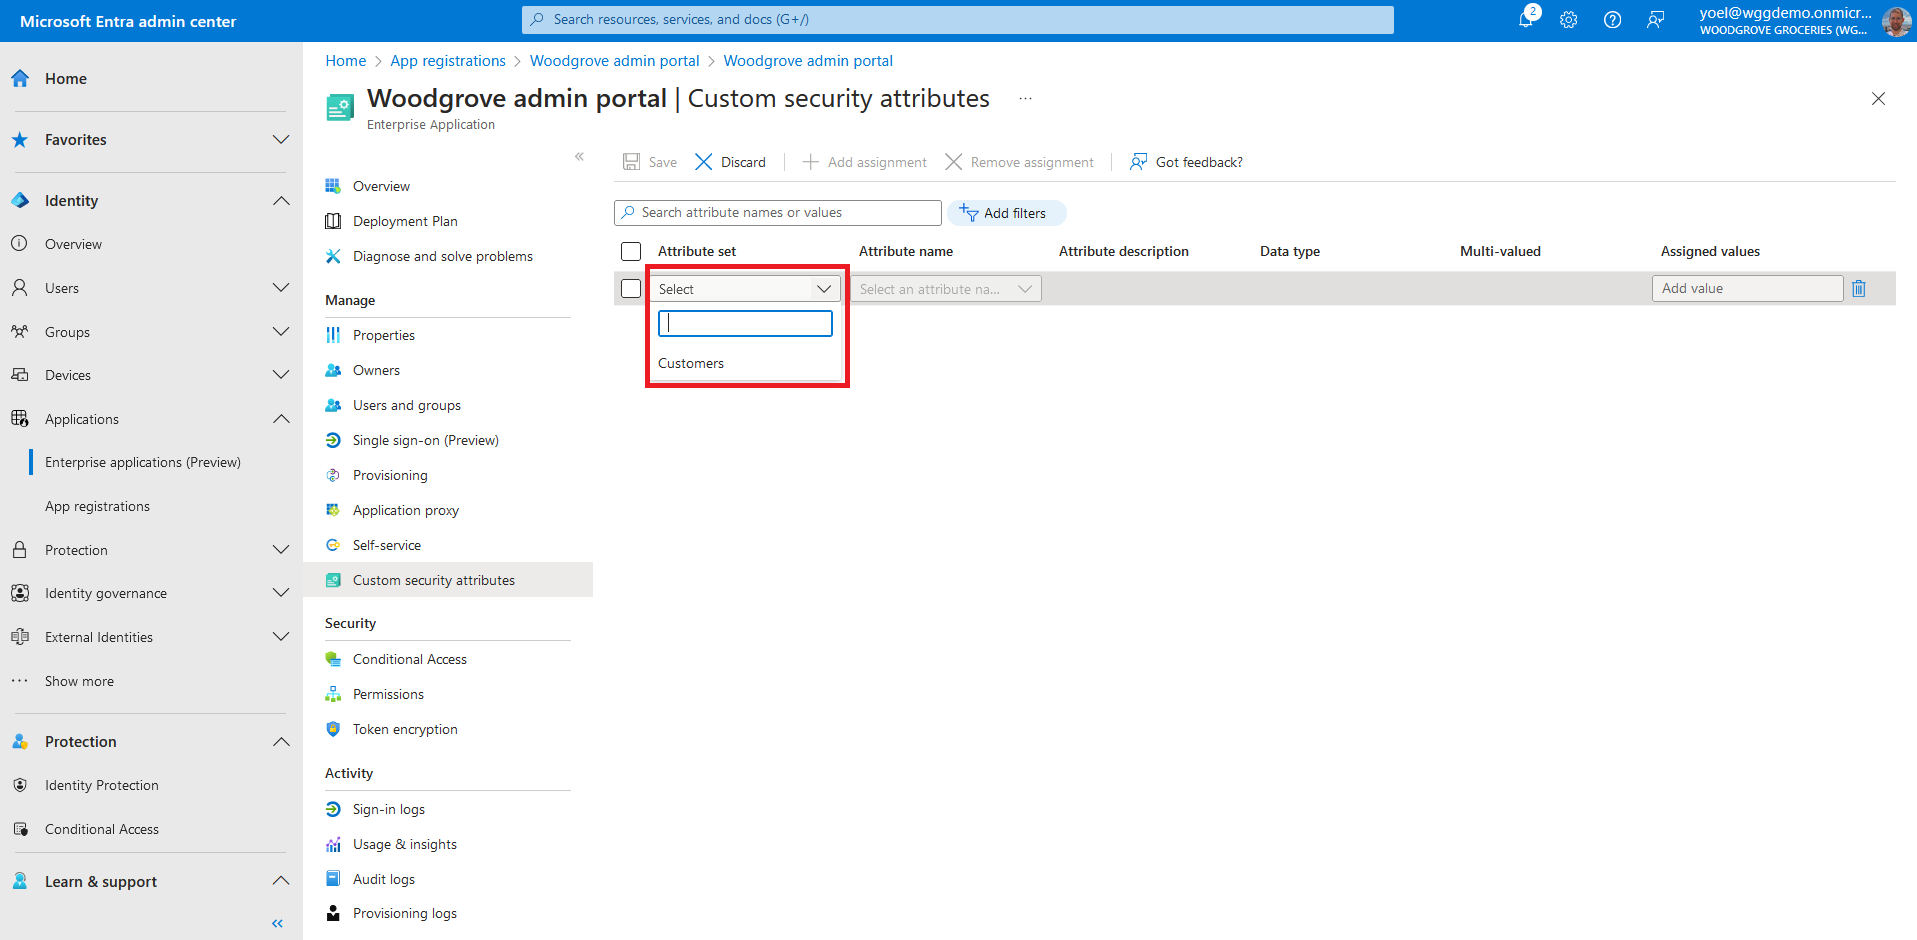
Enter a name, description, and maximum number of attributes. In this example we added a Customers attribute set.
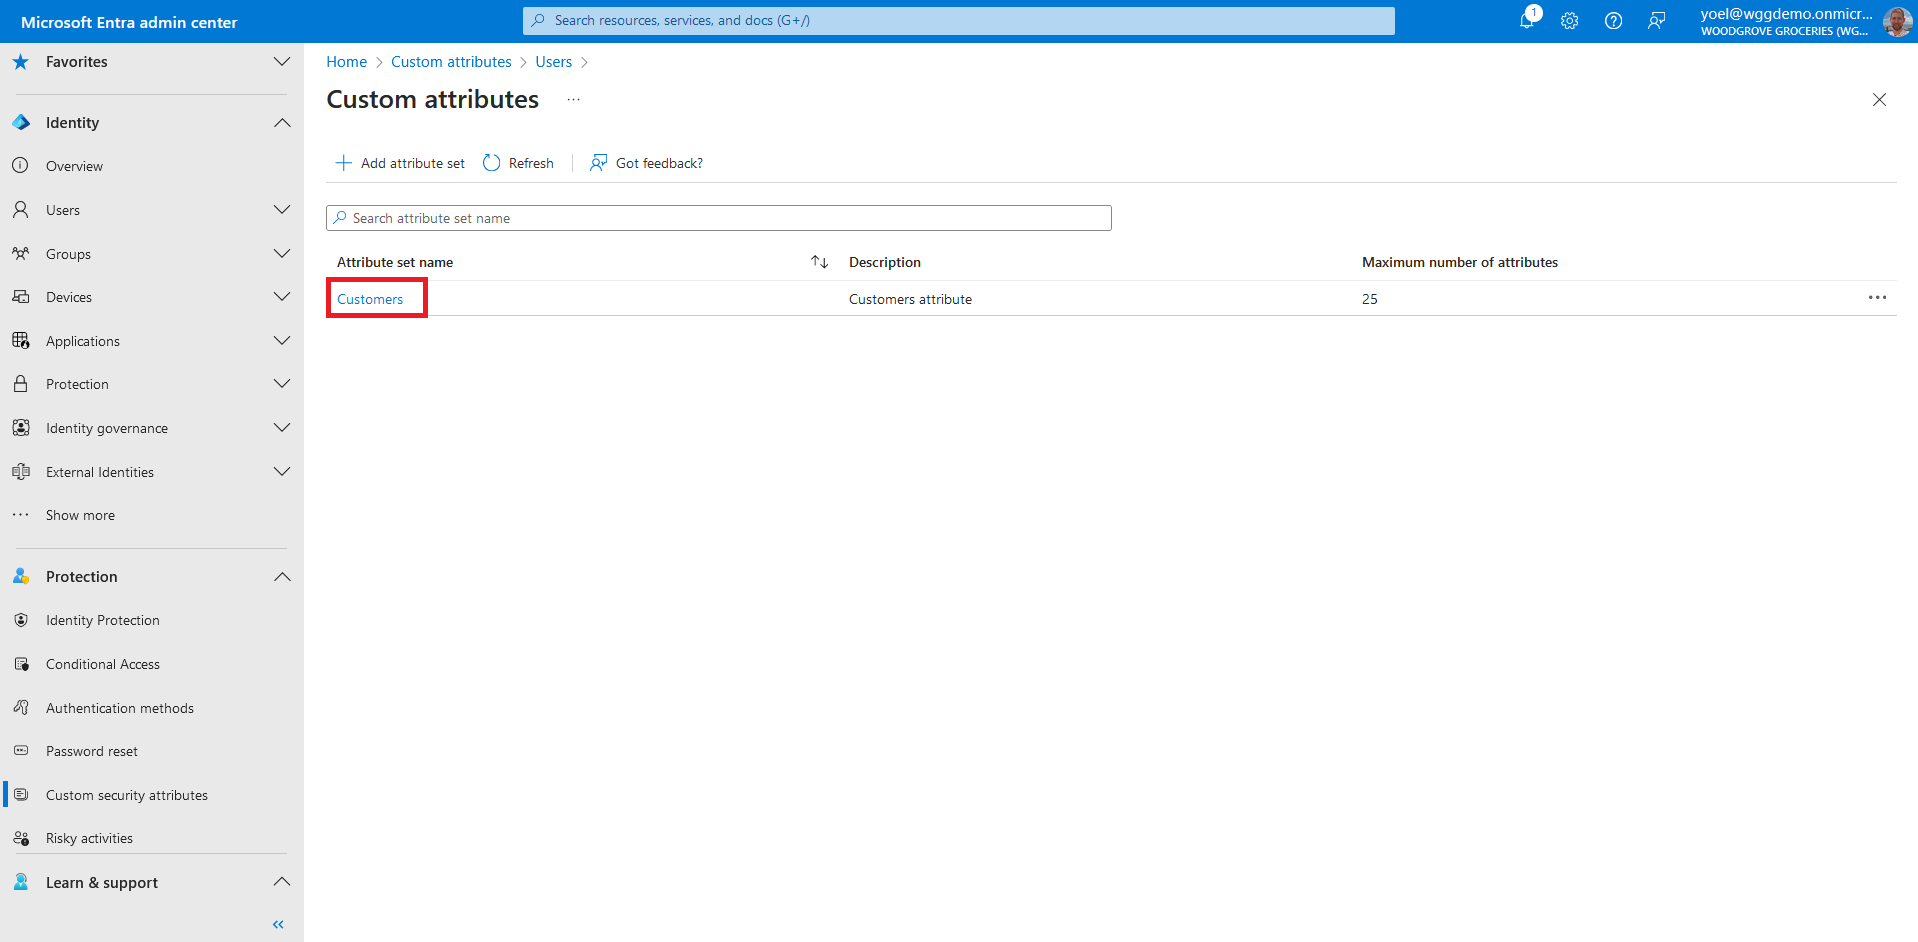
The new attribute set appears in the list of attribute sets, select it.
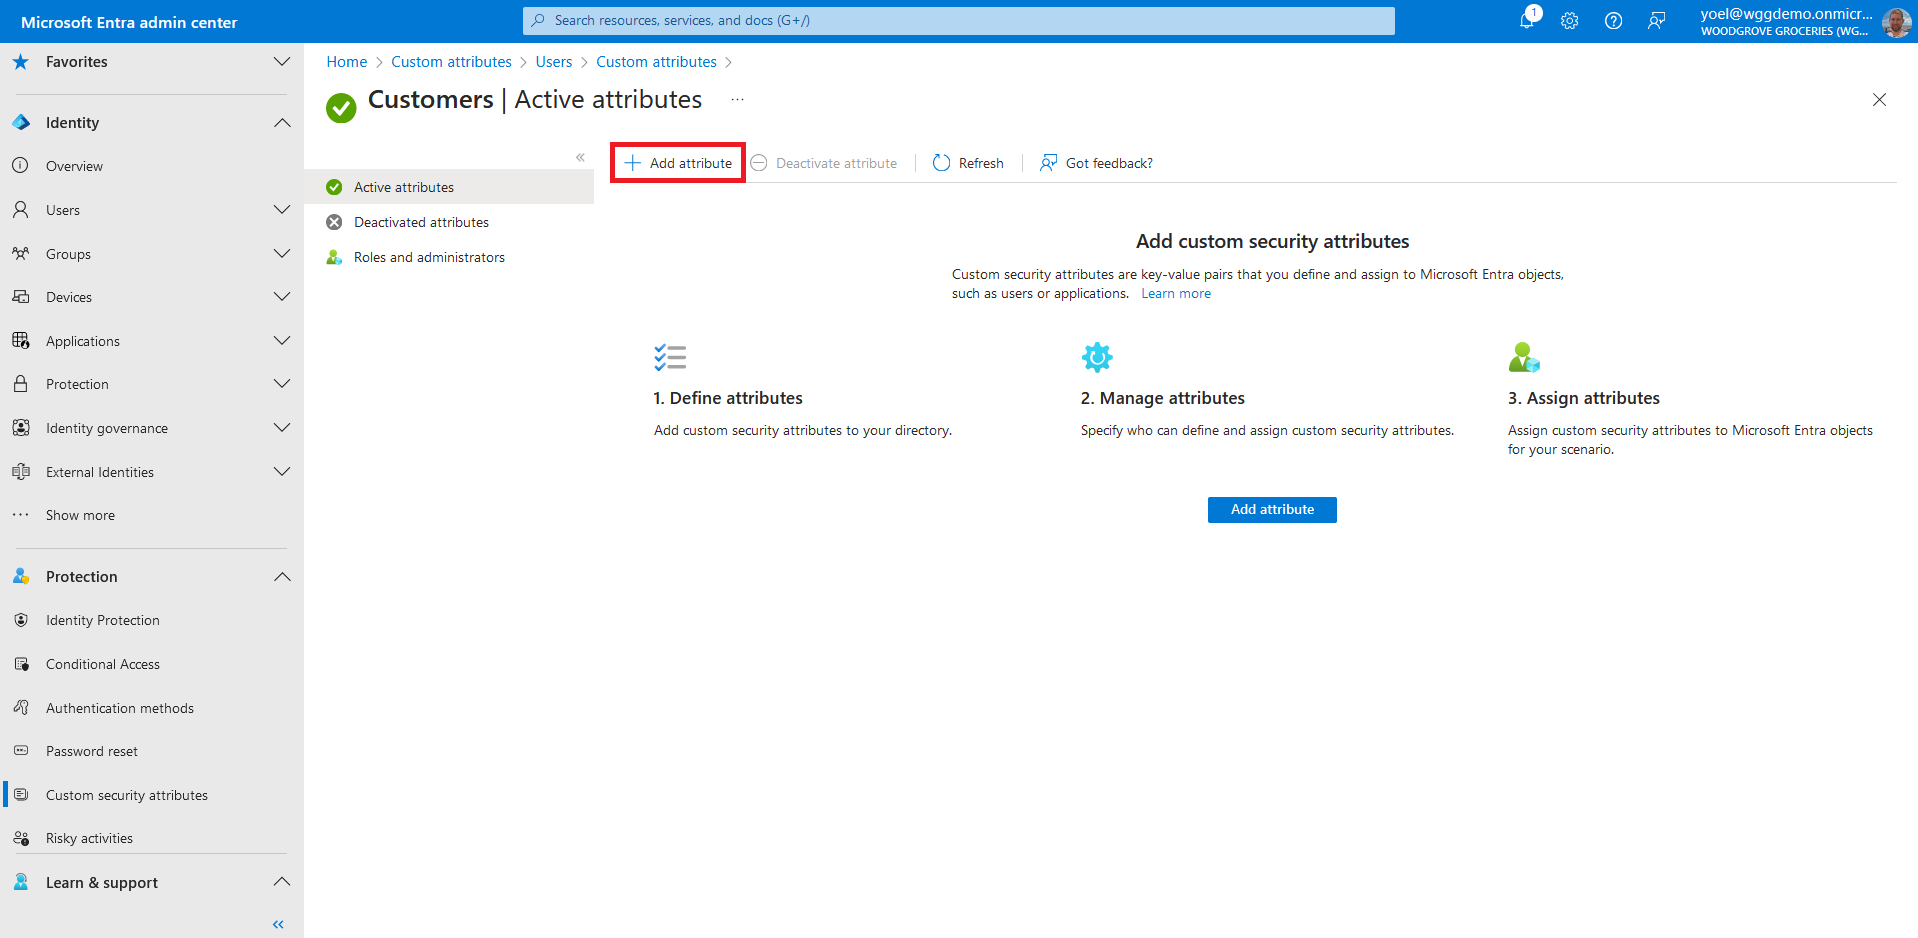
Select Add attribute to add a new custom security attribute to the attribute set you created.
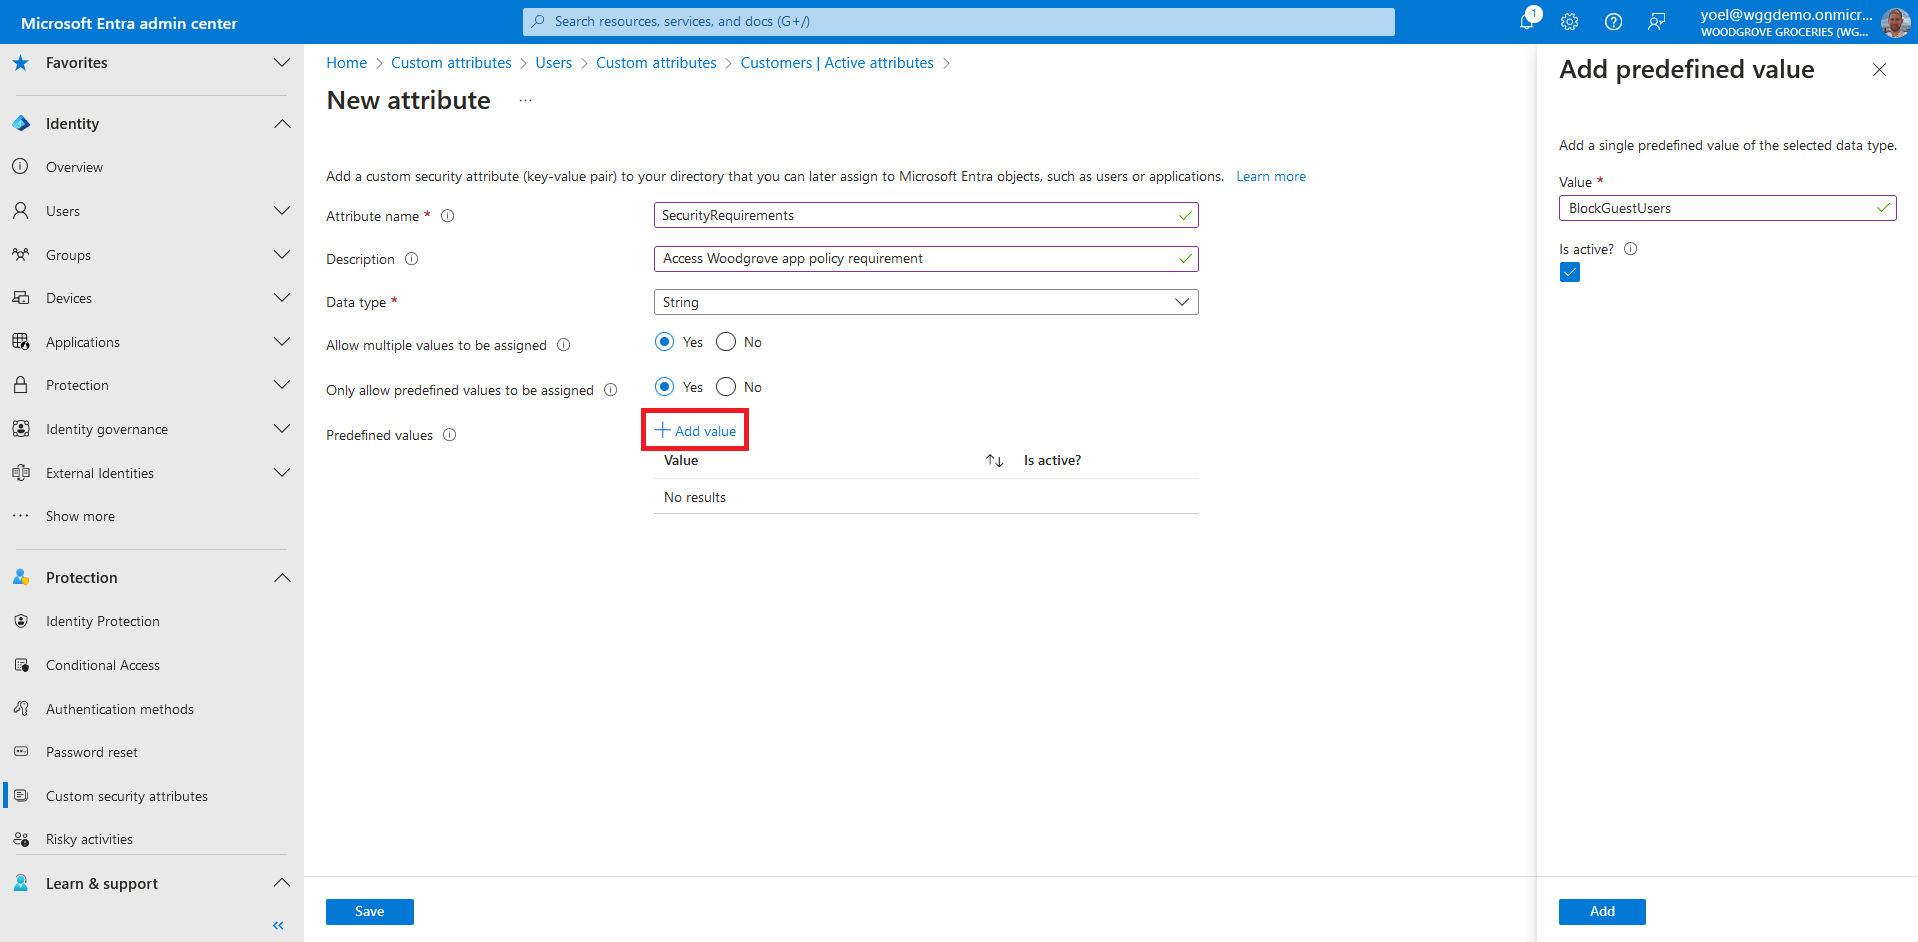
In the Attribute name box, enter a custom security attribute name. In this example we named it PolicyRequirement. Enter an optional Description. From the Data type list, select the data type for the custom security attribute. For Allow multiple values to be assigned, select Yes. And for Only allow predefined values to be assigned, select Yes or No. Then, select the Add value link, and enter a value. In this example we added the BlockGuestUsers value.
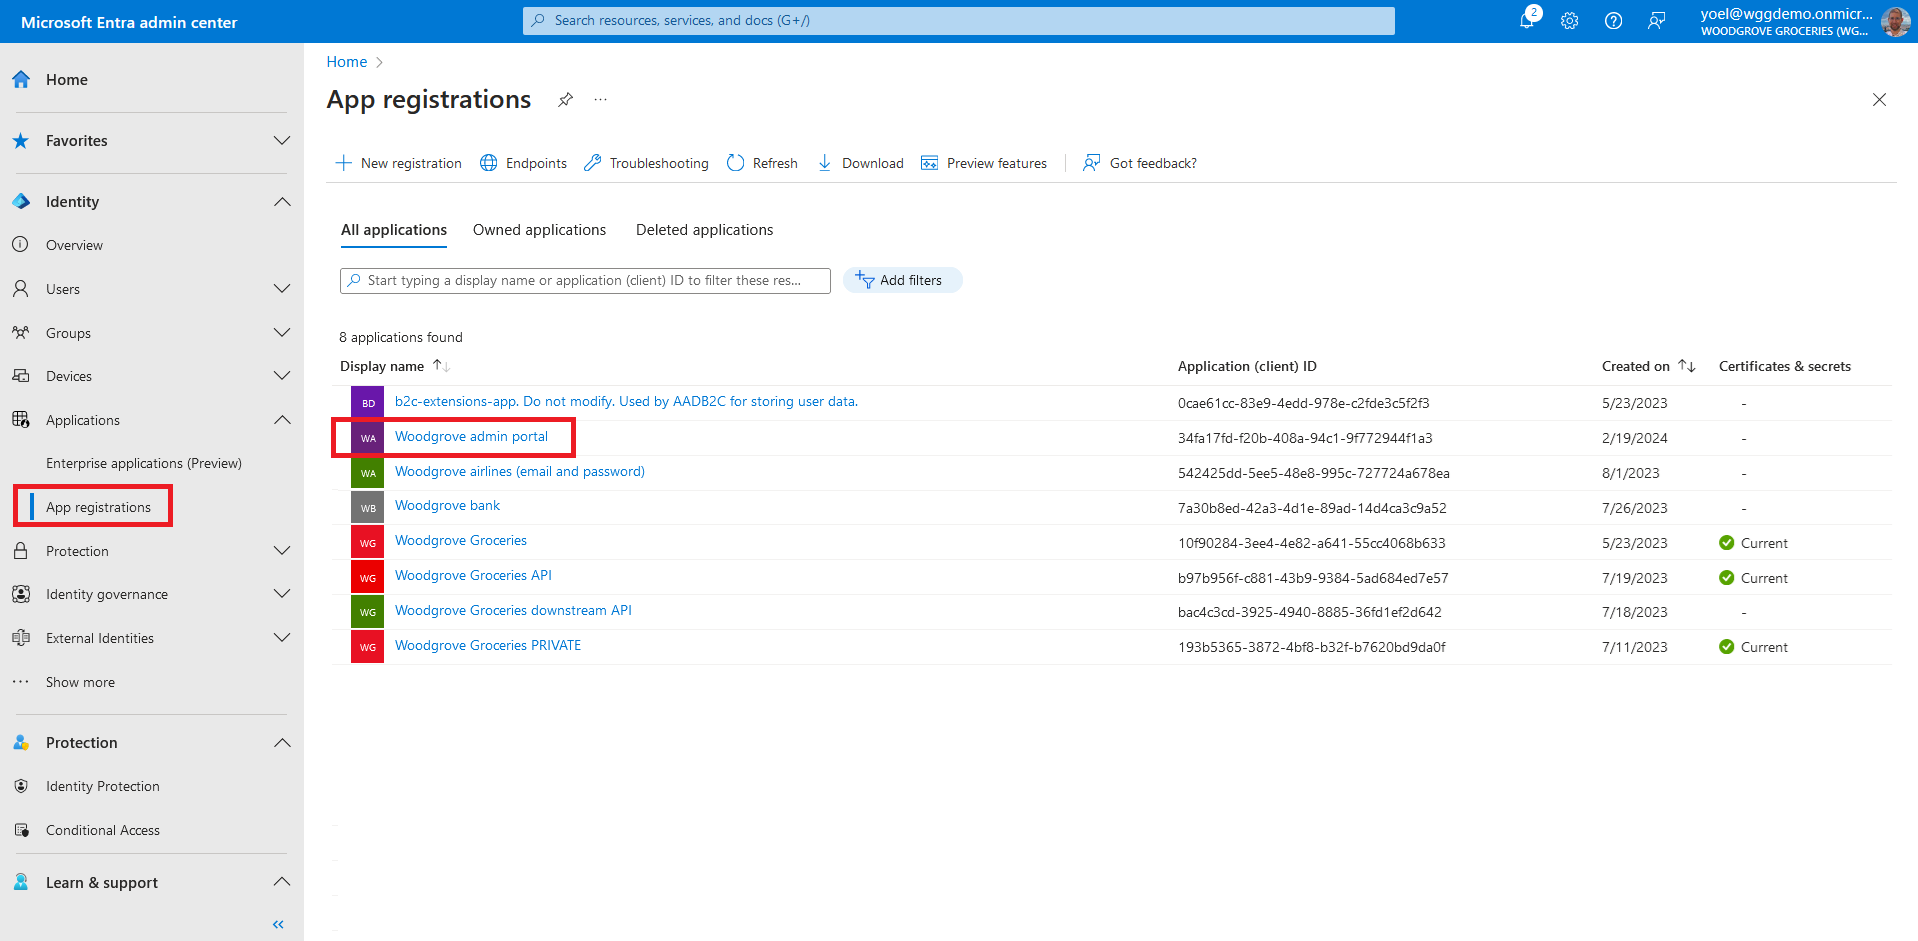
In the next steps you assign custom security attributes to an application. From the menu, select App registrations and select your application. In this example we select the Woodgrove admin portal application.
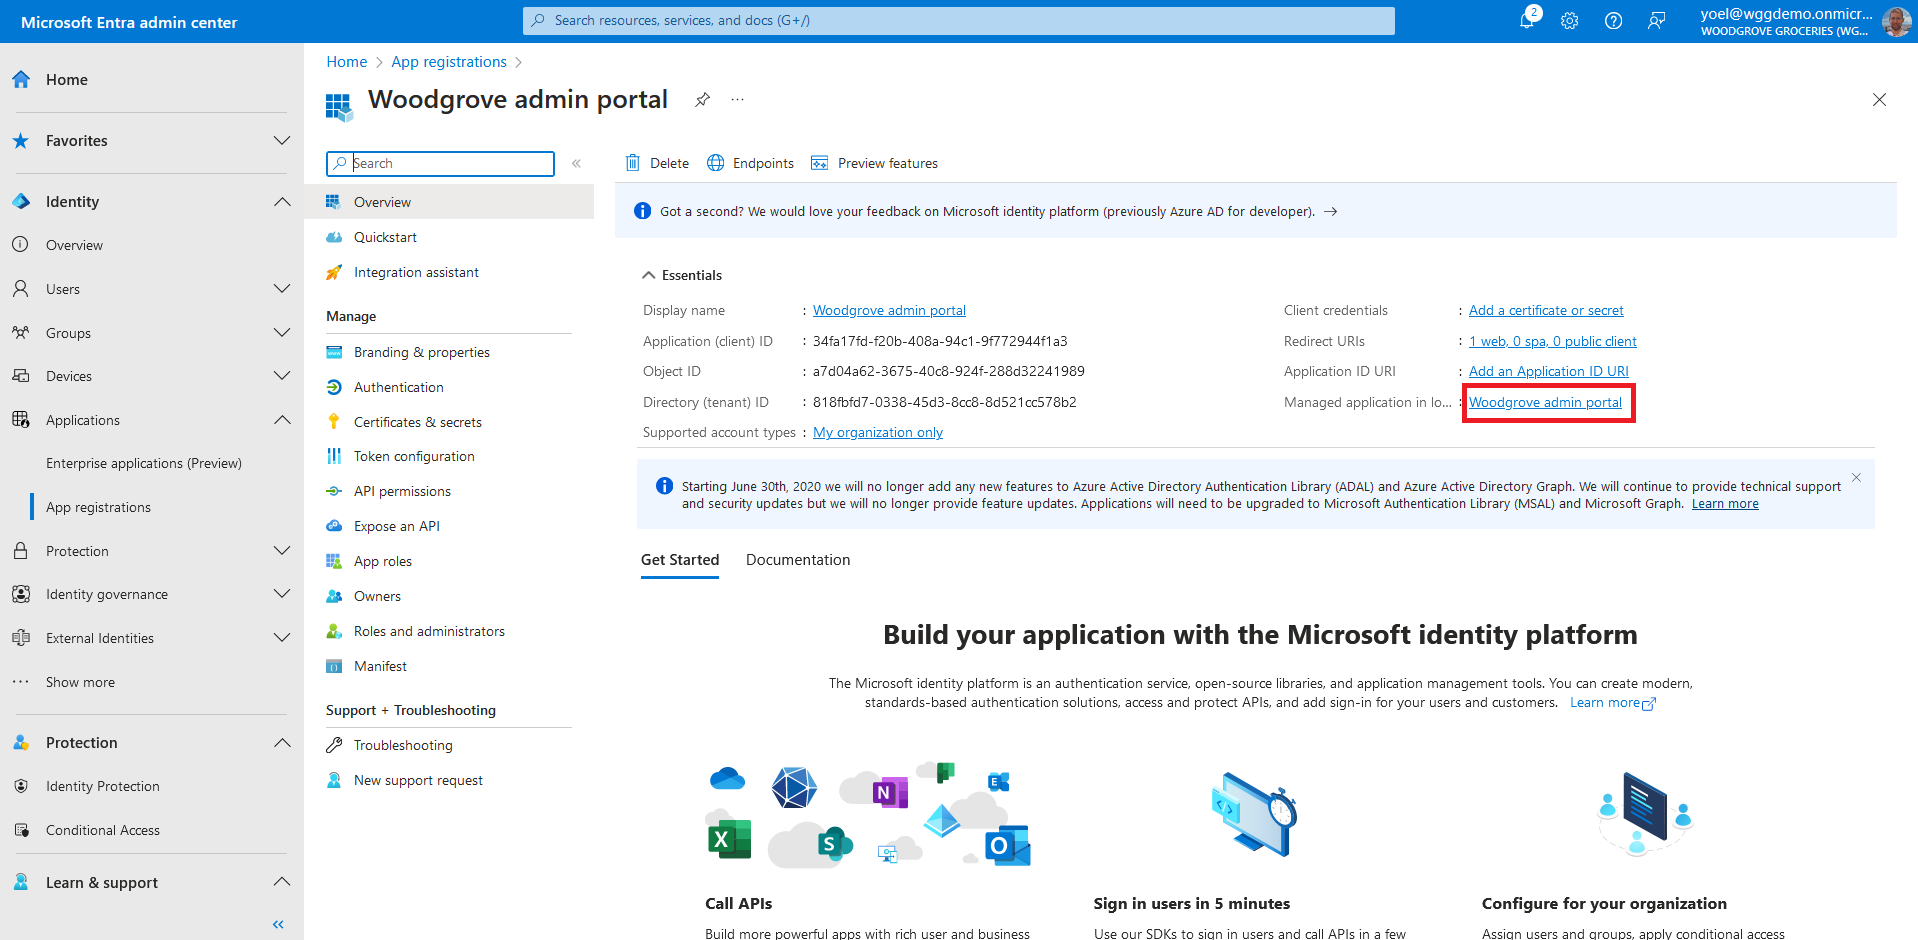
Now open the service principal of your application. To do so, select the link next to Managed application in local directory.
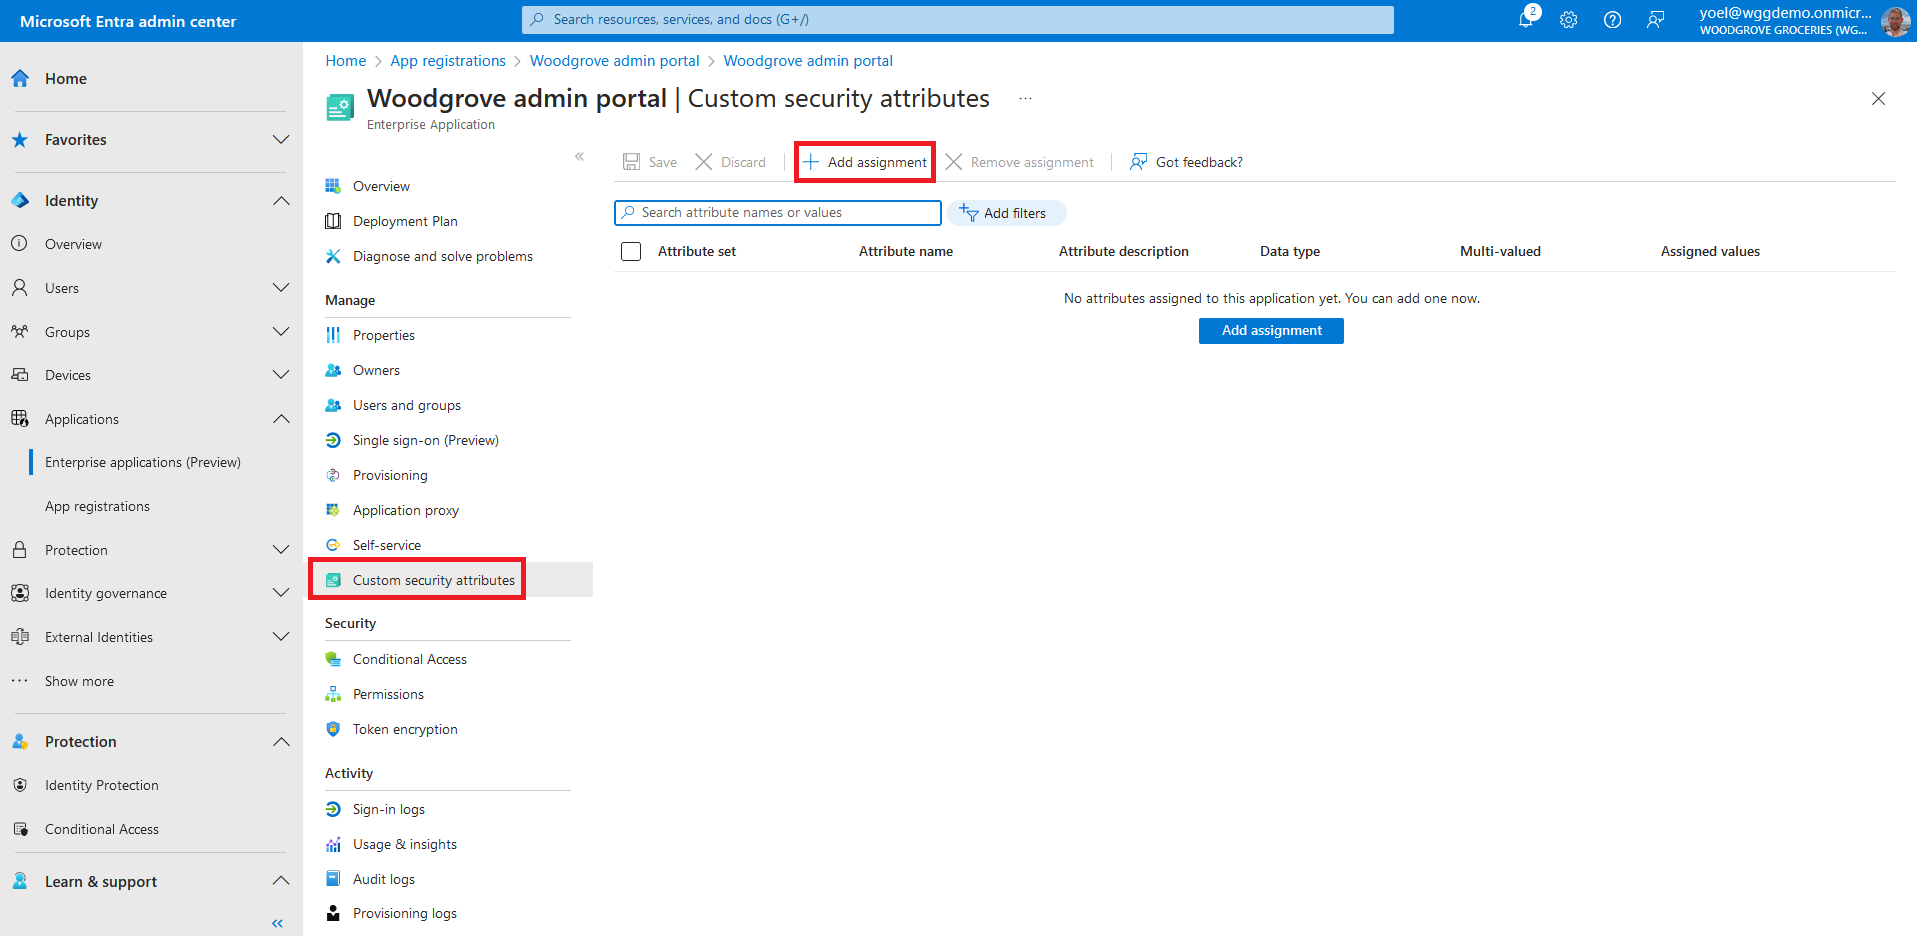
To add assignment to an app, in the Manage section, select Custom security attributes, then select Add assignment.
In Attribute set, select an attribute set from the list. In this example we seleted the Customers.
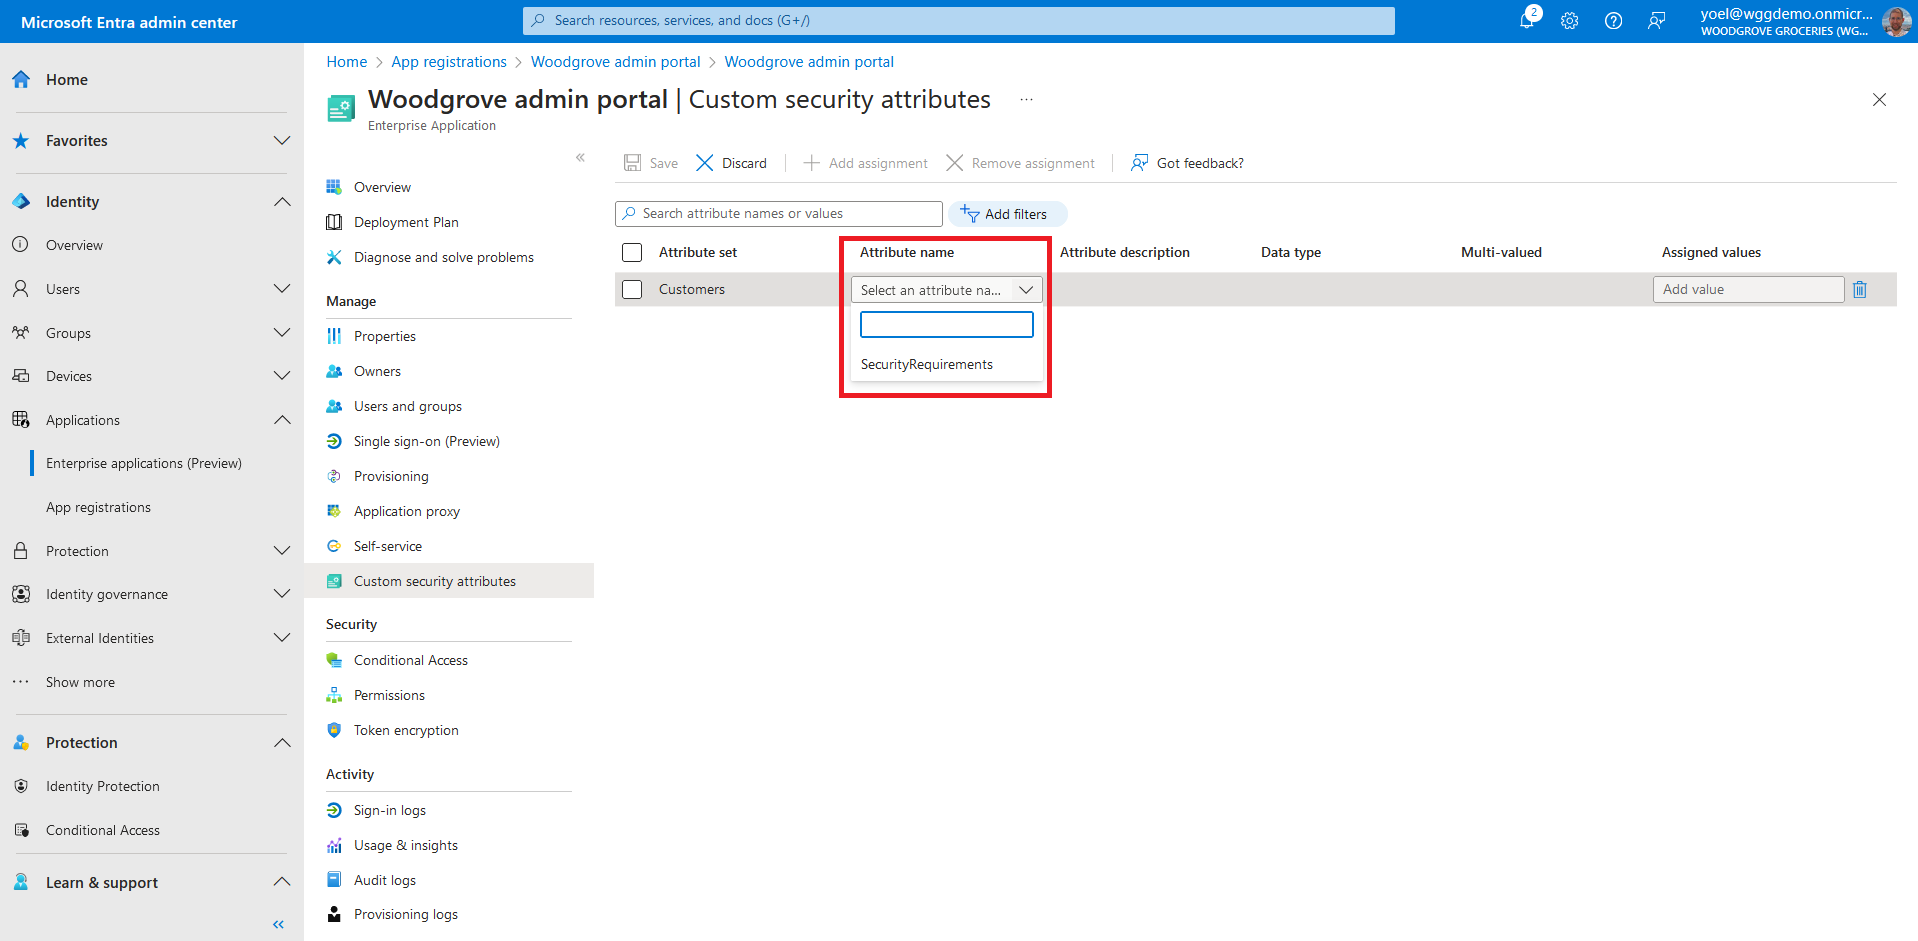
For the Attribute name, select a custom security attribute from the list. In this example we seleted the PolicyRequirement attribute.
Select Add values to open the Attribute values pane and add your values. When finished adding values. In this exampe we seleted BlockGuestUsers.

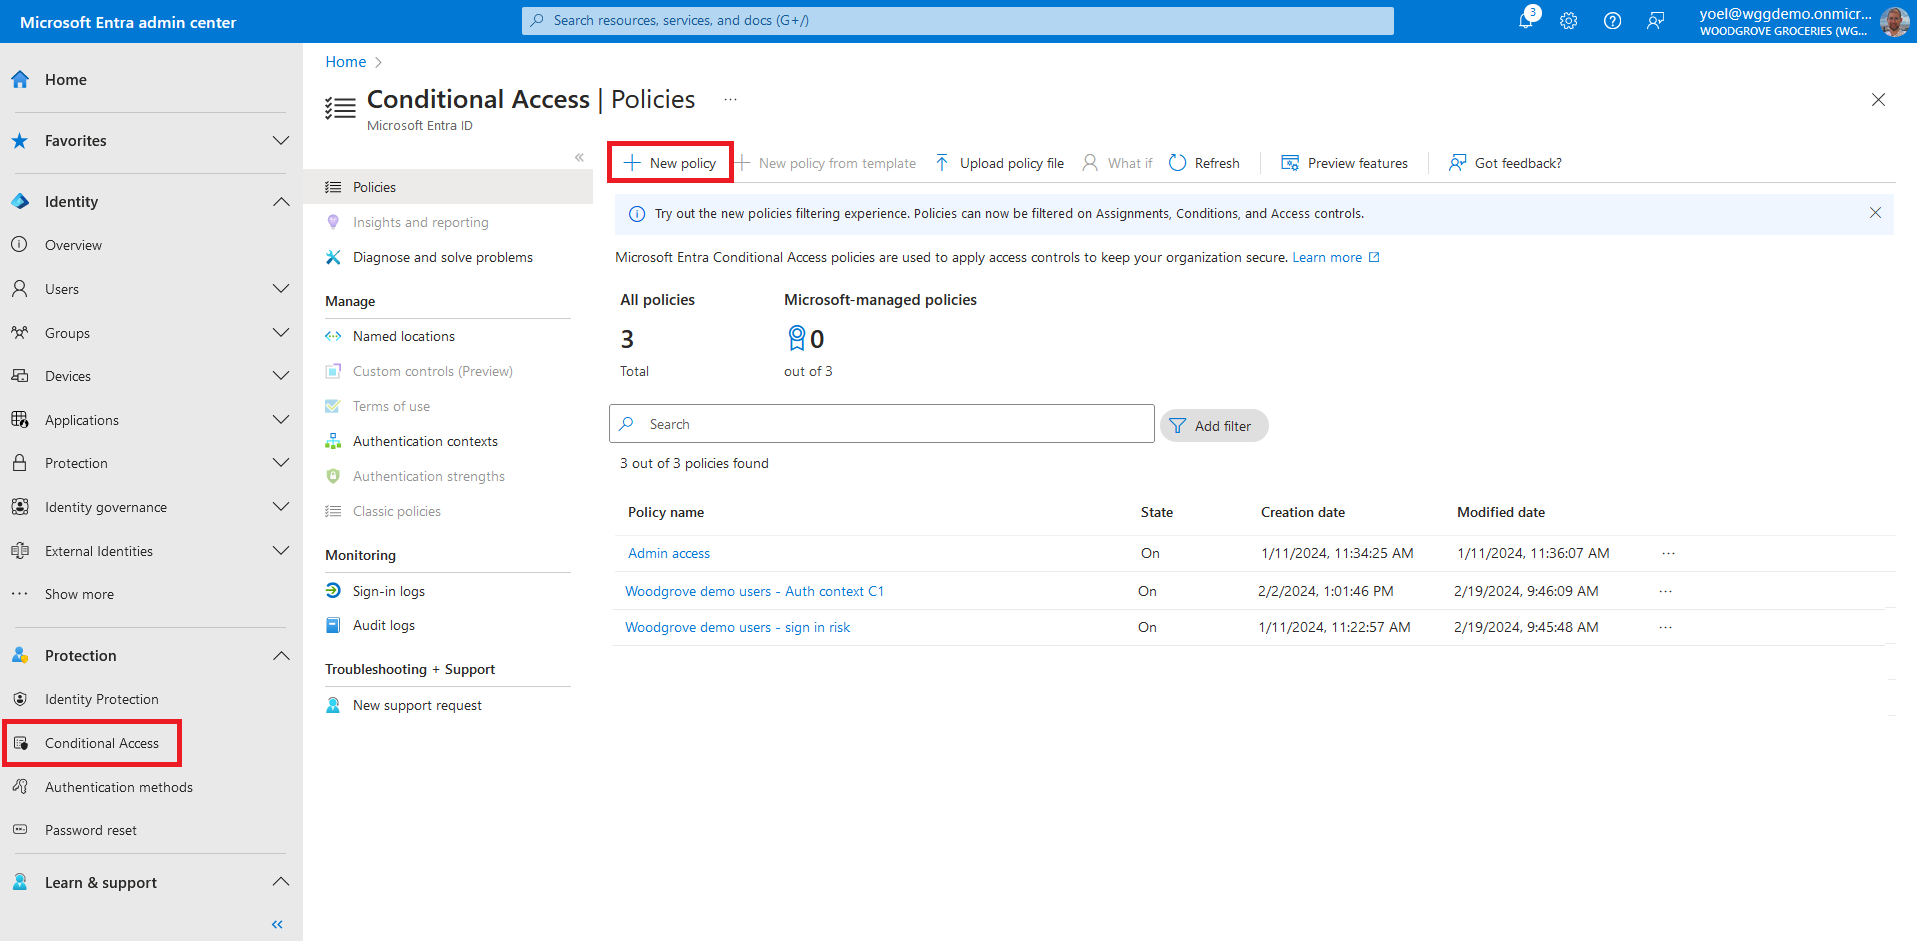
In the next steps you create a Conditional Access policy to secure the application. The conditional access policy filters for applications with the custom security attribut you cretaed. From the meun, select Protection > Conditional Access and select New policy.
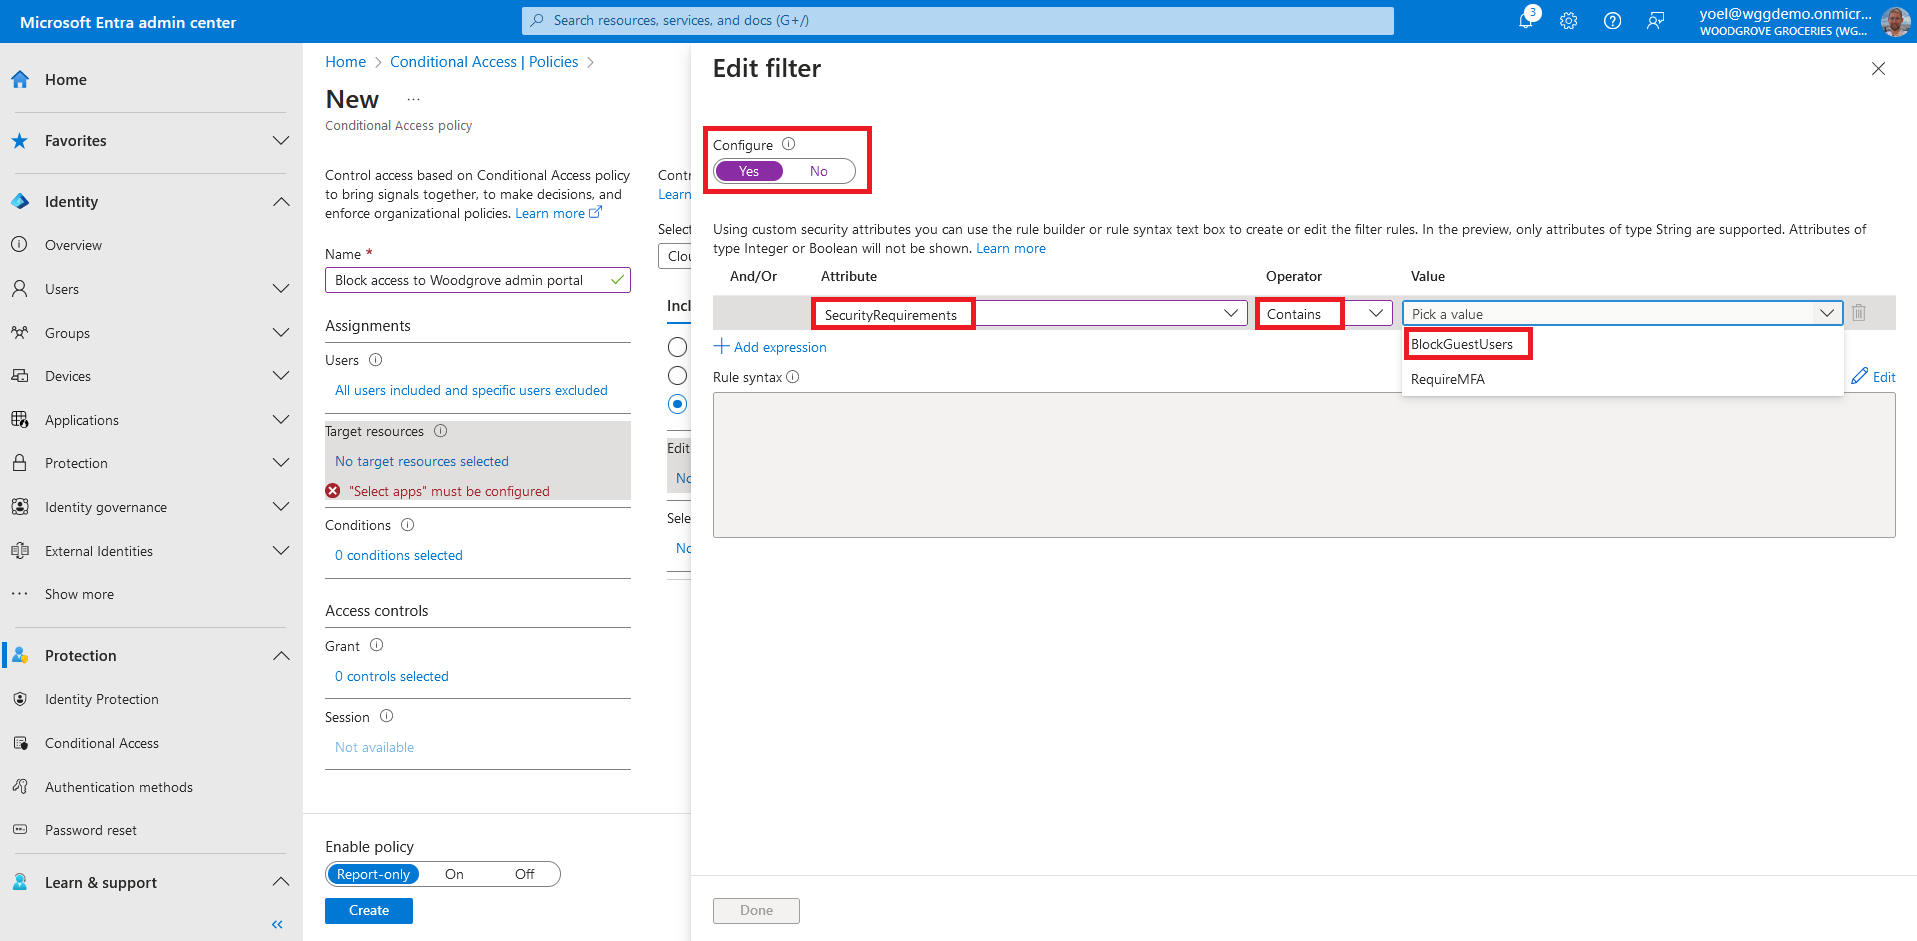
After you give your policy a name and select the users in the Assignments, go to Target resources. Under the Include choose the Select apps option and select Edit filter.
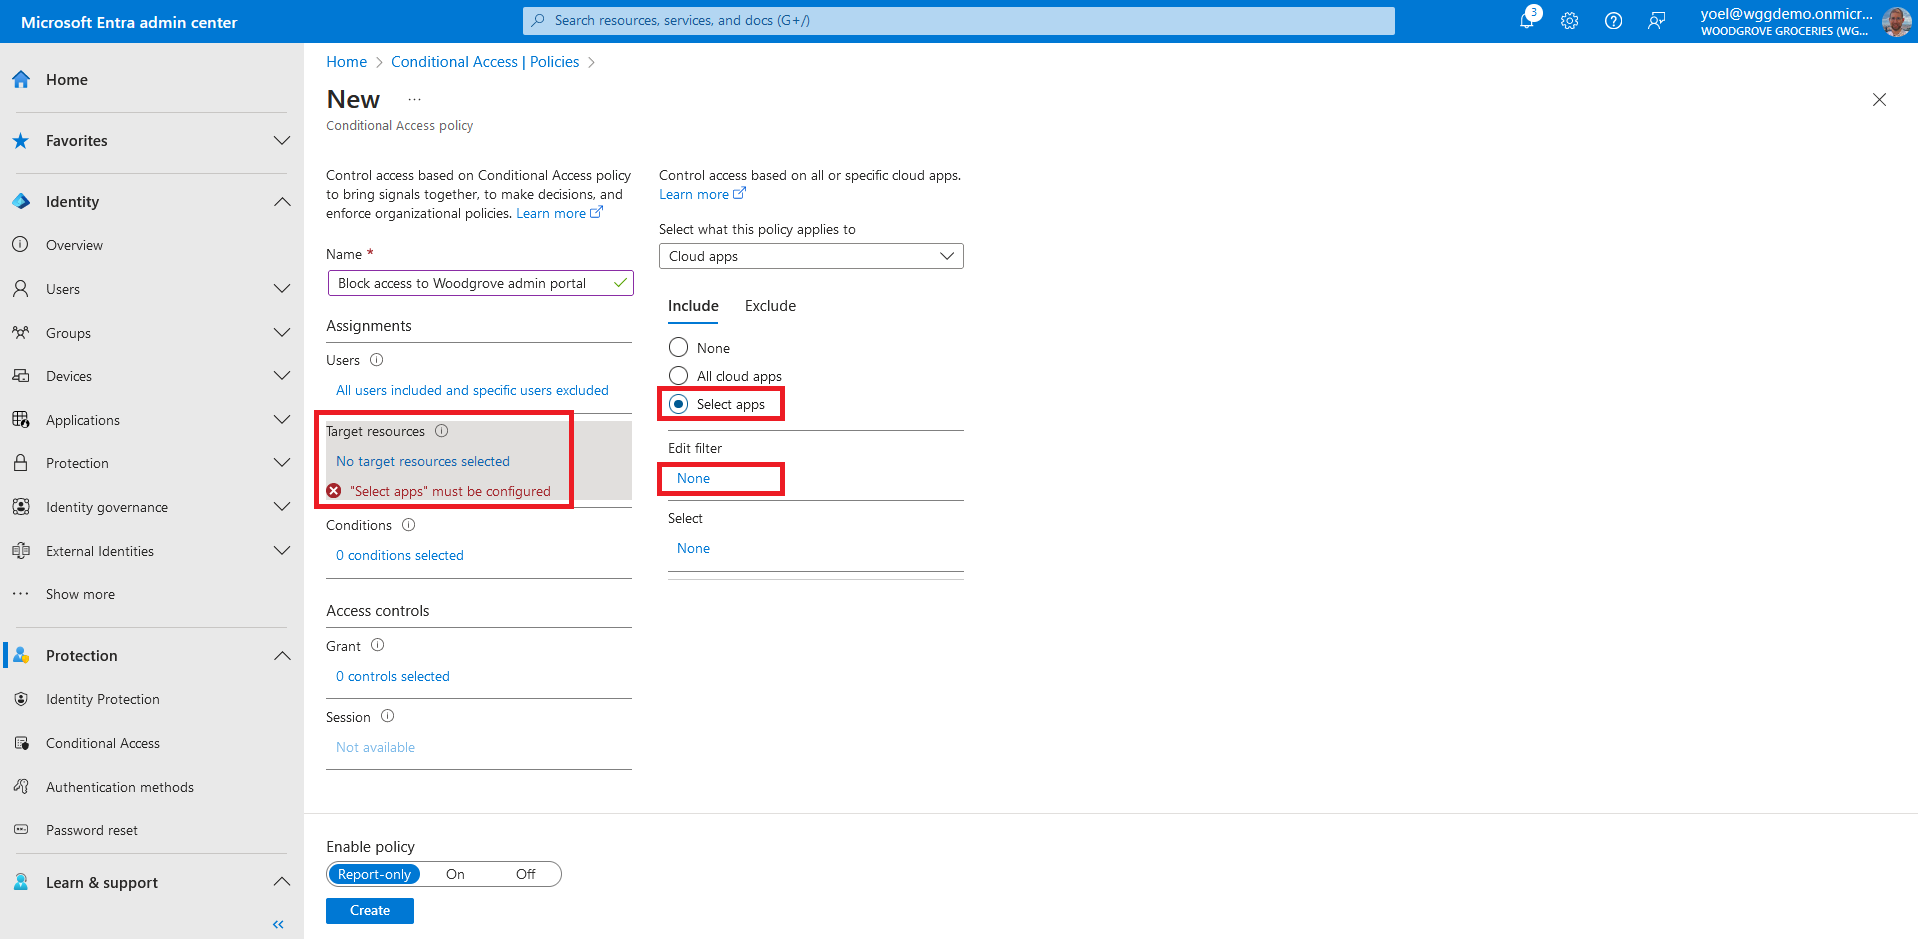
Set Configure to Yes. Select the Attribute you created earlier called PolicyRequirement. Set Operator to Contains and set the Value to BlockGuestUsers. Then select Done.
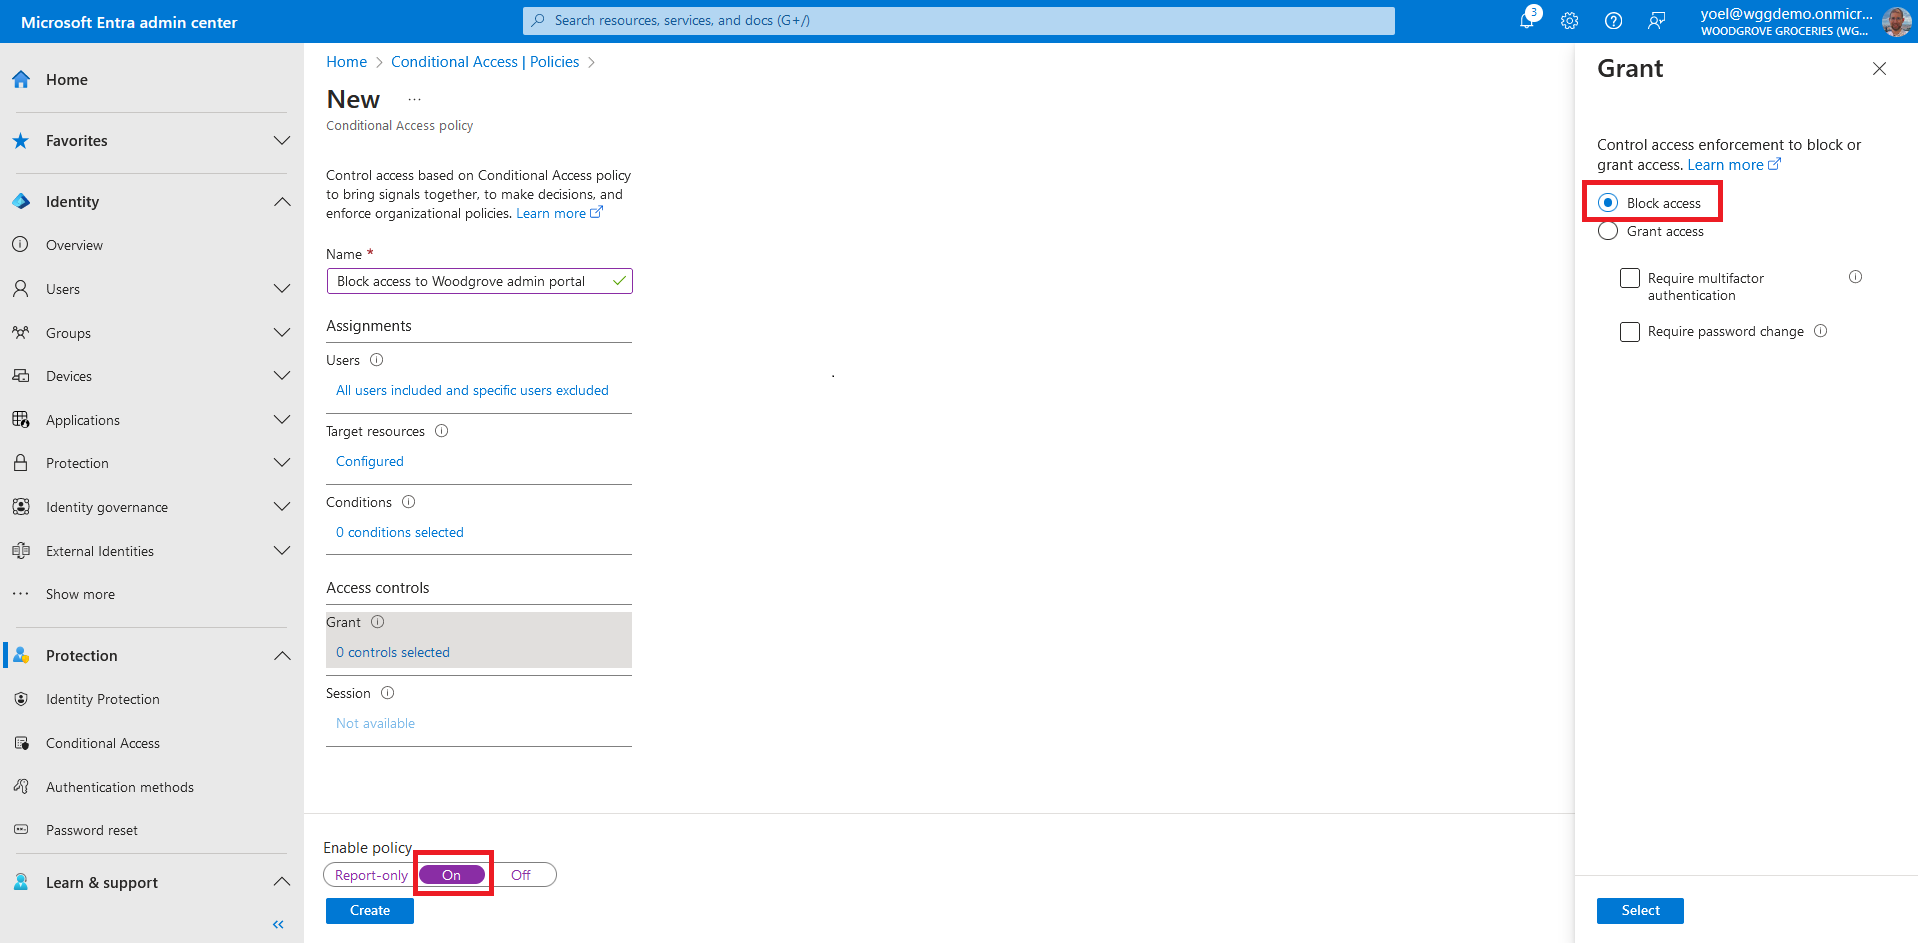
Under Access controls > Grant, select Block access. Confirm your settings and set Enable policy to On. Select Create to create your policy.
Well done!
The custom security attributes successfully created and the conditional access policy with custom security attributes is configured. To test the user experience, sign-up or sign-in into your application.
Dependencies
This script is self-contained.Create attribute set
Start by adding a security attribute set.
POST https://graph.microsoft.com/v1.0/directory/attributeSets
{
    "description": "Customers attribute",
    "id": "Customers",
    "maxAttributesPerSet": 25
}
Create a custom security attribute
Then add a custom security attribute, to the attribute set you created Customers. The attribute name is SecurityRequirements with two values BlockGuestUsers and RequireMFA.
POST https://graph.microsoft.com/v1.0/directory/customSecurityAttributeDefinitions
{
    "attributeSet": "Customers",
    "description": "Customer's application security requirements",
    "isCollection": true,
    "isSearchable": true,
    "name": "SecurityRequirements",
    "status": "Available",
    "type": "String",
    "usePreDefinedValuesOnly": true,
    "allowedValues": [
        {
            "id": "BlockGuestUsers",
            "isActive": true
        },
        {
            "id": "RequireMFA",
            "isActive": true
        }
    ]
}
Create conditional access policy
Next create conditional access policy. The following example blocks access to all users (excludes tenant administrators). It targets applications that tagged as BlockGuestUsers.
POST https://graph.microsoft.com/v1.0/identity/conditionalAccess/policies
{
    "templateId": null,
    "displayName": "Block access to Woodgrove admin portal",
    "modifiedDateTime": null,
    "state": "enabled",
    "sessionControls": null,
    "conditions": {
        "userRiskLevels": [],
        "signInRiskLevels": [],
        "clientAppTypes": [
            "all"
        ],
        "servicePrincipalRiskLevels": [],
        "platforms": null,
        "locations": null,
        "devices": null,
        "clientApplications": null,
        "applications": {
            "includeApplications": [],
            "excludeApplications": [],
            "includeUserActions": [],
            "includeAuthenticationContextClassReferences": [],
            "applicationFilter": {
                "mode": "include",
                "rule": "CustomSecurityAttribute.Customers_SecurityRequirements -contains \"BlockGuestUsers\""
            }
        },
        "users": {
            "includeUsers": [
                "All"
            ],
            "excludeUsers": [],
            "includeGroups": [],
            "excludeGroups": [],
            "includeRoles": [],
            "excludeRoles": [
                "62e90394-69f5-4237-9190-012177145e10",
                "f2ef992c-3afb-46b9-b7cf-a126ee74c451",
                "ac434307-12b9-4fa1-a708-88bf58caabc1"
            ],
            "includeGuestsOrExternalUsers": null,
            "excludeGuestsOrExternalUsers": null
        }
    },
    "grantControls": {
        "operator": "OR",
        "builtInControls": [
            "block"
        ],
        "customAuthenticationFactors": [],
        "termsOfUse": [],
        "authenticationStrength": null
    }
}
Register a web application
To register a web application, use the following Microsoft Graph and replace.
- Value of enableIdTokenIssuance is set to true to allow OAuth2 implicit flow.
POST https://graph.microsoft.com/v1.0/applications
{
    "displayName": "Woodgrove admin portal",
    "description": "Simulates a Woodgrove admin portal where only administrators have access",
    "signInAudience": "AzureADMyOrg",
    "api": {
        "acceptMappedClaims": true,
        "requestedAccessTokenVersion": 2
    },
    "requiredResourceAccess": [
        {
            "resourceAppId": "00000003-0000-0000-c000-000000000000",
            "resourceAccess": [
                {
                    "id": "37f7f235-527c-4136-accd-4a02d197296e",
                    "type": "Scope"
                },
                {
                    "id": "7427e0e9-2fba-42fe-b0c0-848c9e6a8182",
                    "type": "Scope"
                }
            ]
        }
    ],
    "web": {
        "redirectUris": [
            "https://jwt.ms"
        ],
        "implicitGrantSettings": {
            "enableAccessTokenIssuance": false,
            "enableIdTokenIssuance": true
        }
    }
}
Create a service principal for your application
After you register you registered your application, create a service principal. The following Microsoft Graph creates a service principal. Replace the {app-ID} with the app ID from the previous call (not the object ID).
POST https://graph.microsoft.com/v1.0/servicePrincipals
{
    "appId": "{app-ID}"
}
Consent to the required permissions
Since the tenant is a customer's tenant, the consumer users themselves can't consent to these permissions. You as the admin must consent to these permissions on behalf of all the users in the tenant: Replace the {service-principal-id} with the service-principal ID you created in the previous step.
POST https://graph.microsoft.com/v1.0/oauth2PermissionGrants
{
    "clientId": "{service-principal-id}",
    "consentType": "AllPrincipals",
    "resourceId": "69309946-6ba5-4714-bb0e-38138430fcfd",
    "scope": "openid offline_access"
}
Add the security attributes to the application
In the final step, you add the security attributes to the application. Replace the {service-principal-id} with the service-principal ID you created in the previous step. In the following exampe:
- Customers is the attribute set.
- SecurityRequirements is the attribute name.
- BlockGuestUsers is the attribute value.
POST https://graph.microsoft.com/v1.0/servicePrincipals/{service-principal-id})
{
    "customSecurityAttributes": {
        "Customers": {
            "@odata.type": "#Microsoft.DirectoryServices.CustomSecurityAttributeValue",
            "SecurityRequirements@odata.type": "#Collection(String)",
            "SecurityRequirements": [
                "BlockGuestUsers"
            ]
        }
    }
}