Sign-in with Microsoft personal account (live.com)
This visual guide demonstrates how to add Microsoft personal accounts (live.com) as a sign-in option for Microsoft Entra external ID. To achieve this, we adhered to the guidelines outlined in the article on custom OpenID Connect identity provider.
Prerequisites
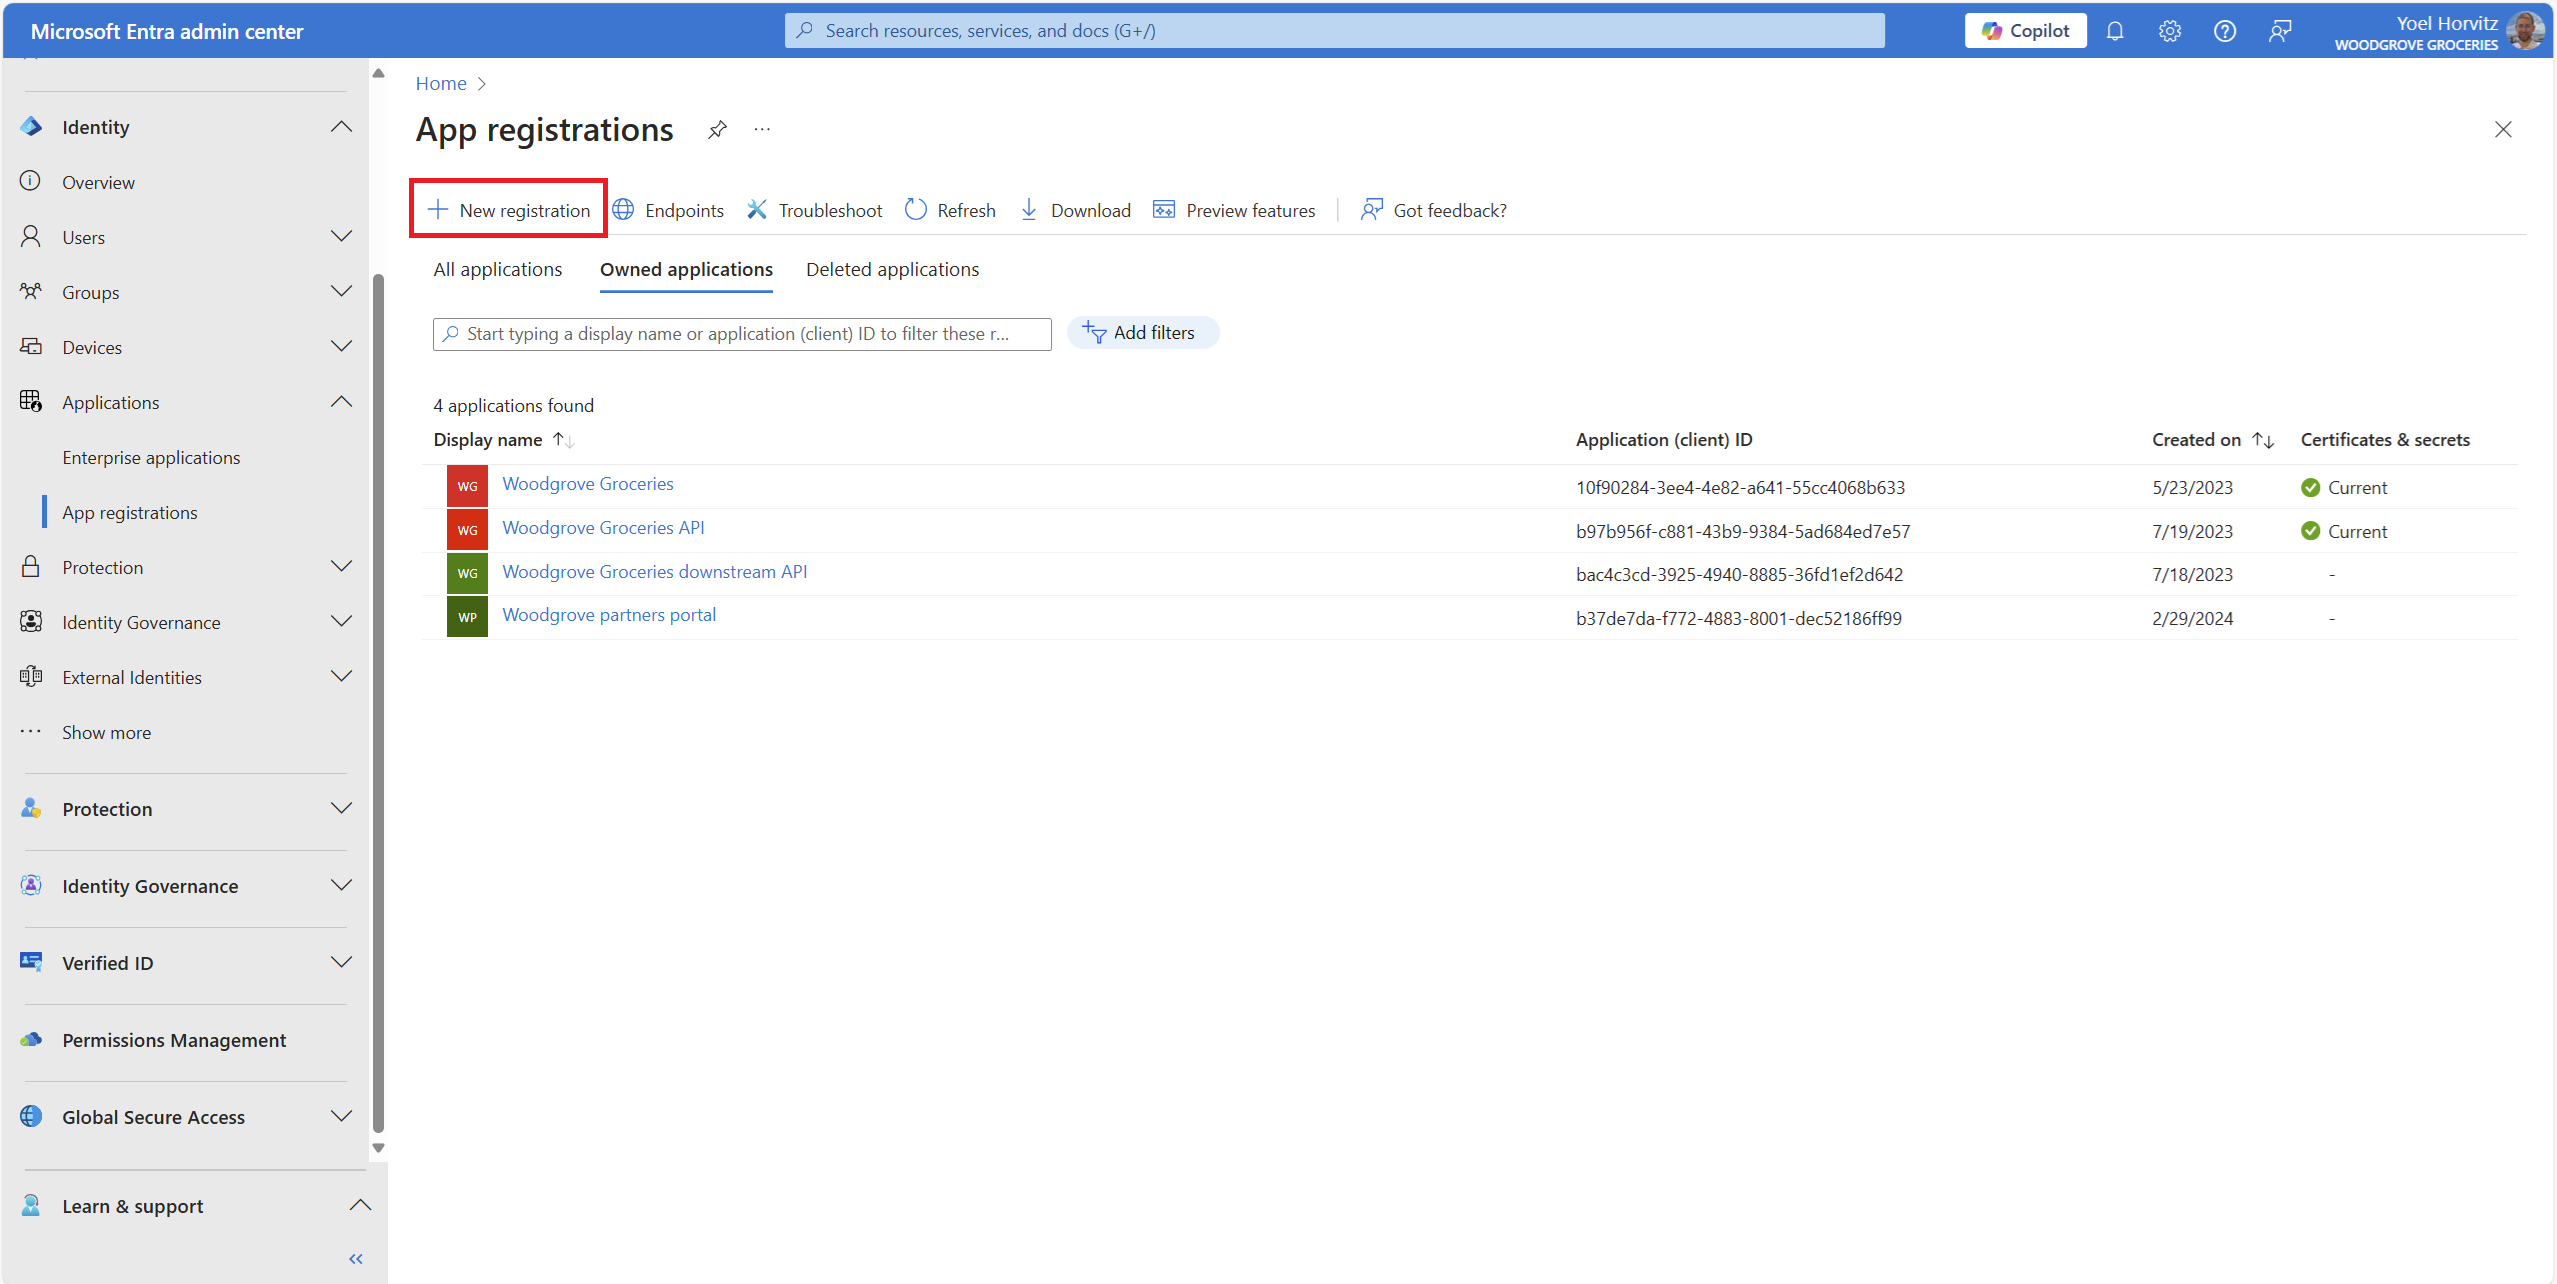
Before you start make sure you have configured the following:To add live.com as an identity provider, you first need to register an application in microsoft Entra ID. It can be any Microsoft Entra ID tenant, like your external ID tenant, or a workforce tenant. Visit https://entra.microsoft.com and sign in with your admin account. Then, browse to Identity > App registrations and select New registration.
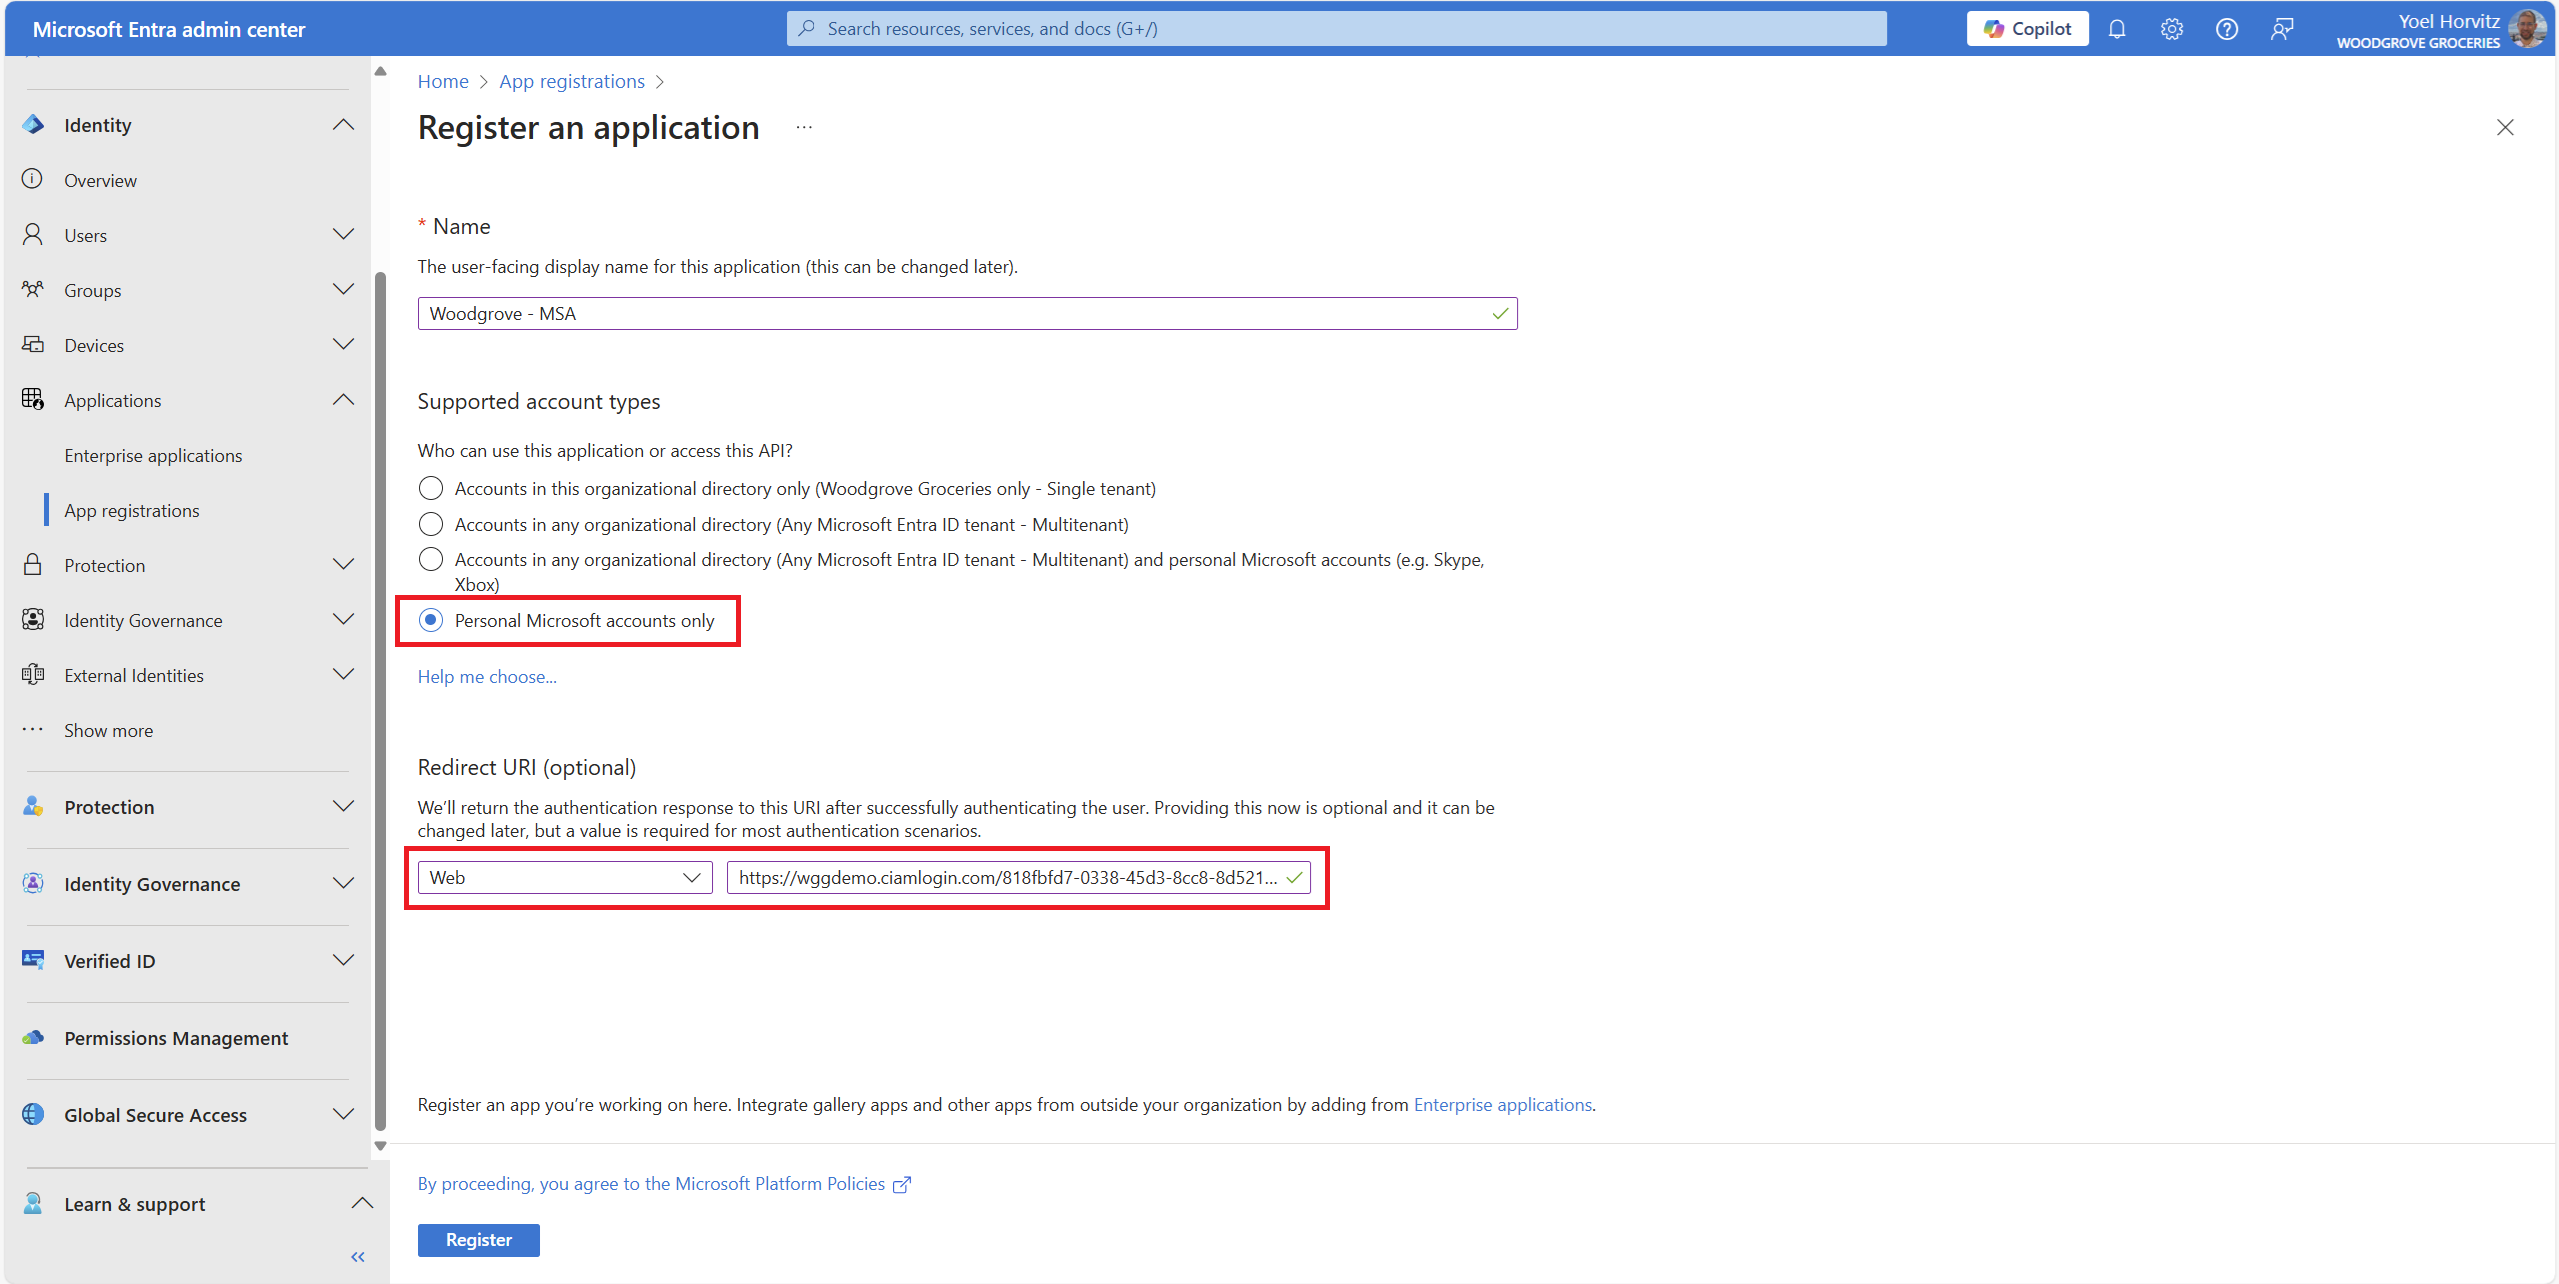
Enter a meaningful application Name that is displayed to users of the app, like Woodgrove. Under Supported account types, select Personal Microsoft accounts only. Under Redirect URI, select Web and then, in the URL box, enter the first redirect URL. Refer to the documentation for redirect URLs details. To register the application, select Register.
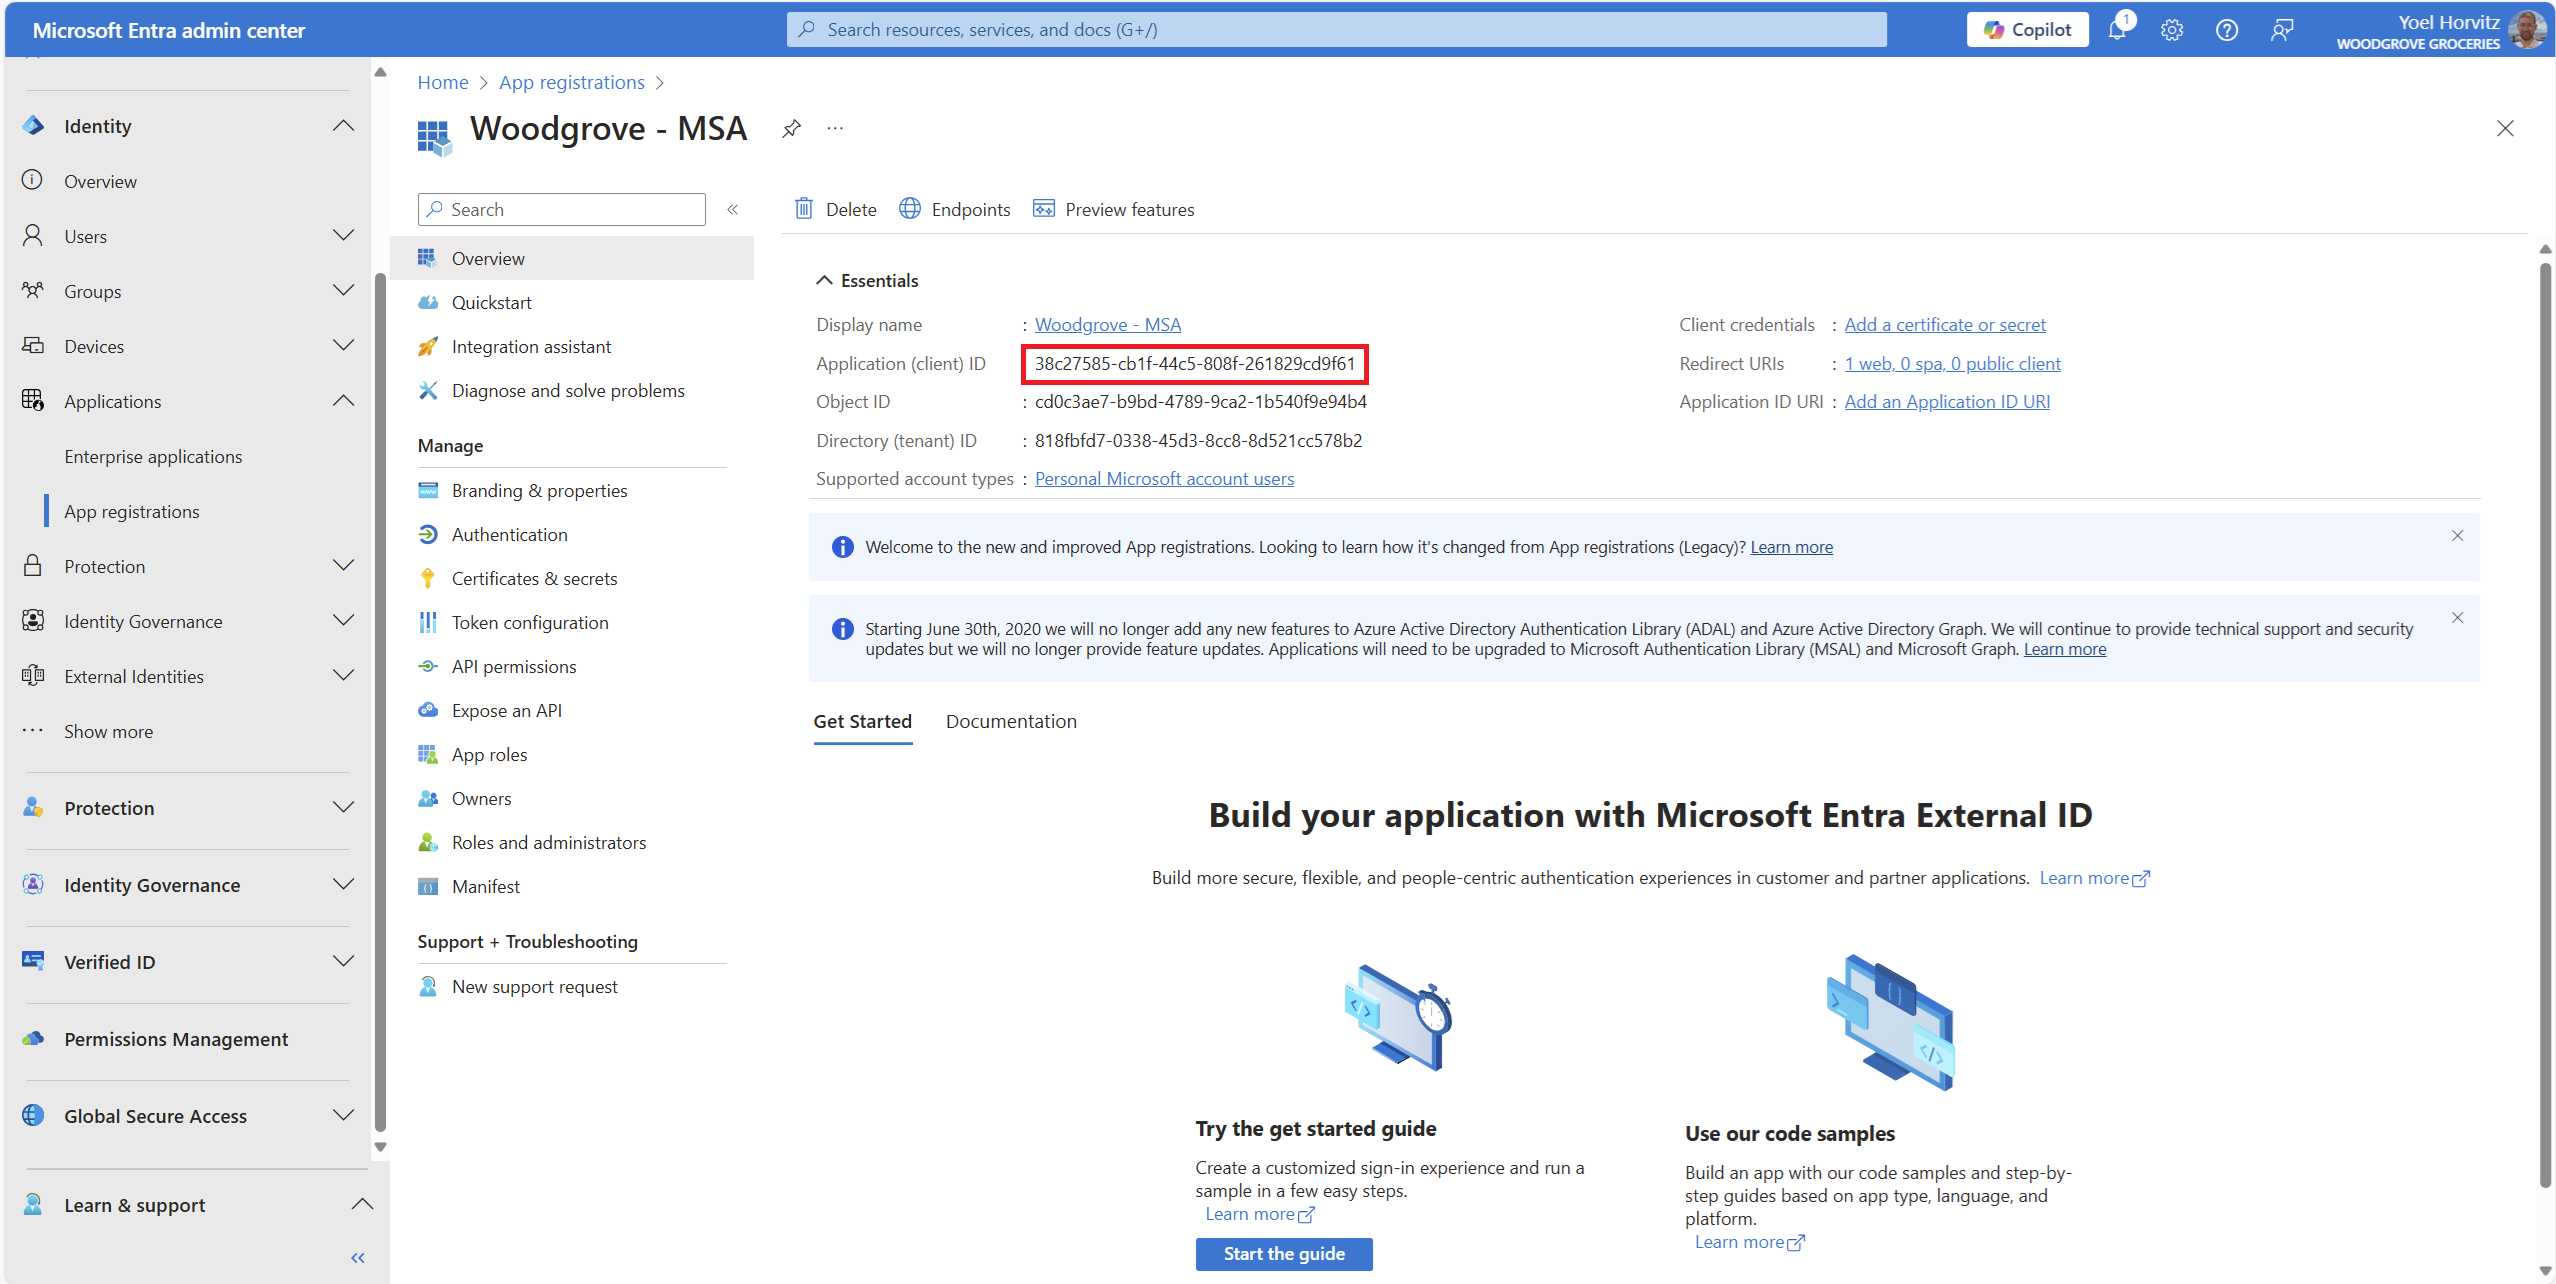
The application's Overview pane is displayed when registration is complete. Please document the Application (client) ID as it will be required for configuring a custom OpenID Connect identity provider.
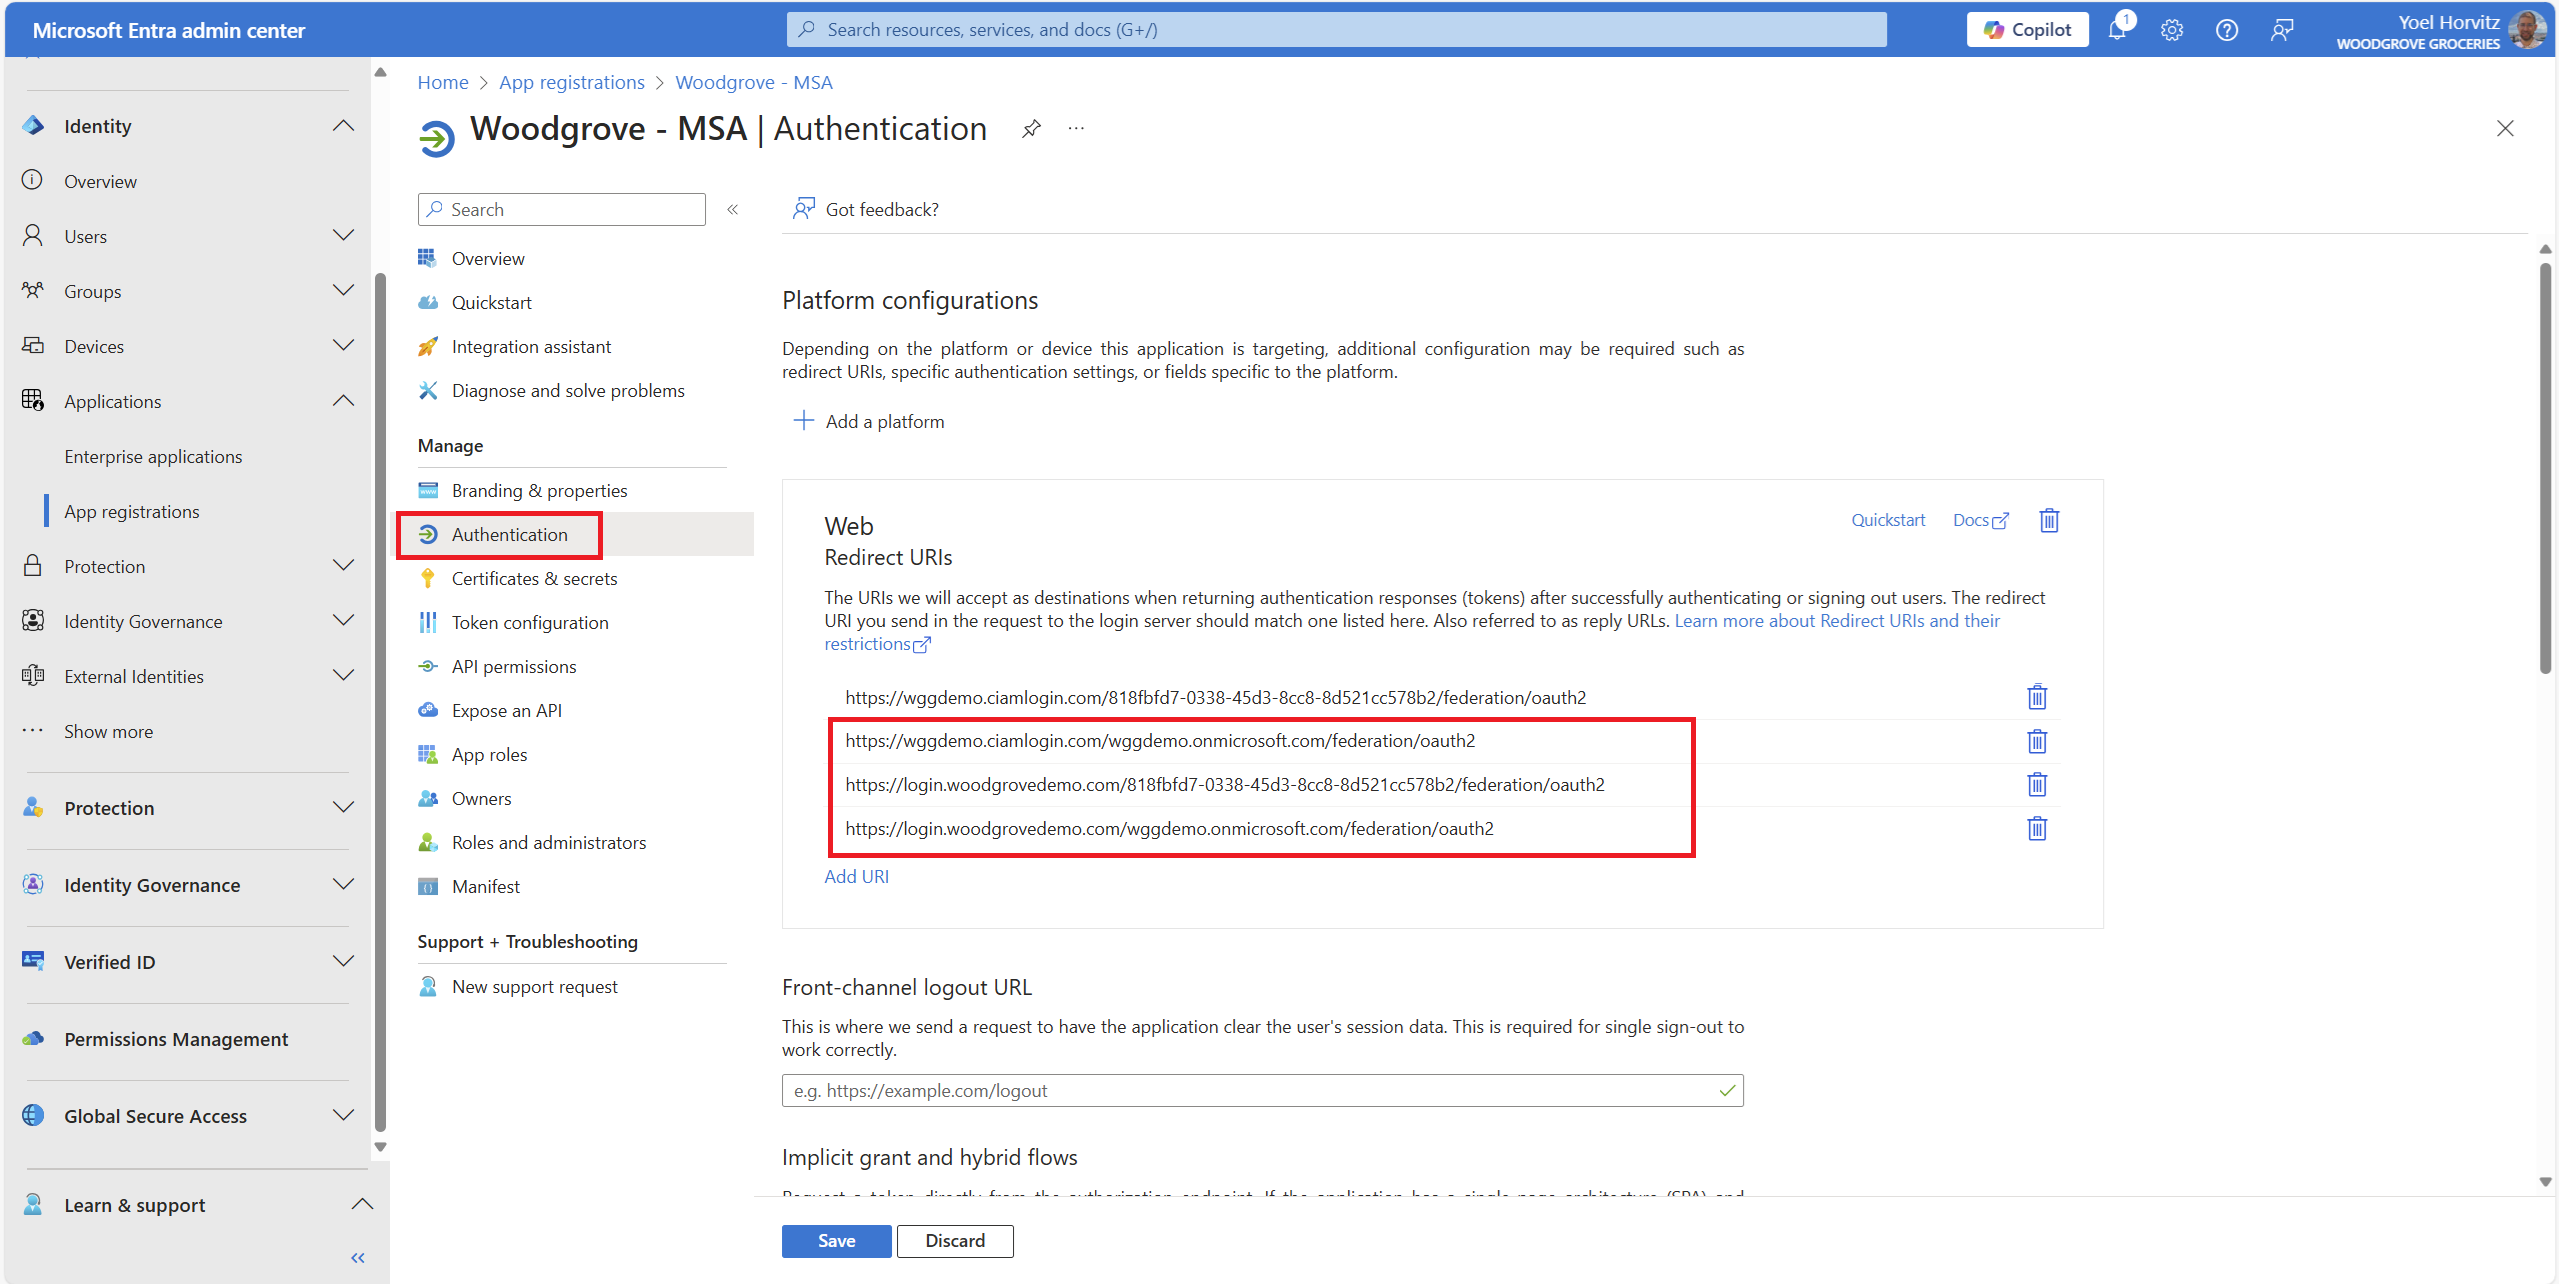
From the menu, choose Authentication and proceed to add the remaining Redirect URLs as detailed in the Custom OpenID Connect documentation. Once completed, select the Save button.
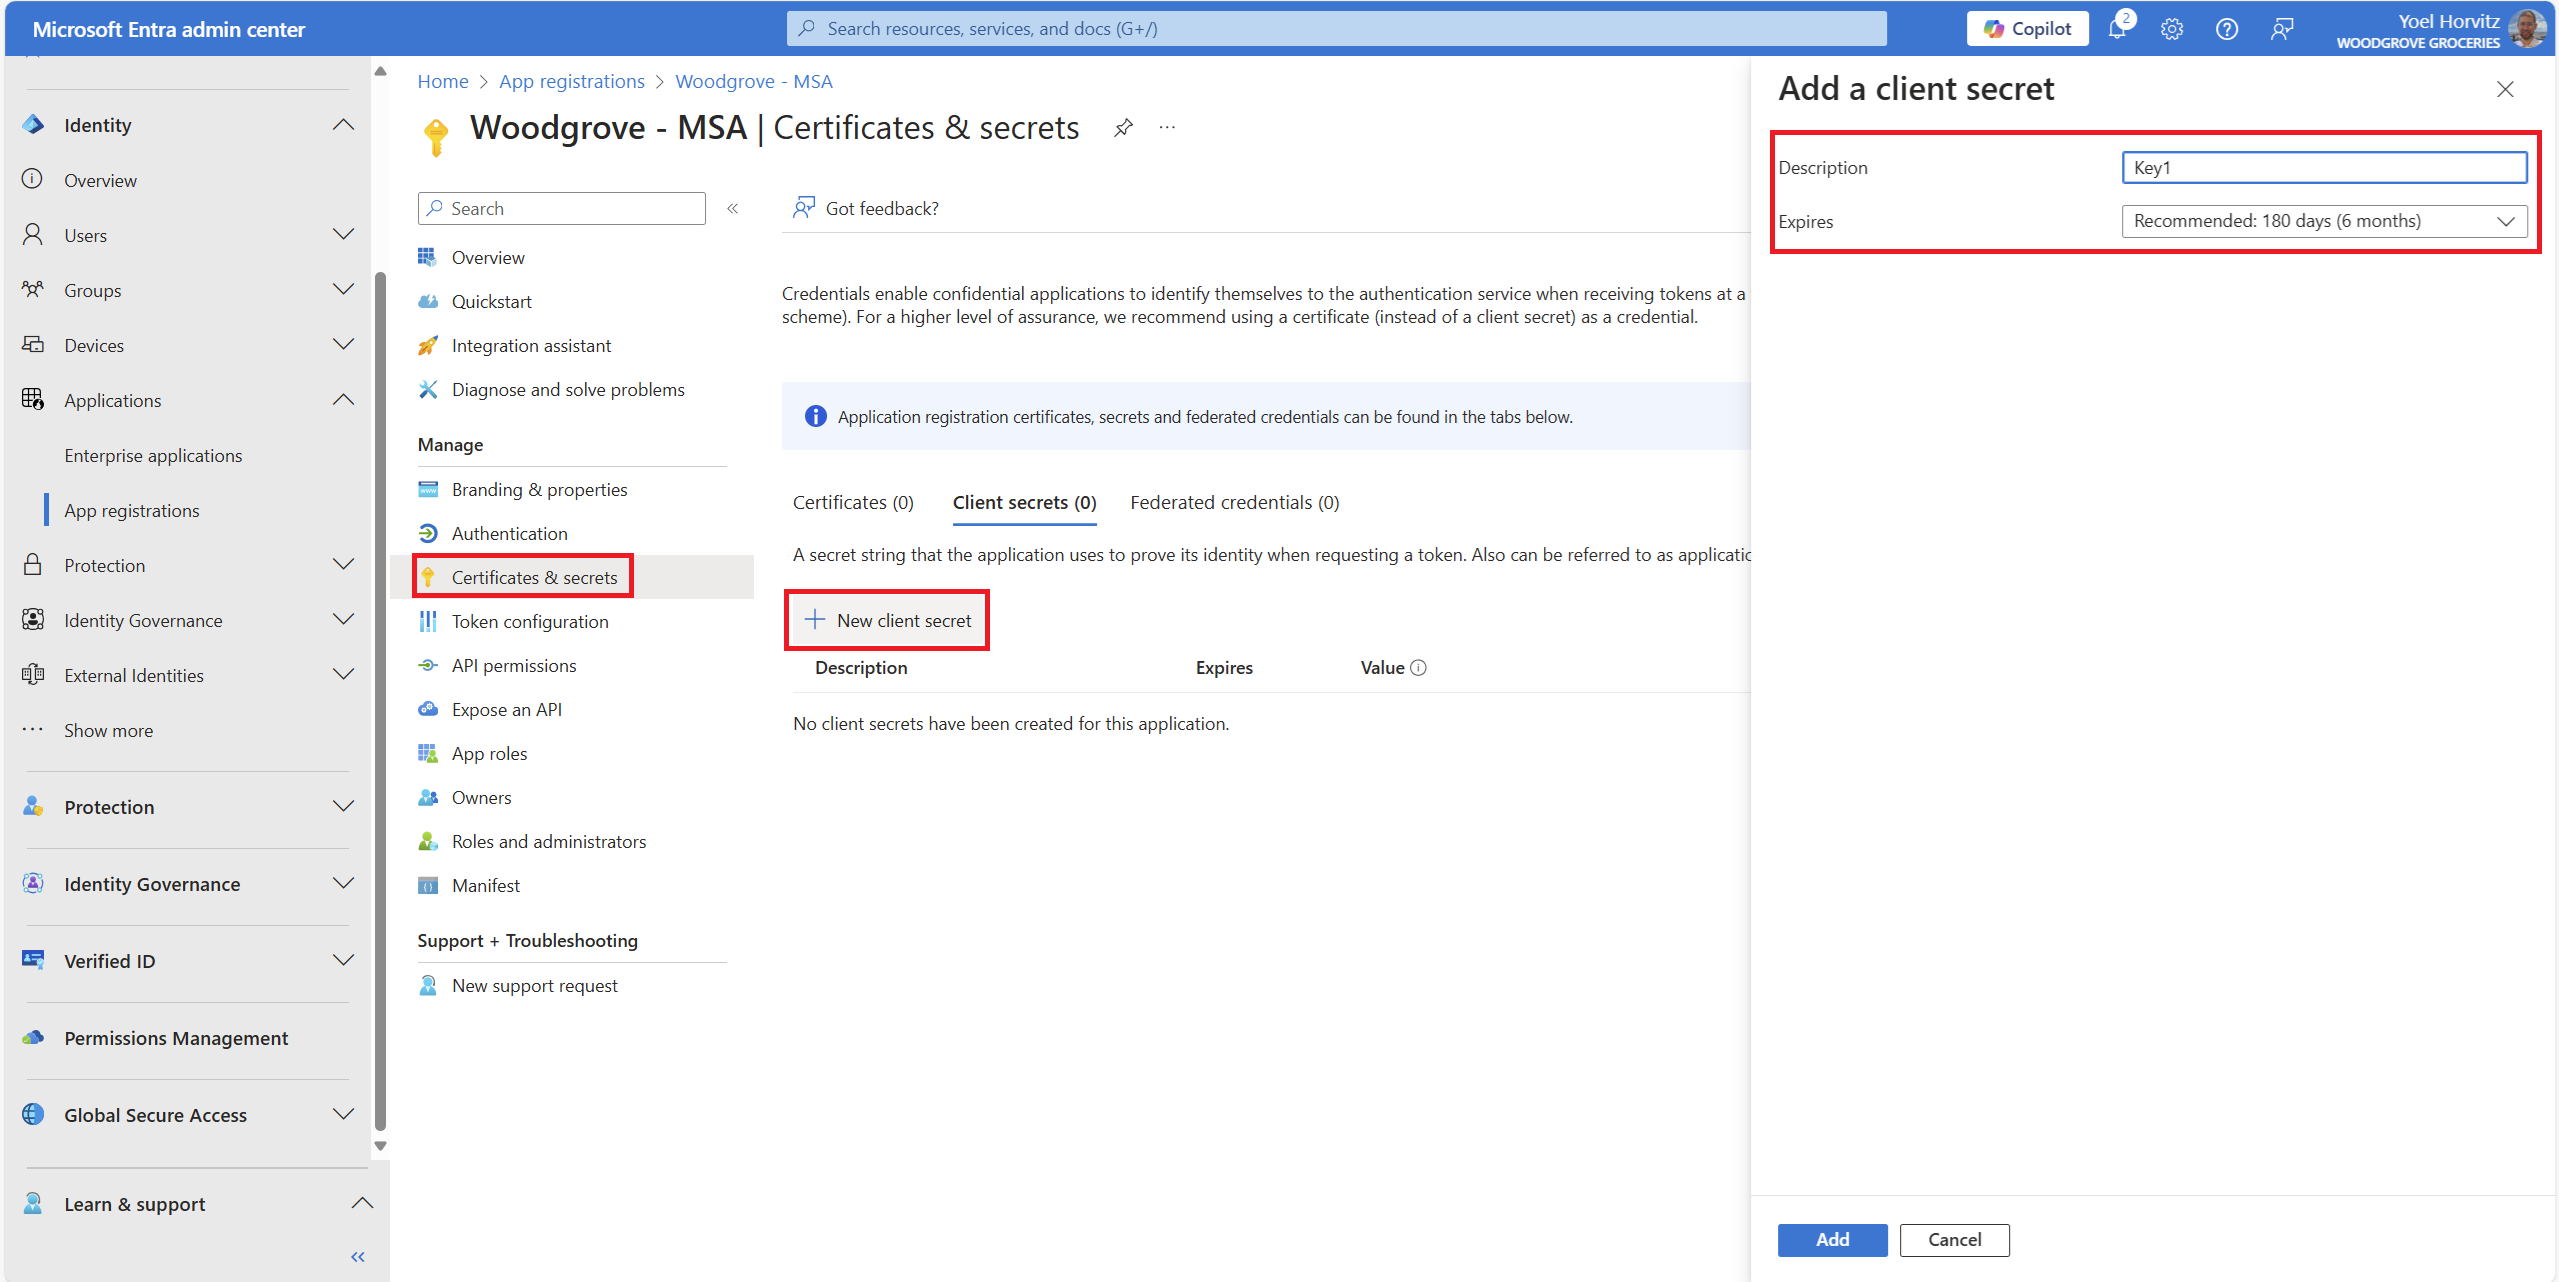
Credentials are used by your custom OpenID Connect identity provider to authenticate itself to the live.com identity provider. Select Certificates & secrets, then Client secrets and New client secret.
Add a description for your client secret. Select an expiration for the secret or specify a custom lifetime. Client secret lifetime is limited to two years (24 months) or less. You can't specify a custom lifetime longer than 24 months. Microsoft recommends that you set an expiration value of less than 12 months. Finally, select Add.
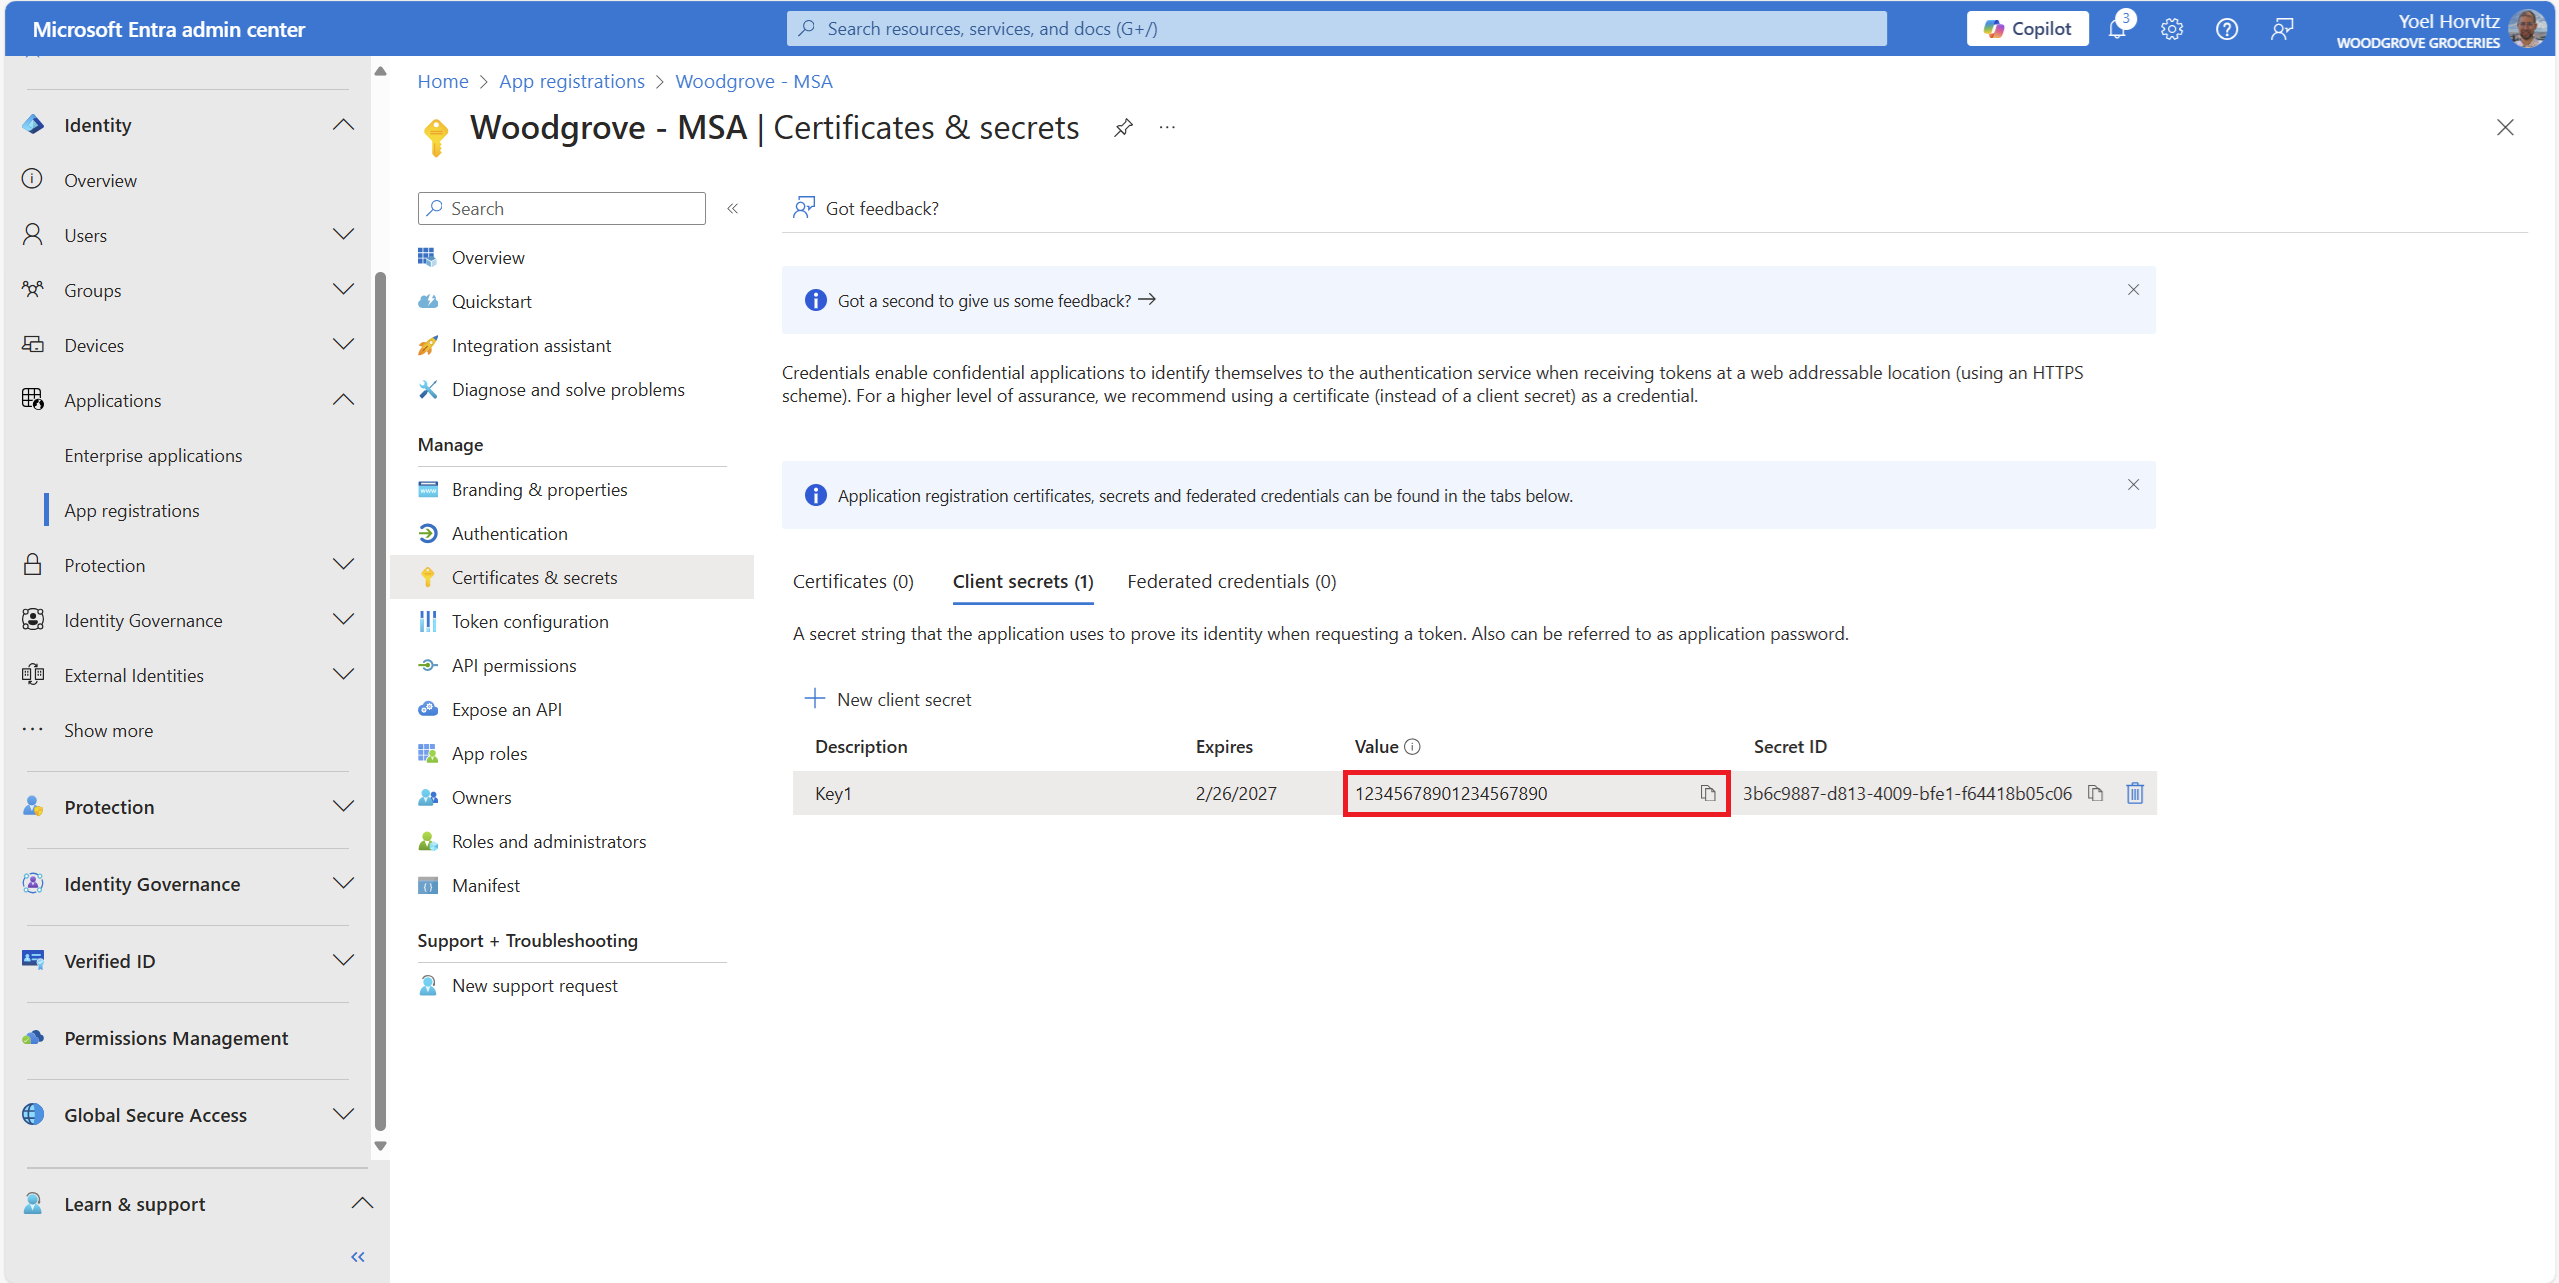
Record the secret's value for use in your custom OpenID Connect identity provider settings. This secret value is never displayed again after you leave this page.
Well done, you successfully registered a live.com application. The next step is to add the live.com as an identity provider into your Microsoft Entra External ID tenant.
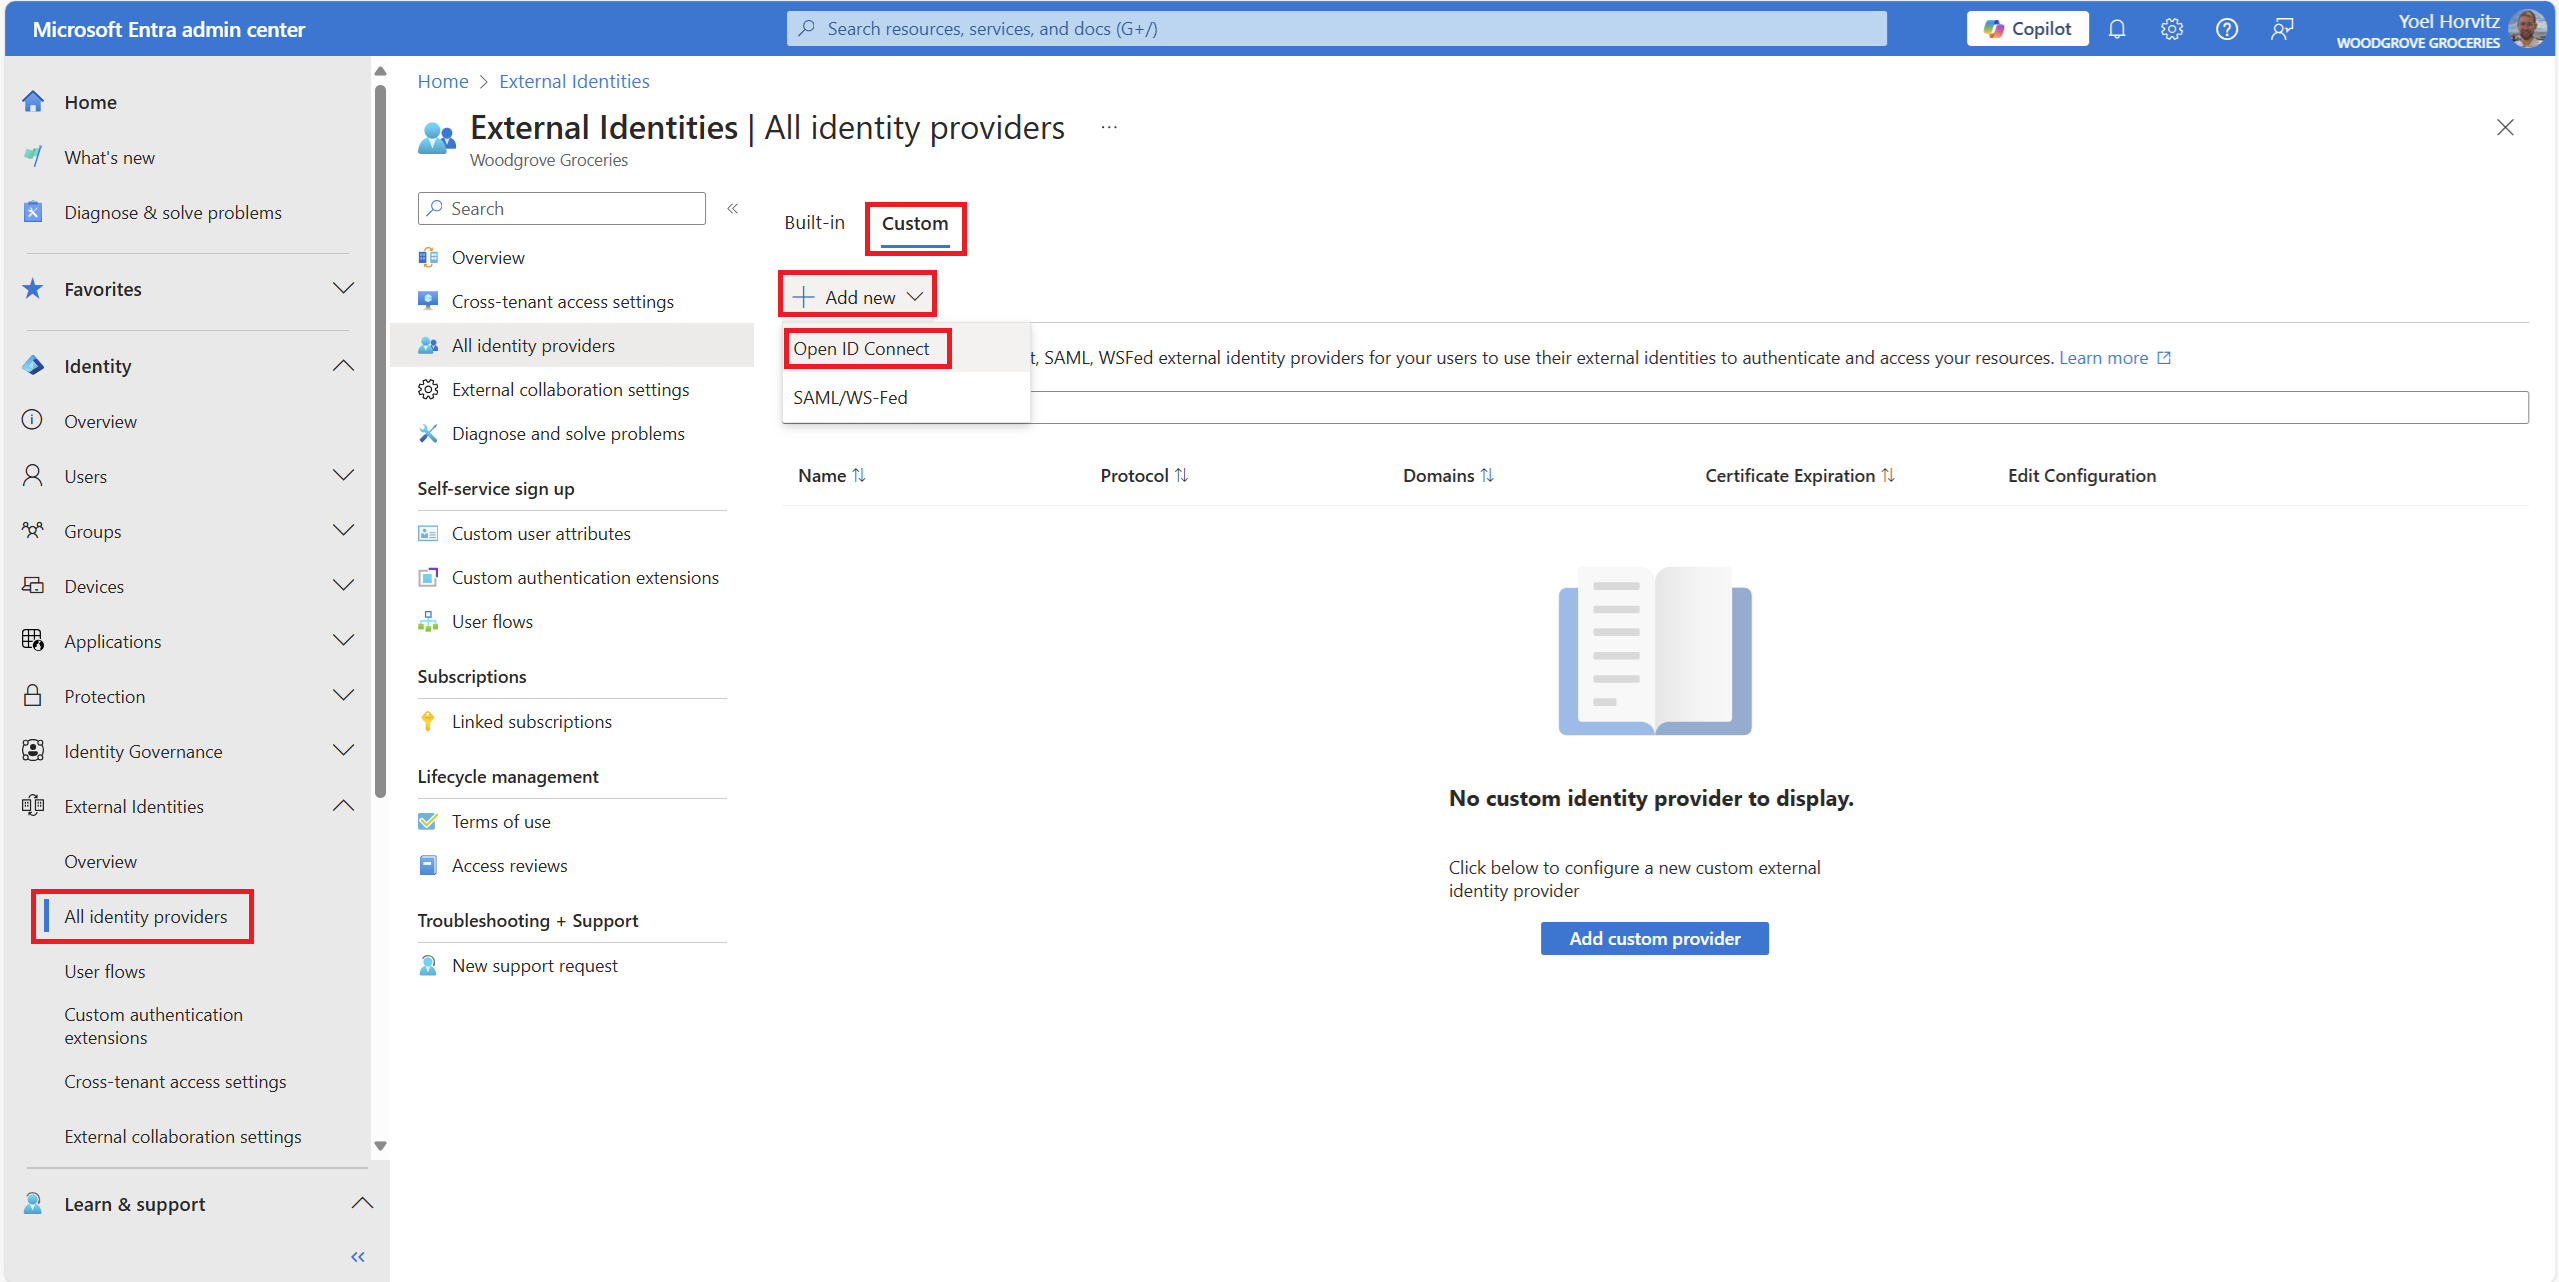
To add live.com as a custom OpenID Connect identity provider, browse to External Identities and then All identity providers. Select the Custom tab, and then select Add new and choose the Open ID Connect option.
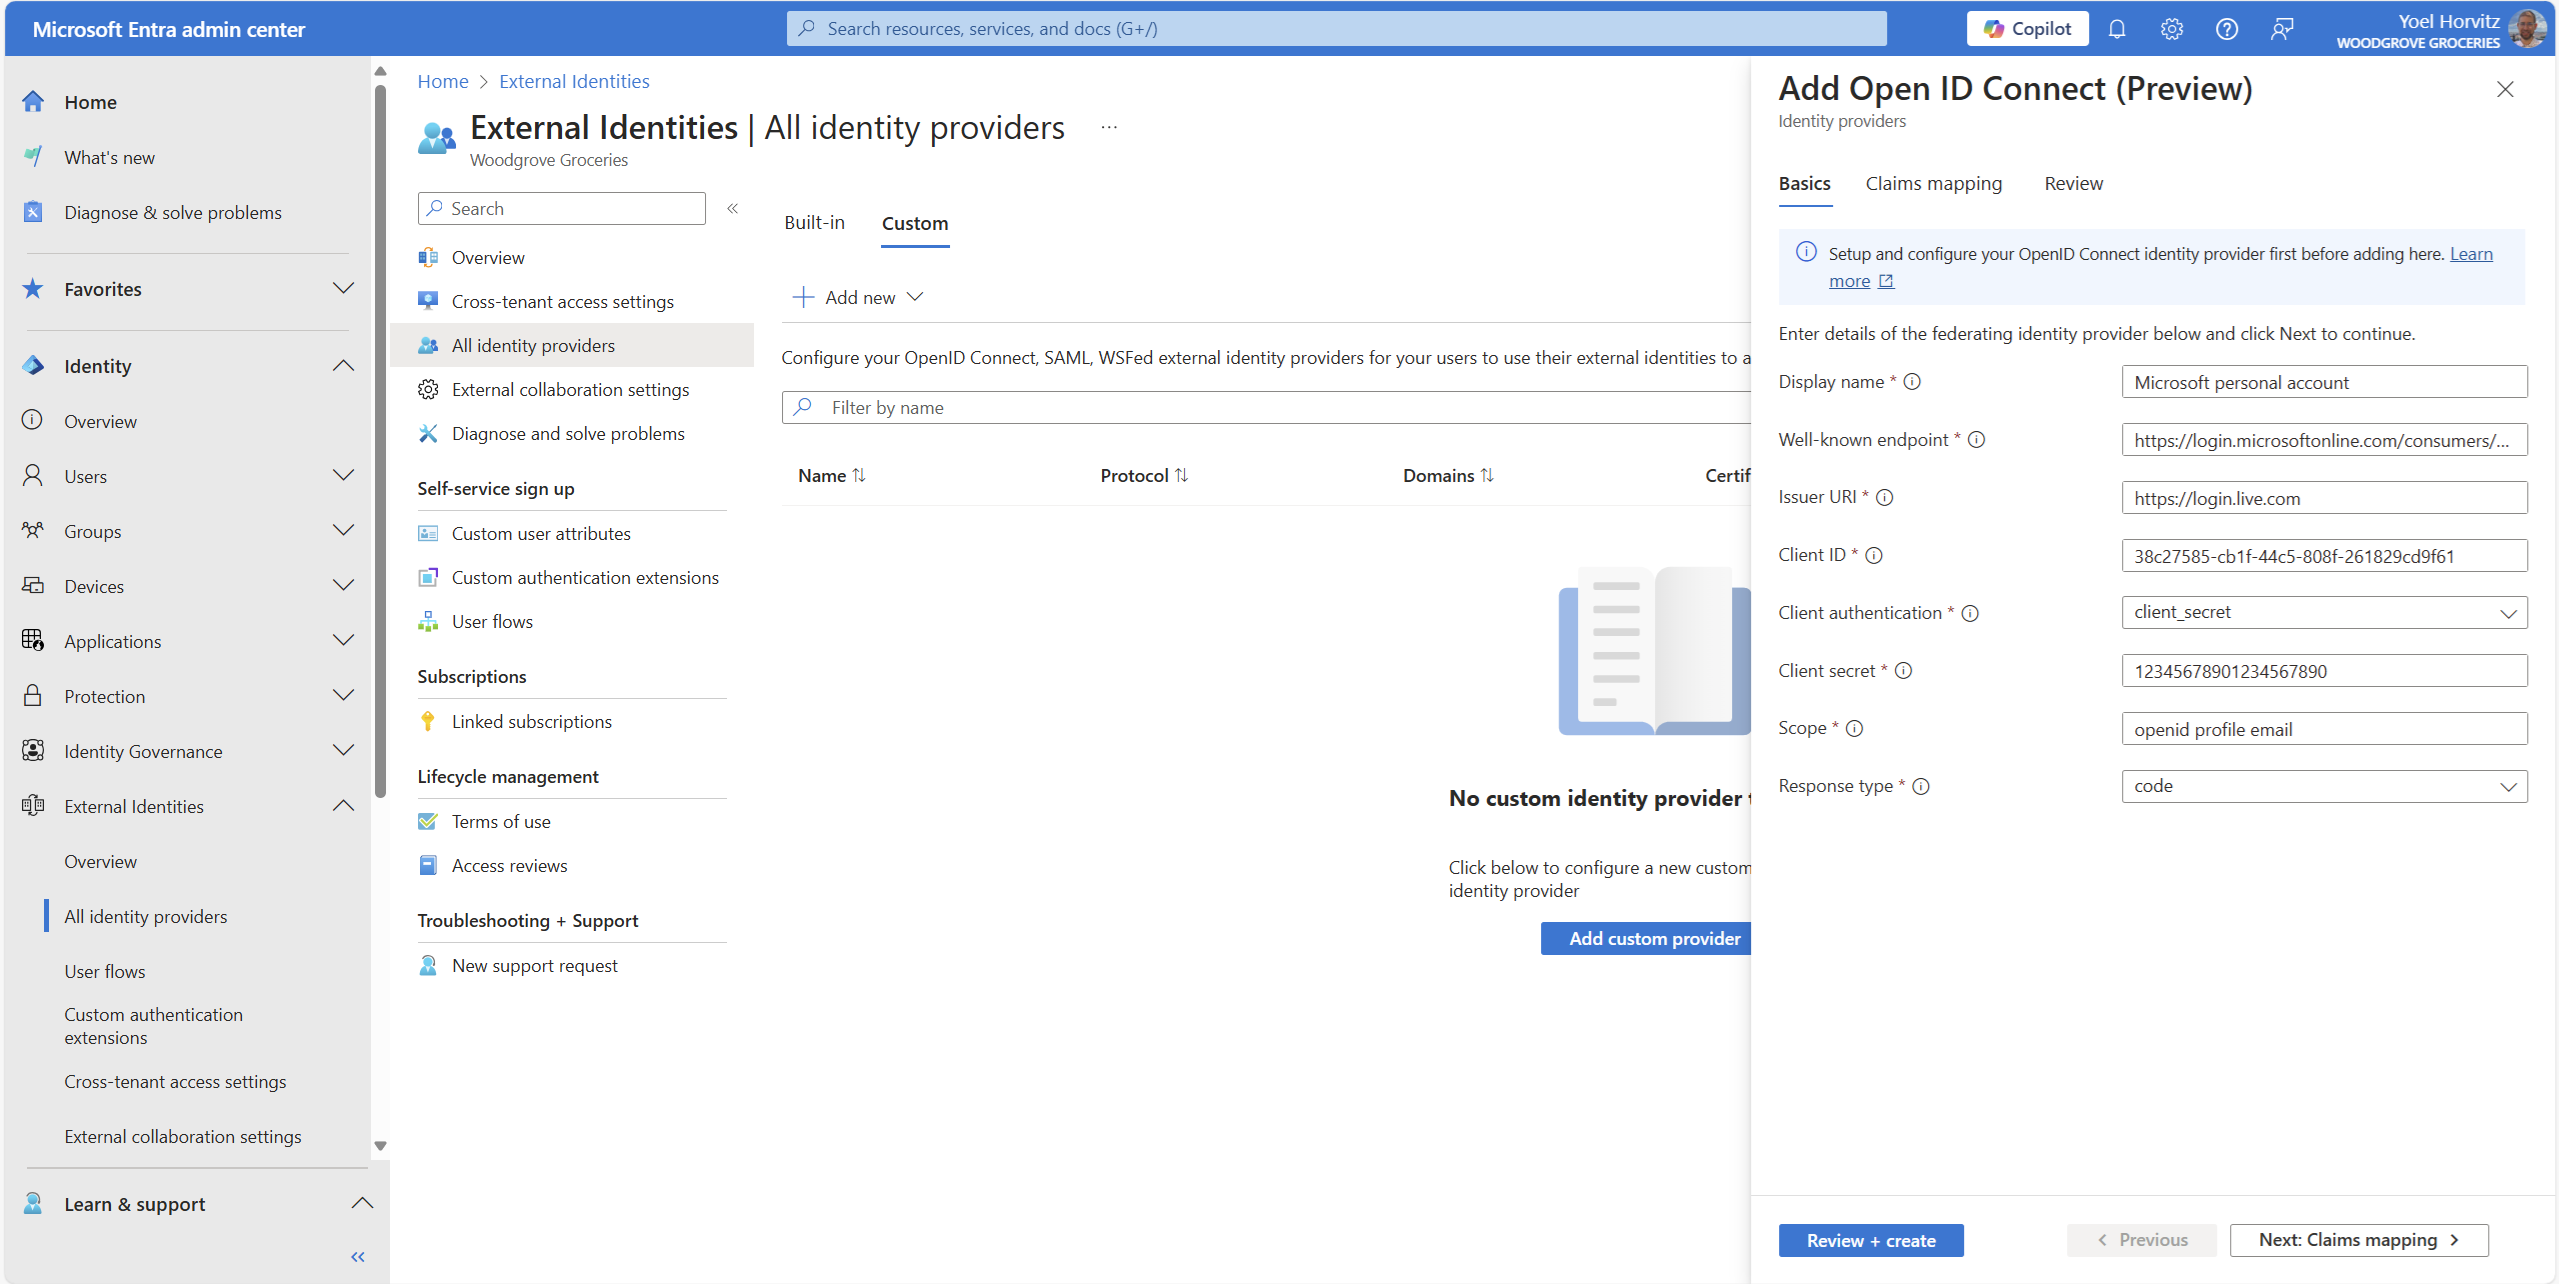
Provide the details for the live.com identity provider and the application you registered, including the application ID and application secret. For further details, please refer to the Custom OpenID Connect document. When complete, select Review + Create and then Create.
The live.com identity provider has been configured in your Microsoft Entra external ID. However, it is not yet accessible in any of the sign-in pages. To activate it, you must associate the live.com identity provider with a user flow.
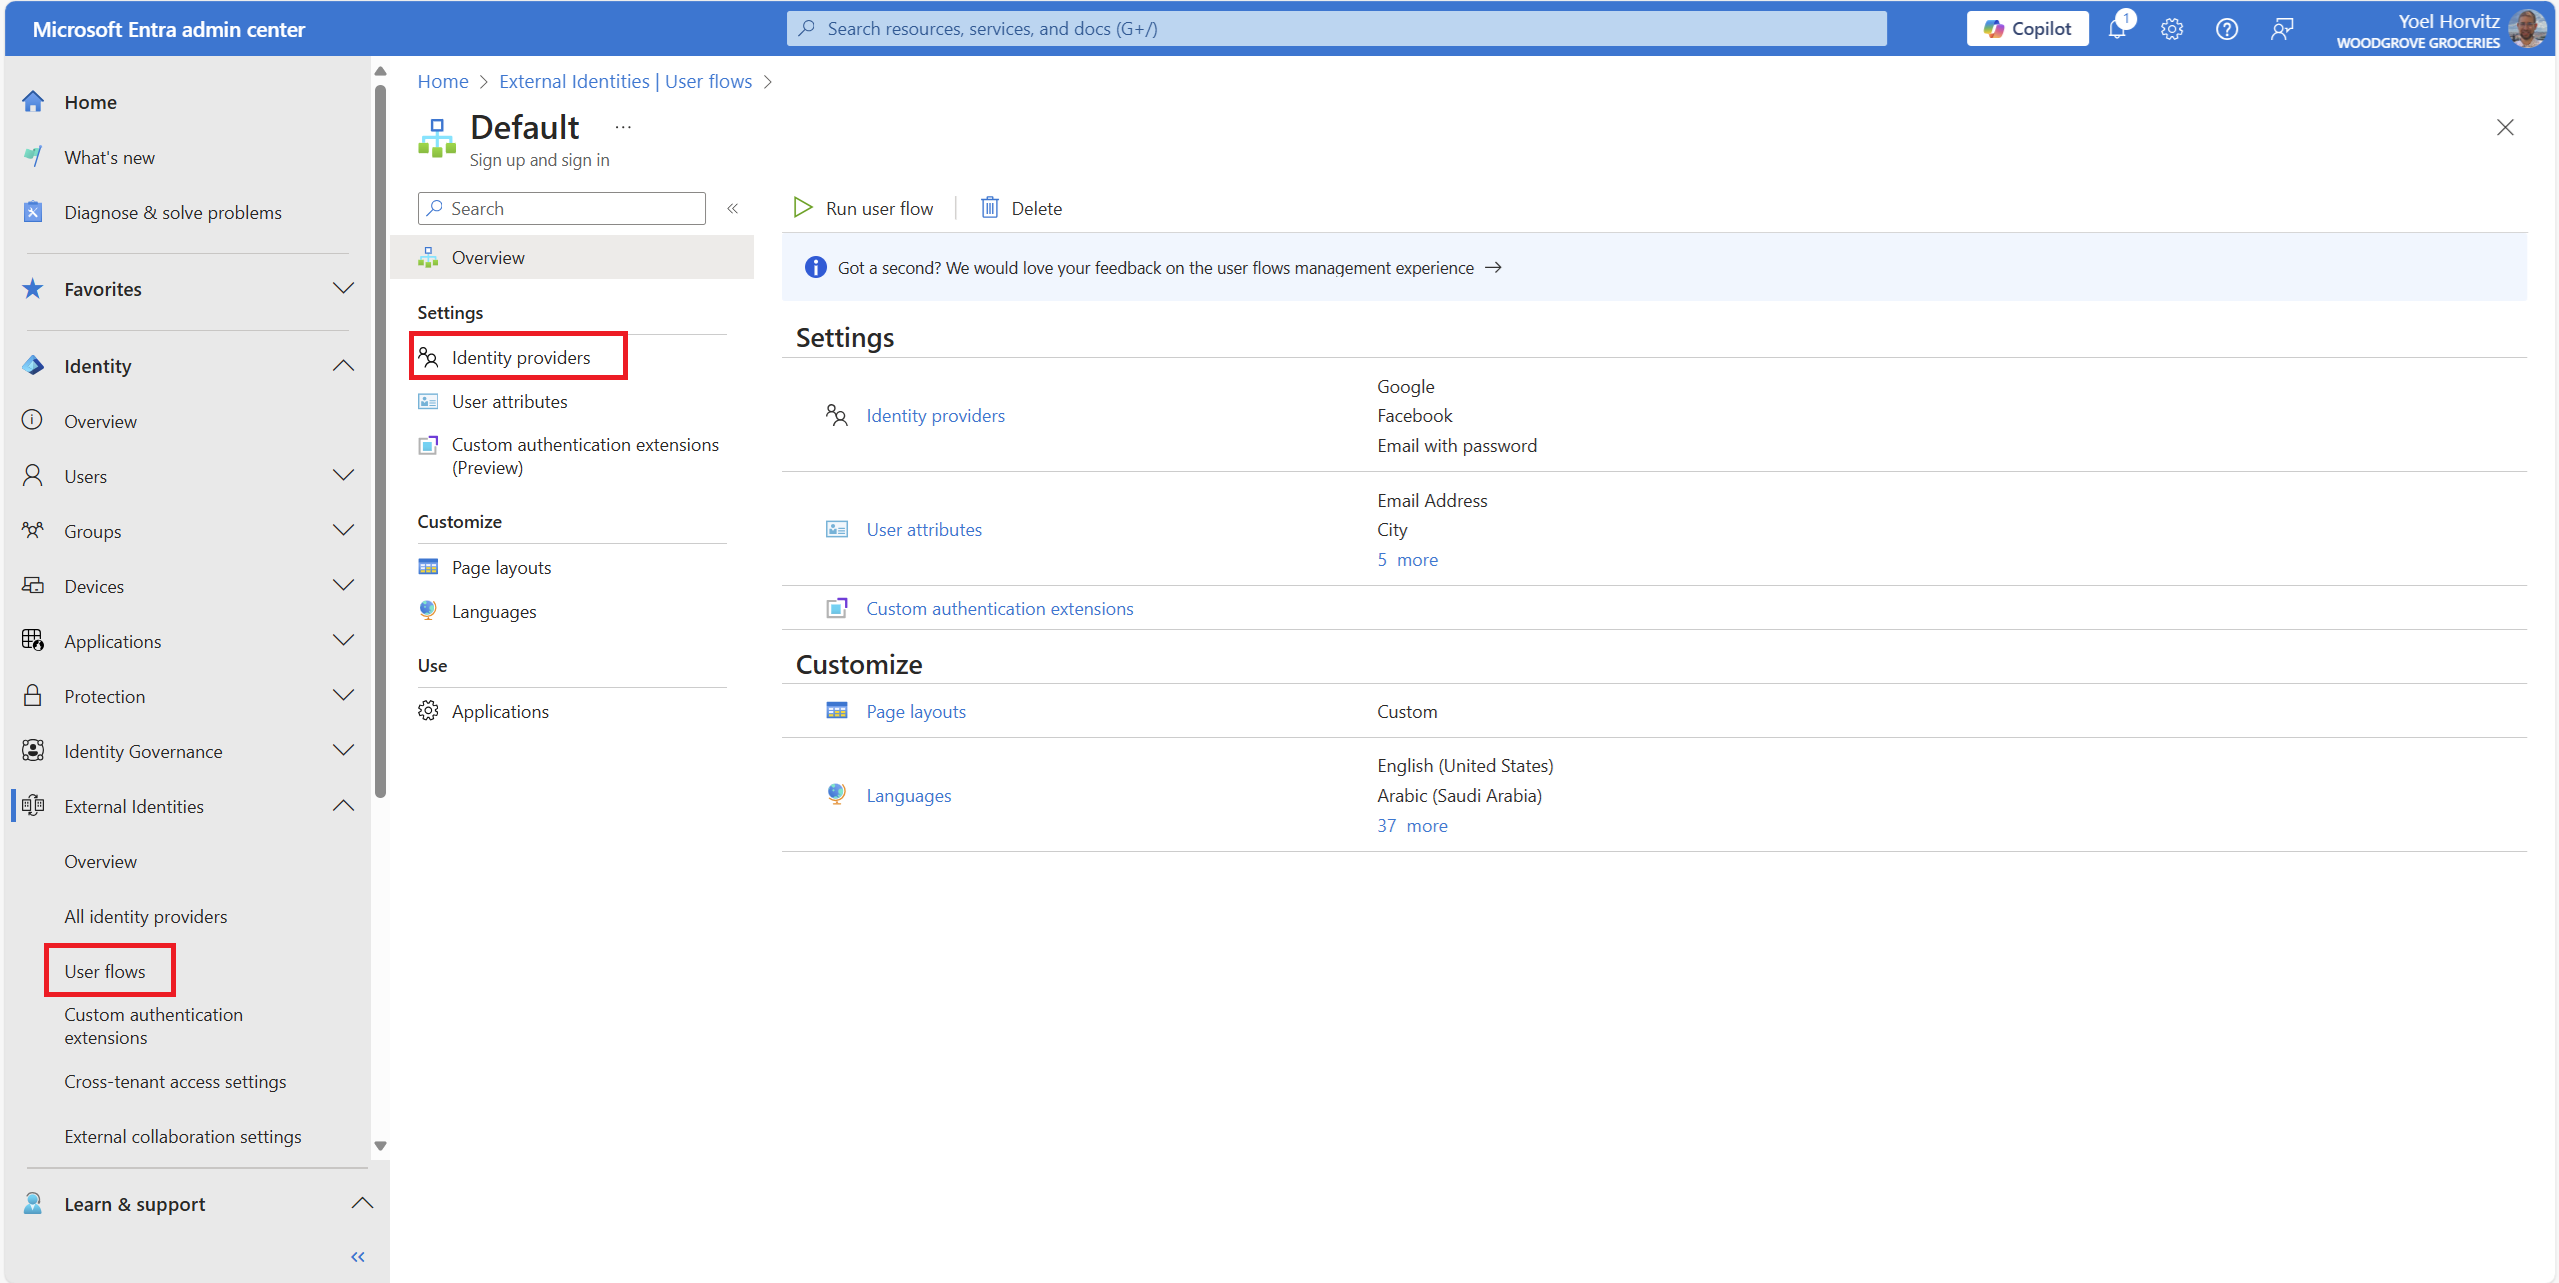
In your Microsoft Entra external ID tenant, navigate to External Identities and then User flows. Select the user flow where you wish to add the live.com identity provider. Then within the user flow, select the Identity providers link
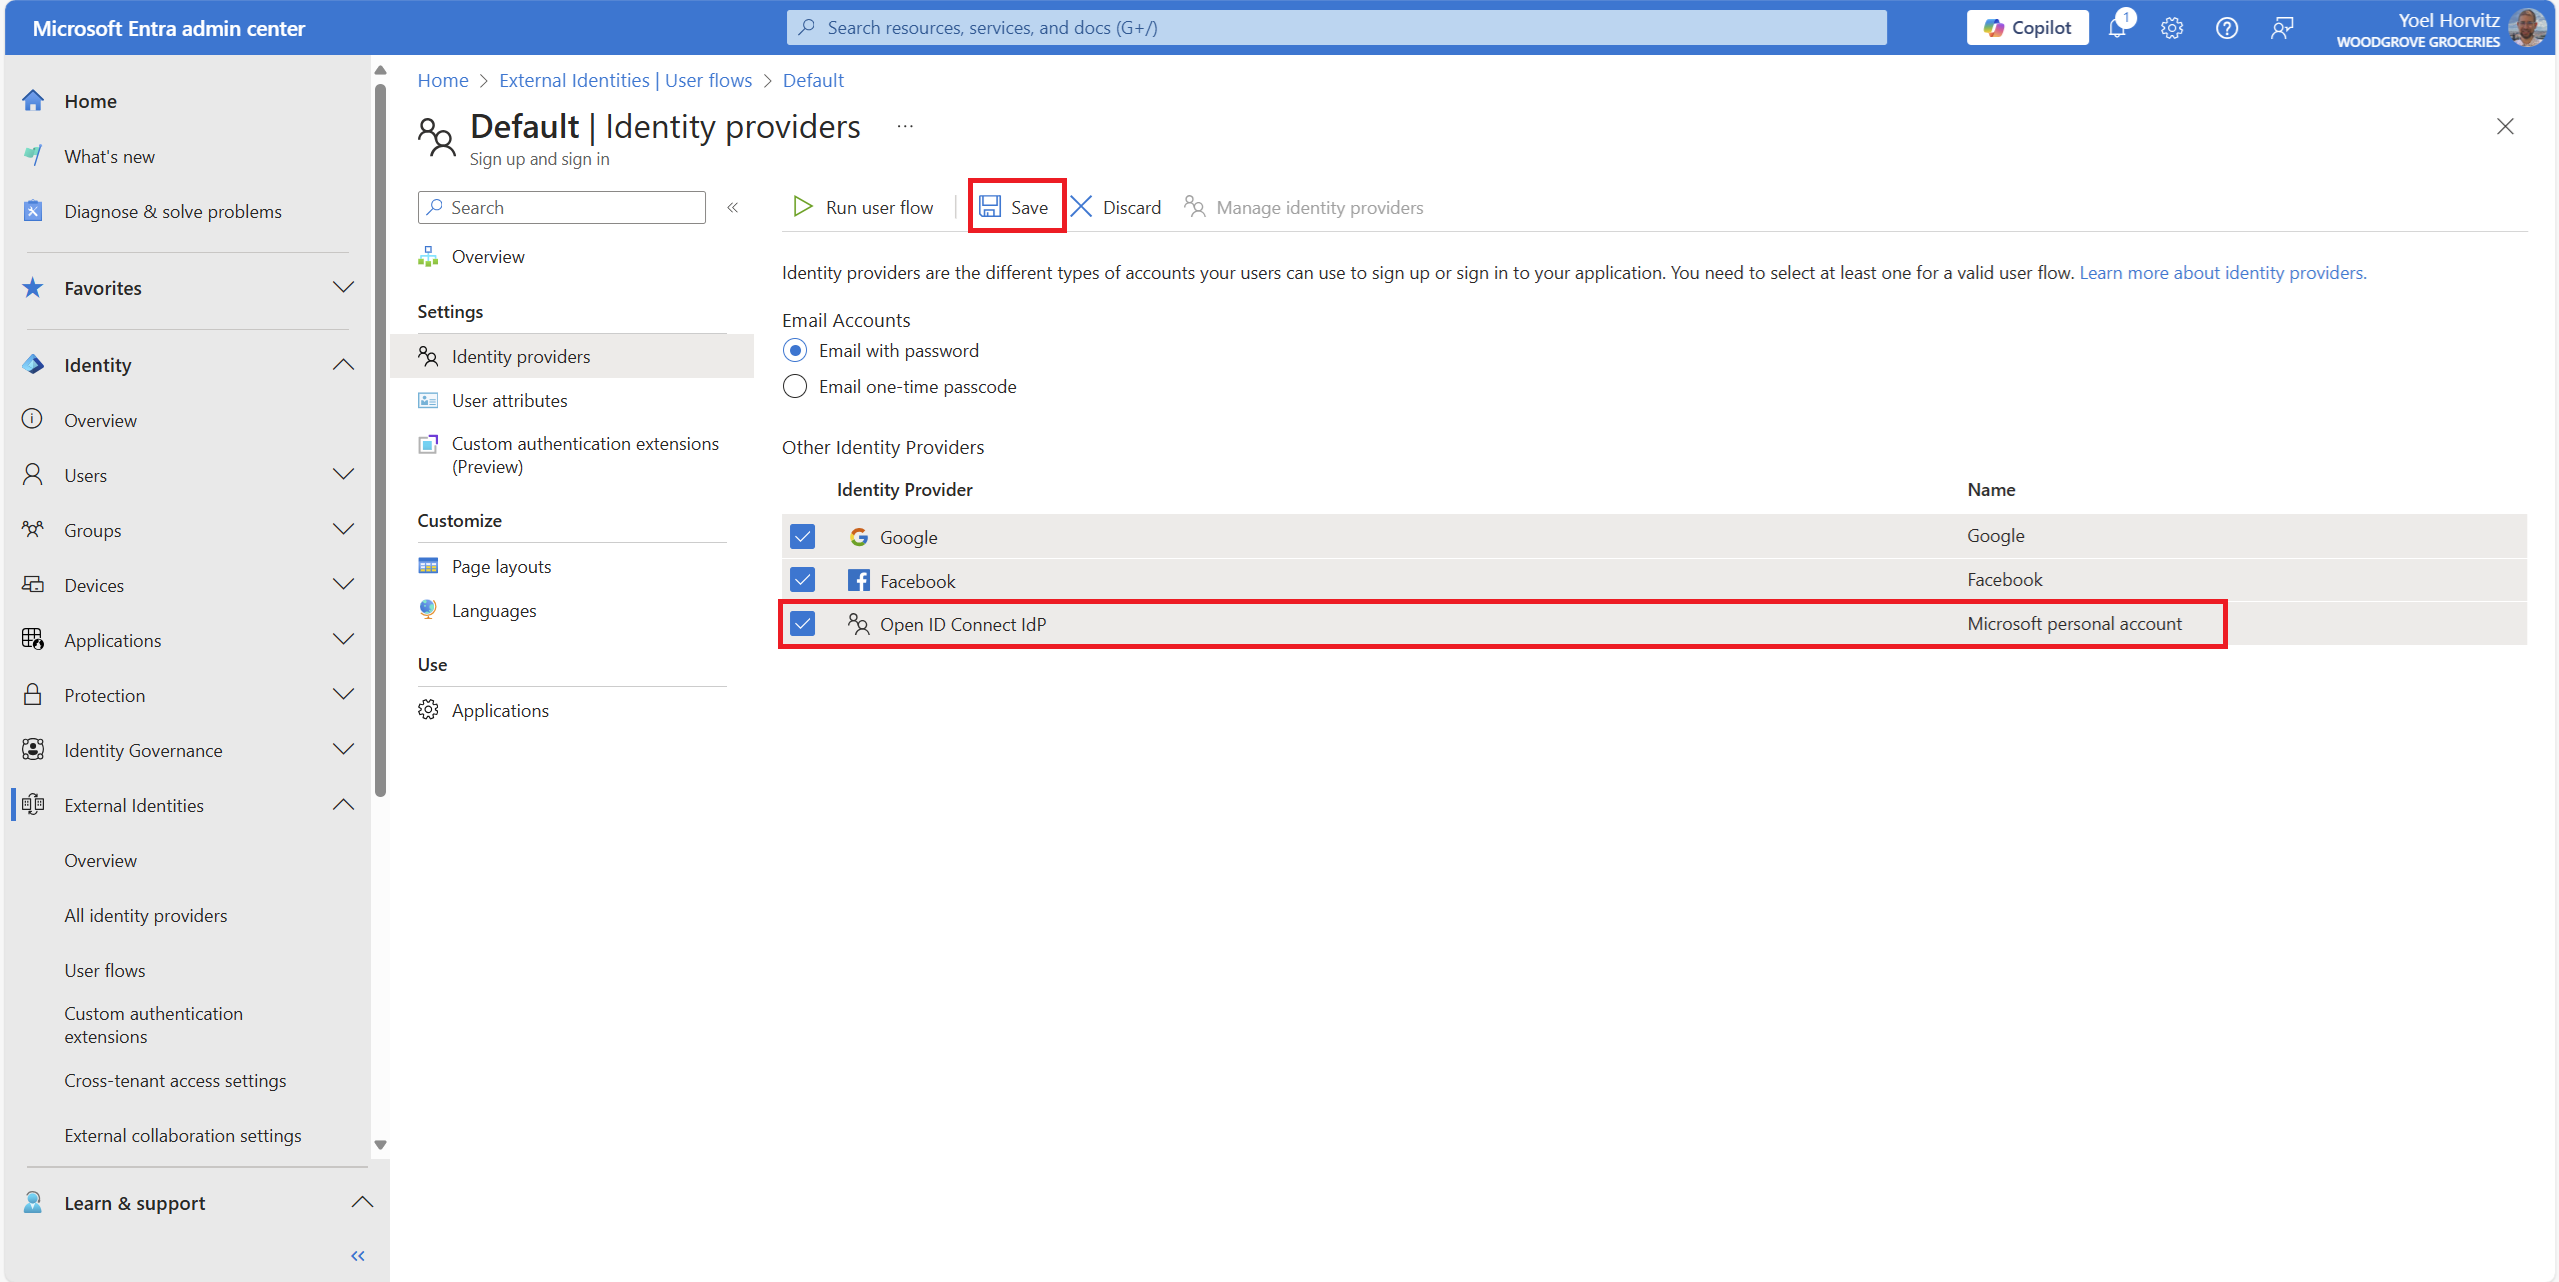
Under Other Identity Providers, select the Microsoft personal account (live.com). At the top of the pane, select Save.
Well done!
You successfully added the Microsoft personal account (live.com) identity provider to your tenant. Then you enabled the sign-in with Microsoft personal account in a user flow. To check the user experience, sign-in to your application and select sing-in with Microsoft personal account option.
Dependencies
- User flow
1. Register Microsoft personal accounts
To add Microsoft personal accounts as an identity provider, you first need to register an application with Supported account types of Personal Microsoft accounts in any of your tenant. Then, register the identity provider in your Microsoft Entra external ID tenant with the following Microsoft Graph.
- Replace the {MSA app ID} with the MSA application ID that you created earlier.
- Replace the {MSA app secret} with the MSA application secret that you recorded.
POST https://graph.microsoft.com/beta/identity/identityProviders
{
    "@odata.type": "#microsoft.graph.oidcIdentityProvider",
    "displayName": "Microsoft Personal account",
    "clientId": "{MSA app ID}",
    "issuer": "https://login.live.com",
    "wellKnownEndpoint": "https://login.microsoftonline.com/consumers/v2.0/.well-known/openid-configuration",
    "responseType": "code",
    "scope": "email profile openid",
    "clientAuthentication": {
        "@odata.type": "#microsoft.graph.oidcClientSecretAuthentication",
        "clientSecret": "{MSA app secret}"
    },
    "inboundClaimMapping": {
        "sub": "sub",
        "name": "name",
        "given_name": "given_name",
        "family_name": "family_name",
        "email": "email",
        "email_verified": "email_verified",
        "phone_number": "phone_number",
        "phone_number_verified": "phone_number_verified",
        "address": {
            "street_address": "street_address",
            "locality": "locality",
            "region": "region",
            "postal_code": "postal_code",
            "country": "country"
        }
    }
}
1.1 Copy the identity provider ID
From the response, copy the value of the identity provider id. For example:
{
    "@odata.context": "https://graph.microsoft.com/beta/$metadata#identity/identityProviders/$entity",
    "@odata.type": "#microsoft.graph.oidcIdentityProvider",
    "id": "11111111-0000-0000-0000-000000000000",
    "displayName": "Microsoft Personal account",
    "supportedTenantTypes": "externalId",
}
1.2 Add MSA identity provider to a user flow
After you register the MSA identity provider to your Microsoft Entra external ID tenant, you can add it to your user flow. In the following Microsoft Graph, replace:
- {user-flow-ID} with your user flow ID.
- {identity-provider-ID} with the ID of the identity provider you copied earlier.
POST https://graph.microsoft.com/beta/identity/authenticationEventsFlows/{user-flow-ID}/microsoft.graph.externalUsersSelfServiceSignUpEventsFlow/onAuthenticationMethodLoadStart/microsoft.graph.onAuthenticationMethodLoadStartExternalUsersSelfServiceSignUp/identityProviders/$ref
{
    "@odata.id": "https://graph.microsoft.com/beta/identity/identityProviders/{identity-provider-ID}"
}
POST https://graph.microsoft.com/beta/identity/authenticationEventsFlows/12345678-0000-0000-0000-000000000000/microsoft.graph.externalUsersSelfServiceSignUpEventsFlow/onAuthenticationMethodLoadStart/microsoft.graph.onAuthenticationMethodLoadStartExternalUsersSelfServiceSignUp/identityProviders/$ref
{
    "@odata.id": "https://graph.microsoft.com/beta/identityProviders/11111111-0000-0000-0000-000000000000"
}