OAuth 2.0 On-Behalf-Of flow
This demo shows:
- How the Woodgrove Groceries makes authenticated requests to a Account web API.
- And how the Account web API makes authenticated requests to a downstream Payment web API. To call the Payment web API, the Account web API acquires an access token for the Payment web API (audience or aud claim) and another set of scopes (permissions) that require by the Payment web API.
Prerequisites
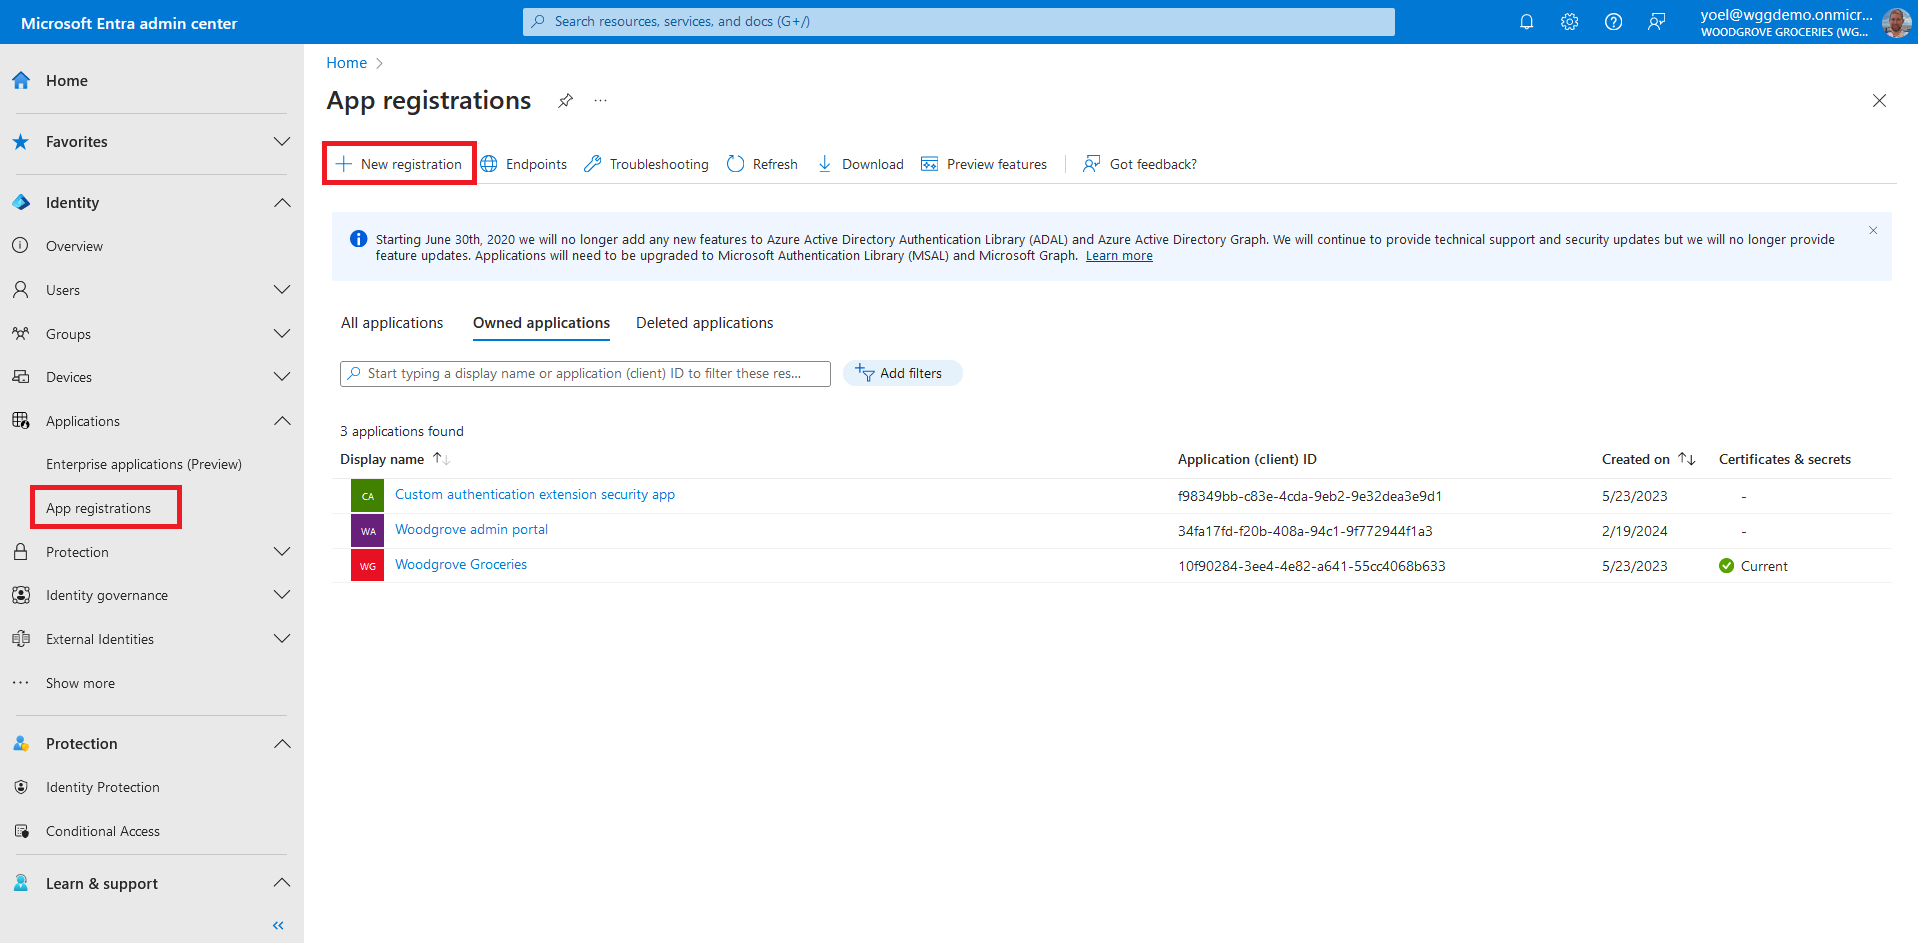
Before you start make sure you have configured the following:To register your API application, sign in to the Microsoft Entra admin center and browse to Applications > App registrations. Then, select + New registration.
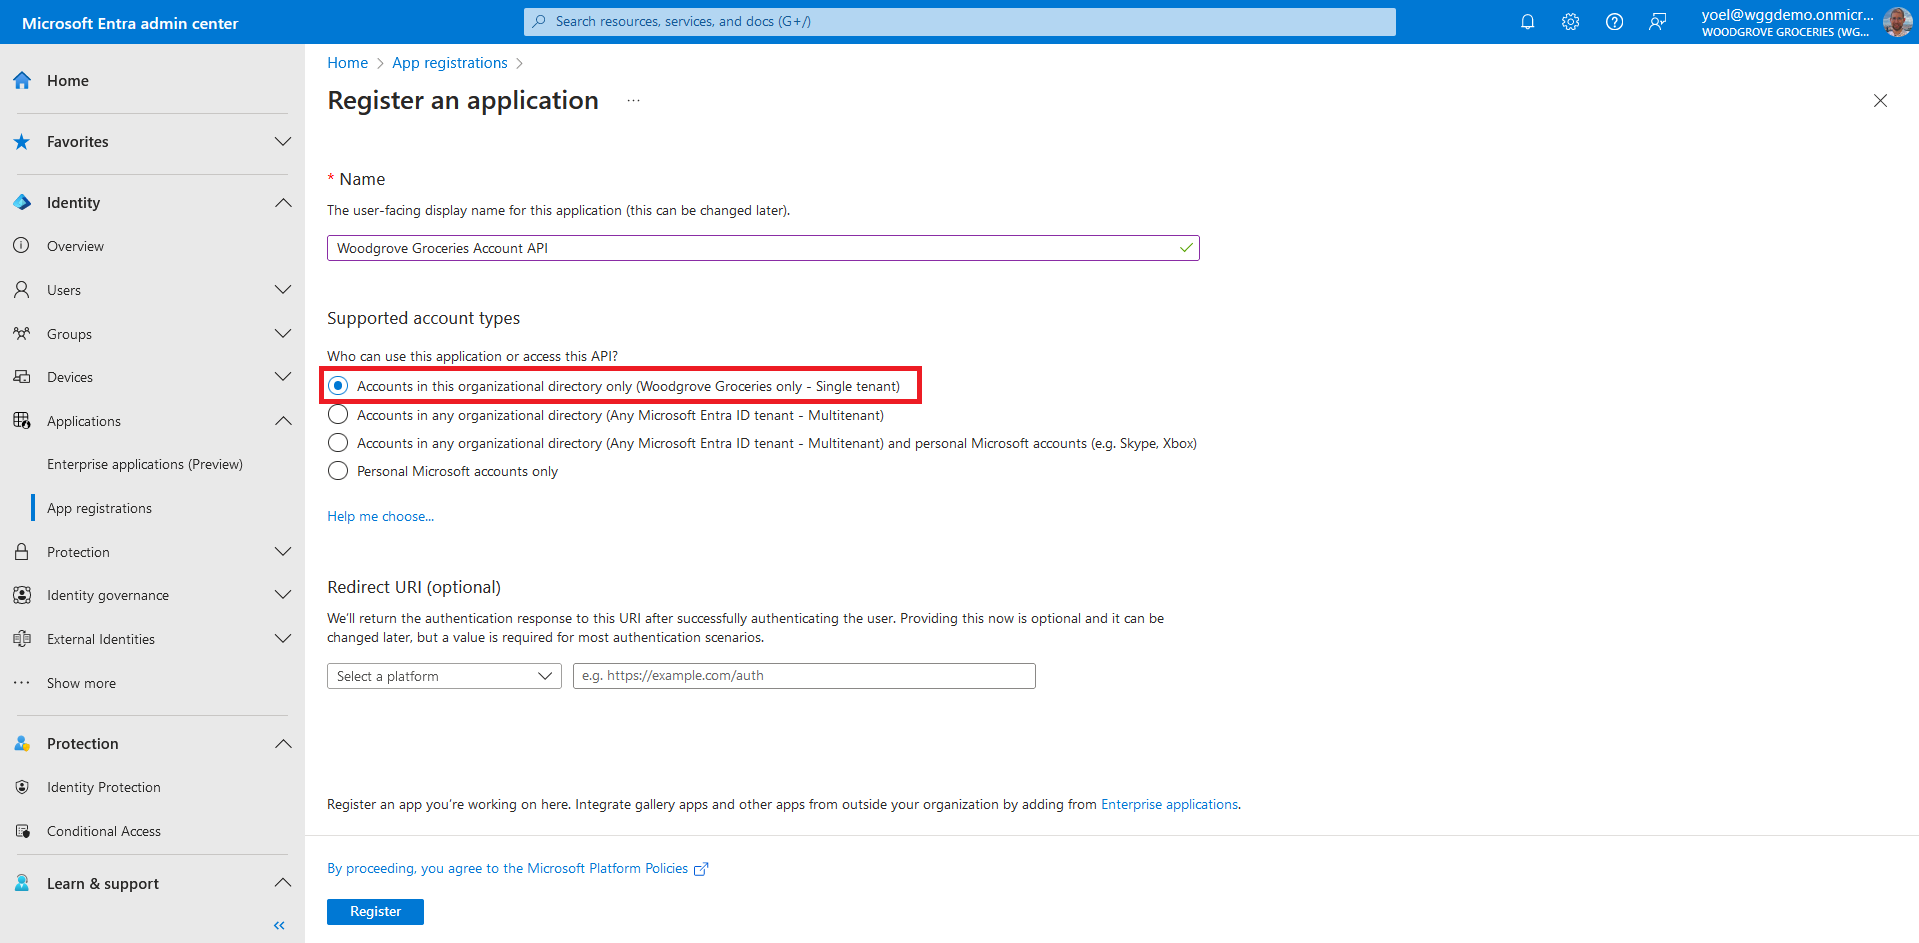
In the Register an application page that appears, enter a meaningful application Name that is displayed to users of the app, for example Woodgrove Groceries Account API. Under Supported account types, select Accounts in this organizational directory only. Then, select Register
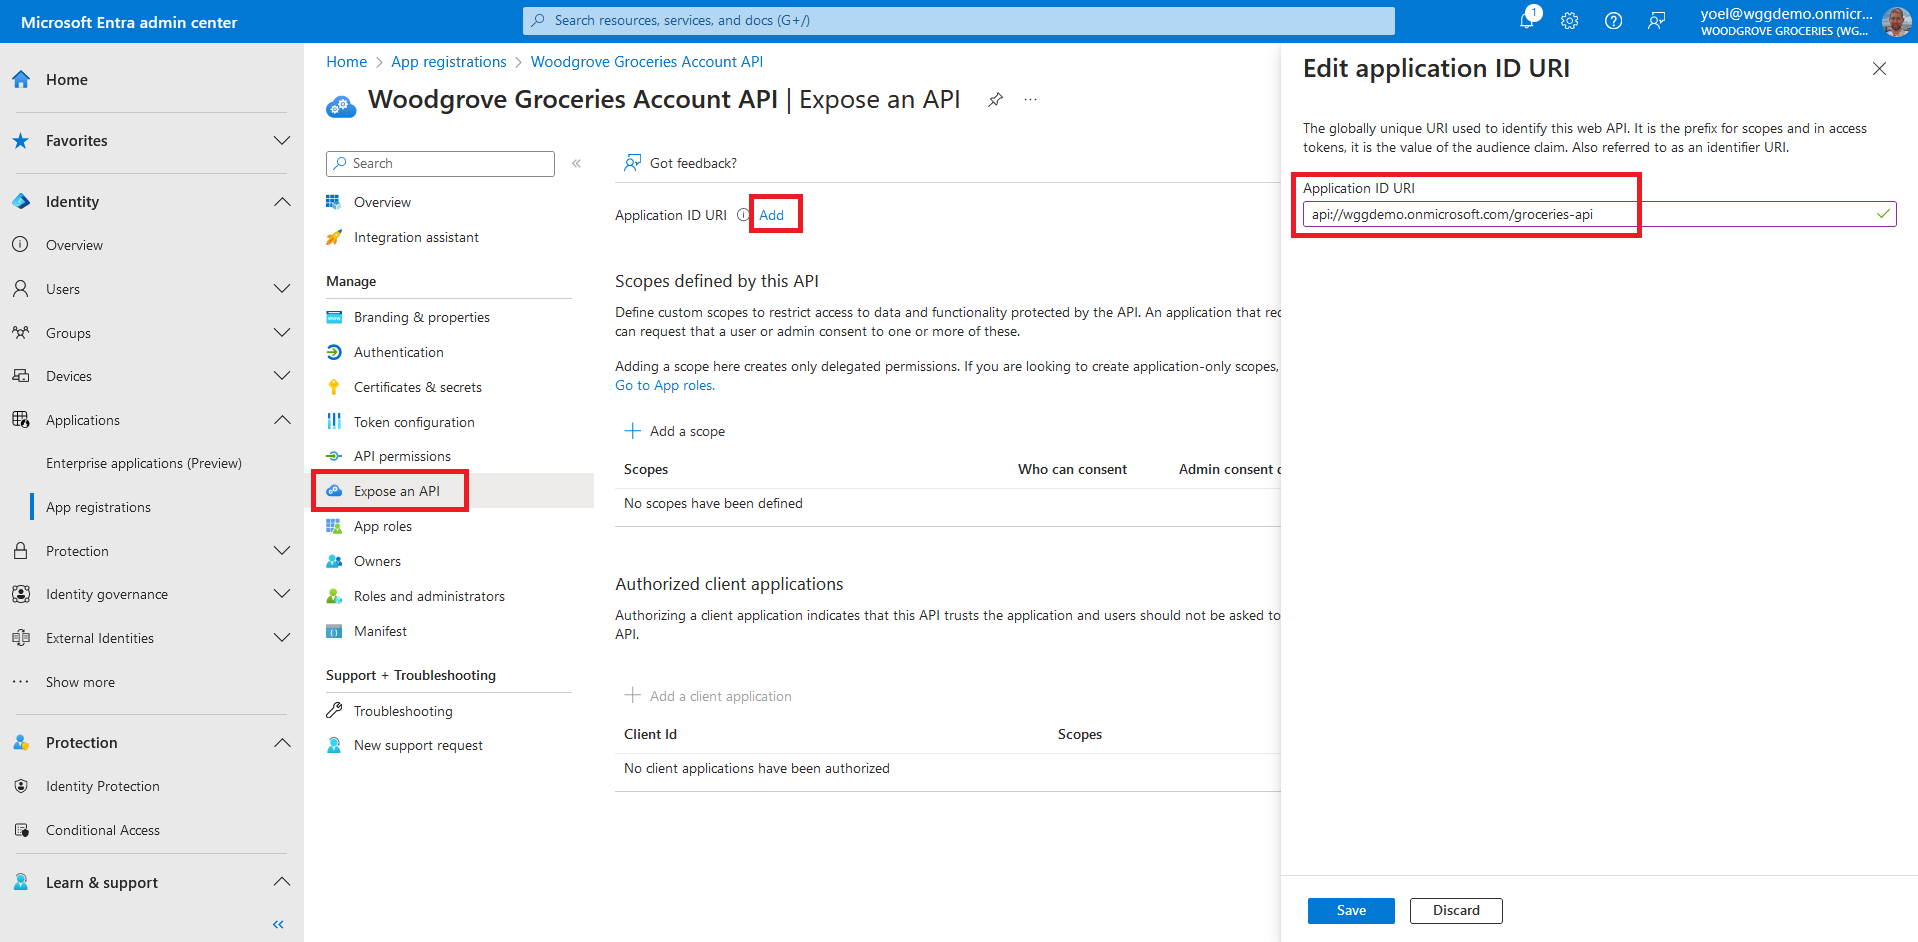
An API needs to publish a minimum of one scope, also called Delegated Permission, for the client apps to obtain an access token for a user successfully. To publish a scope, under Manage, select Expose an API. At the top of the page, next to Application ID URI, select the Add link to generate a URI that is unique for this app.
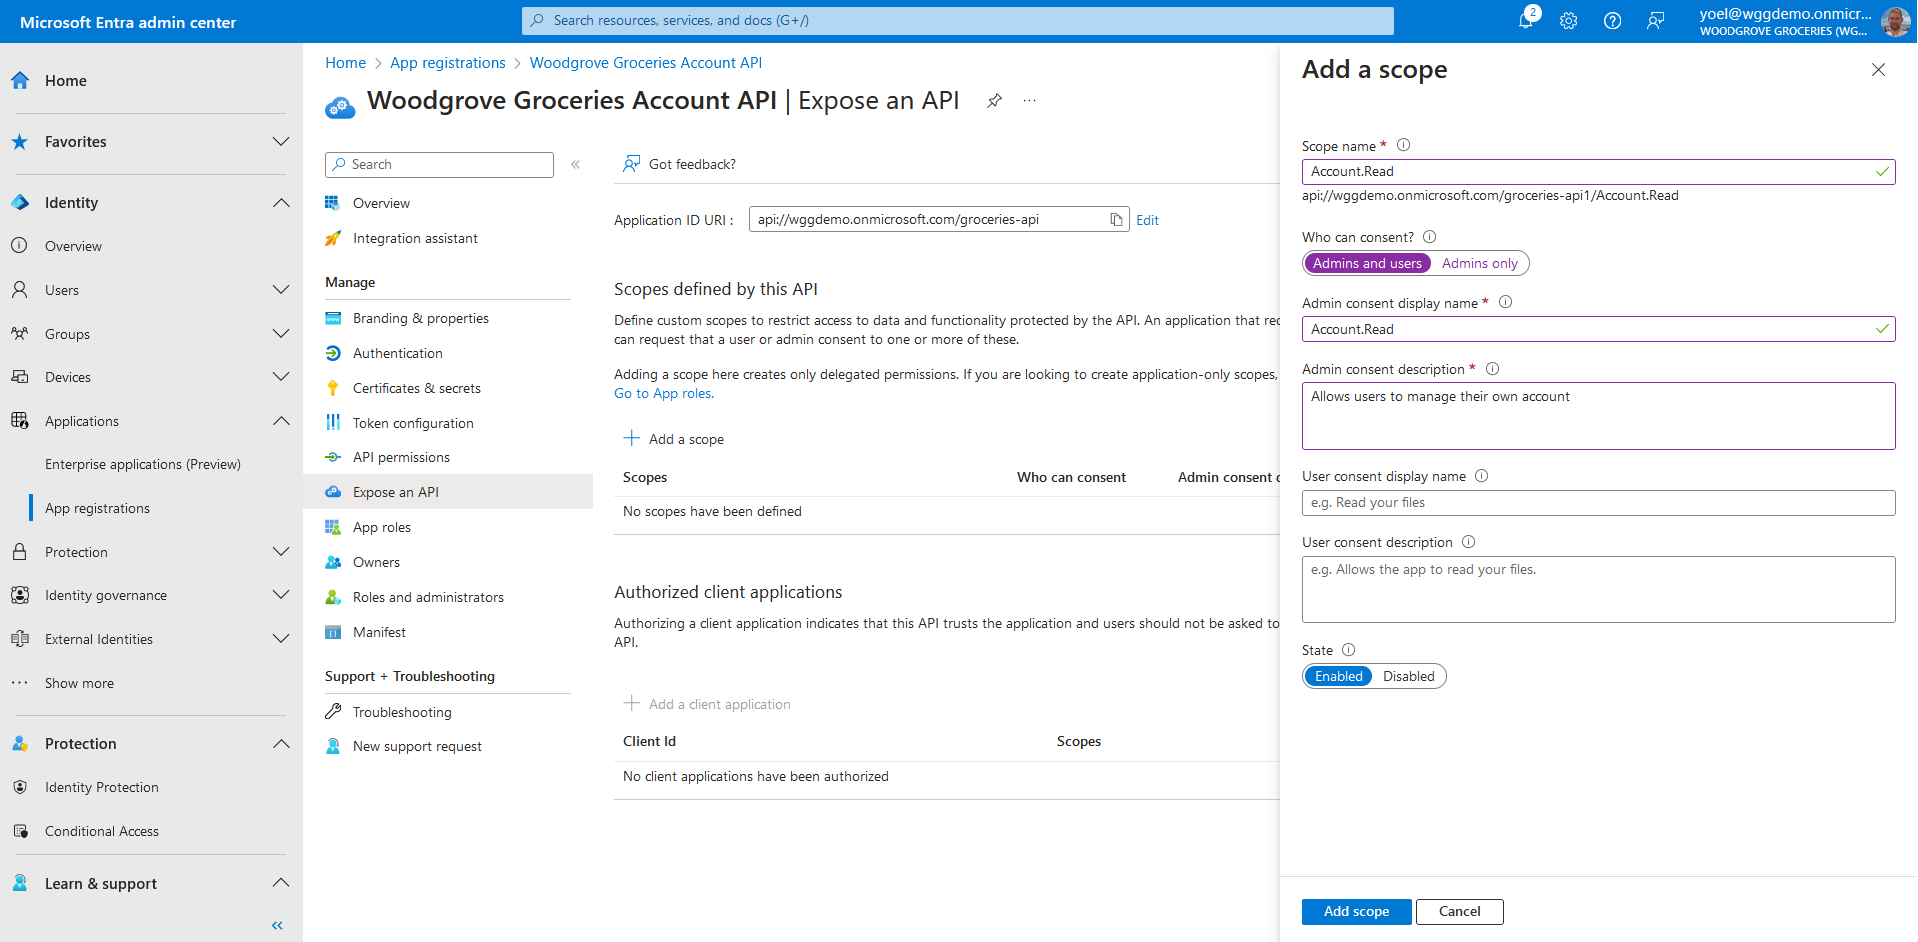
Under Scopes defined by this API, select Add a scope. Enter the following values that define a read account access to the API.
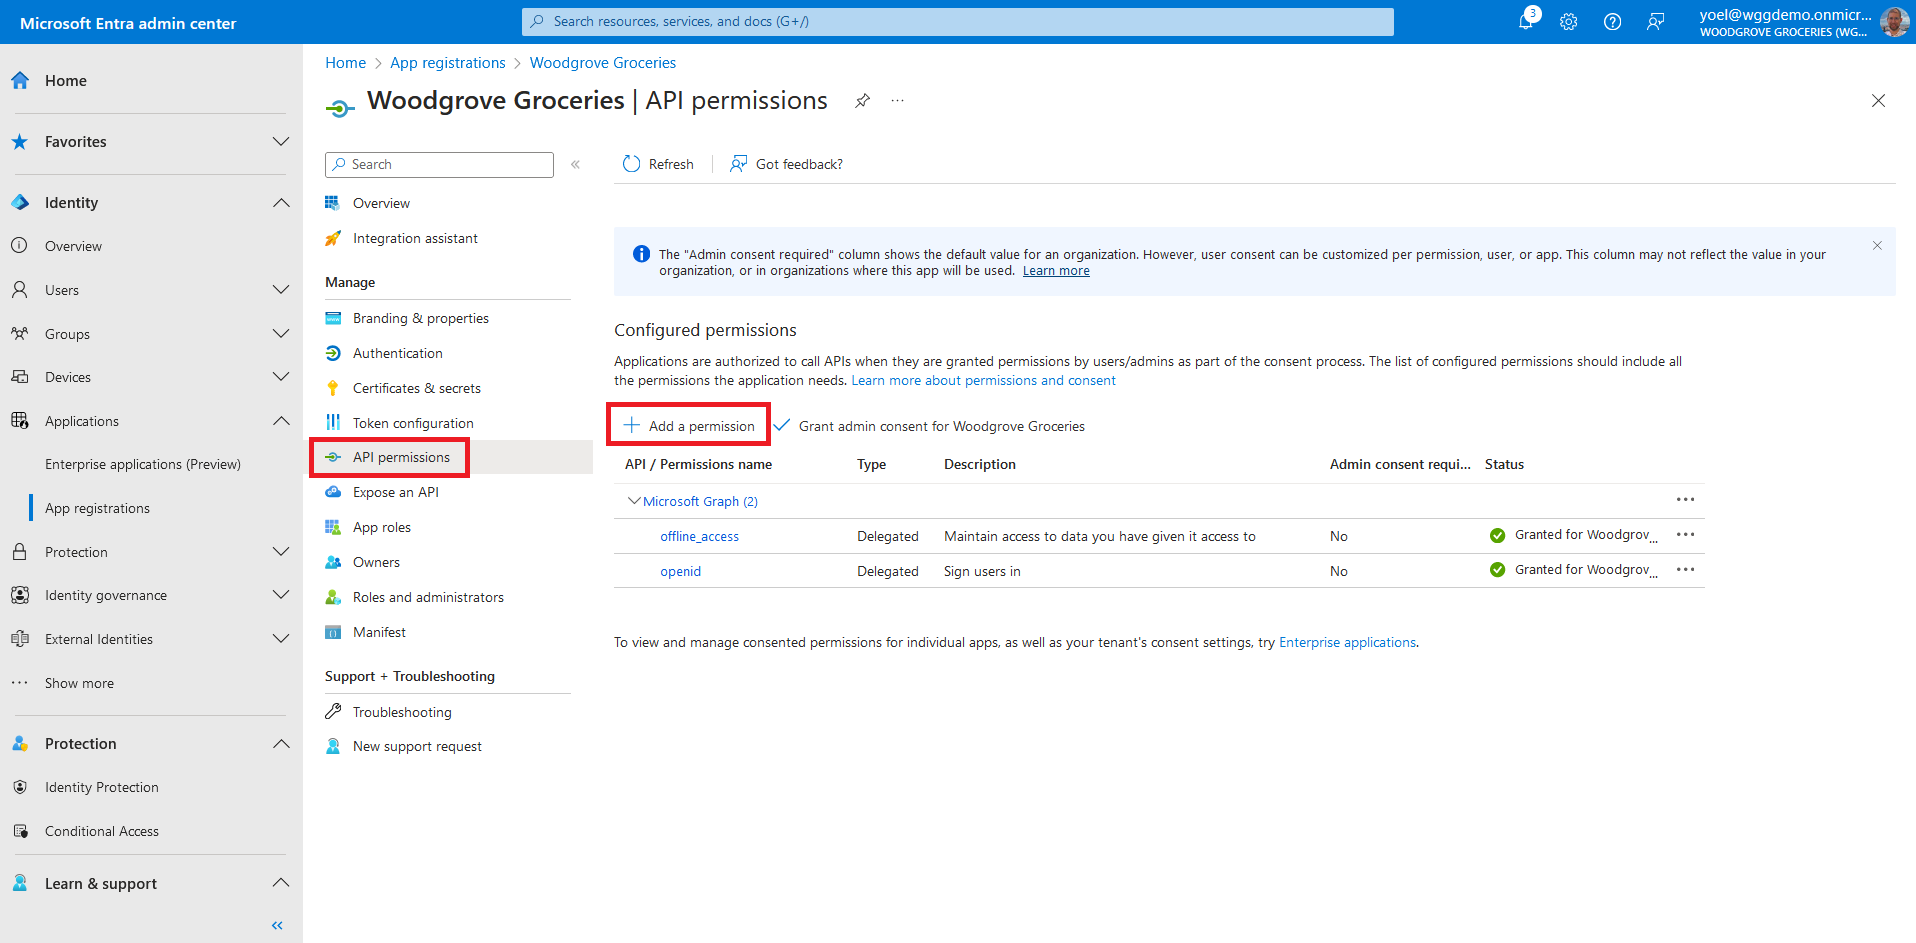
After you added the API scopes to your web API application registration, go to your web or mobile application. In this example, we select the Woodgrove Groceries web app. From the menu, select API permissions, and select Add a permission
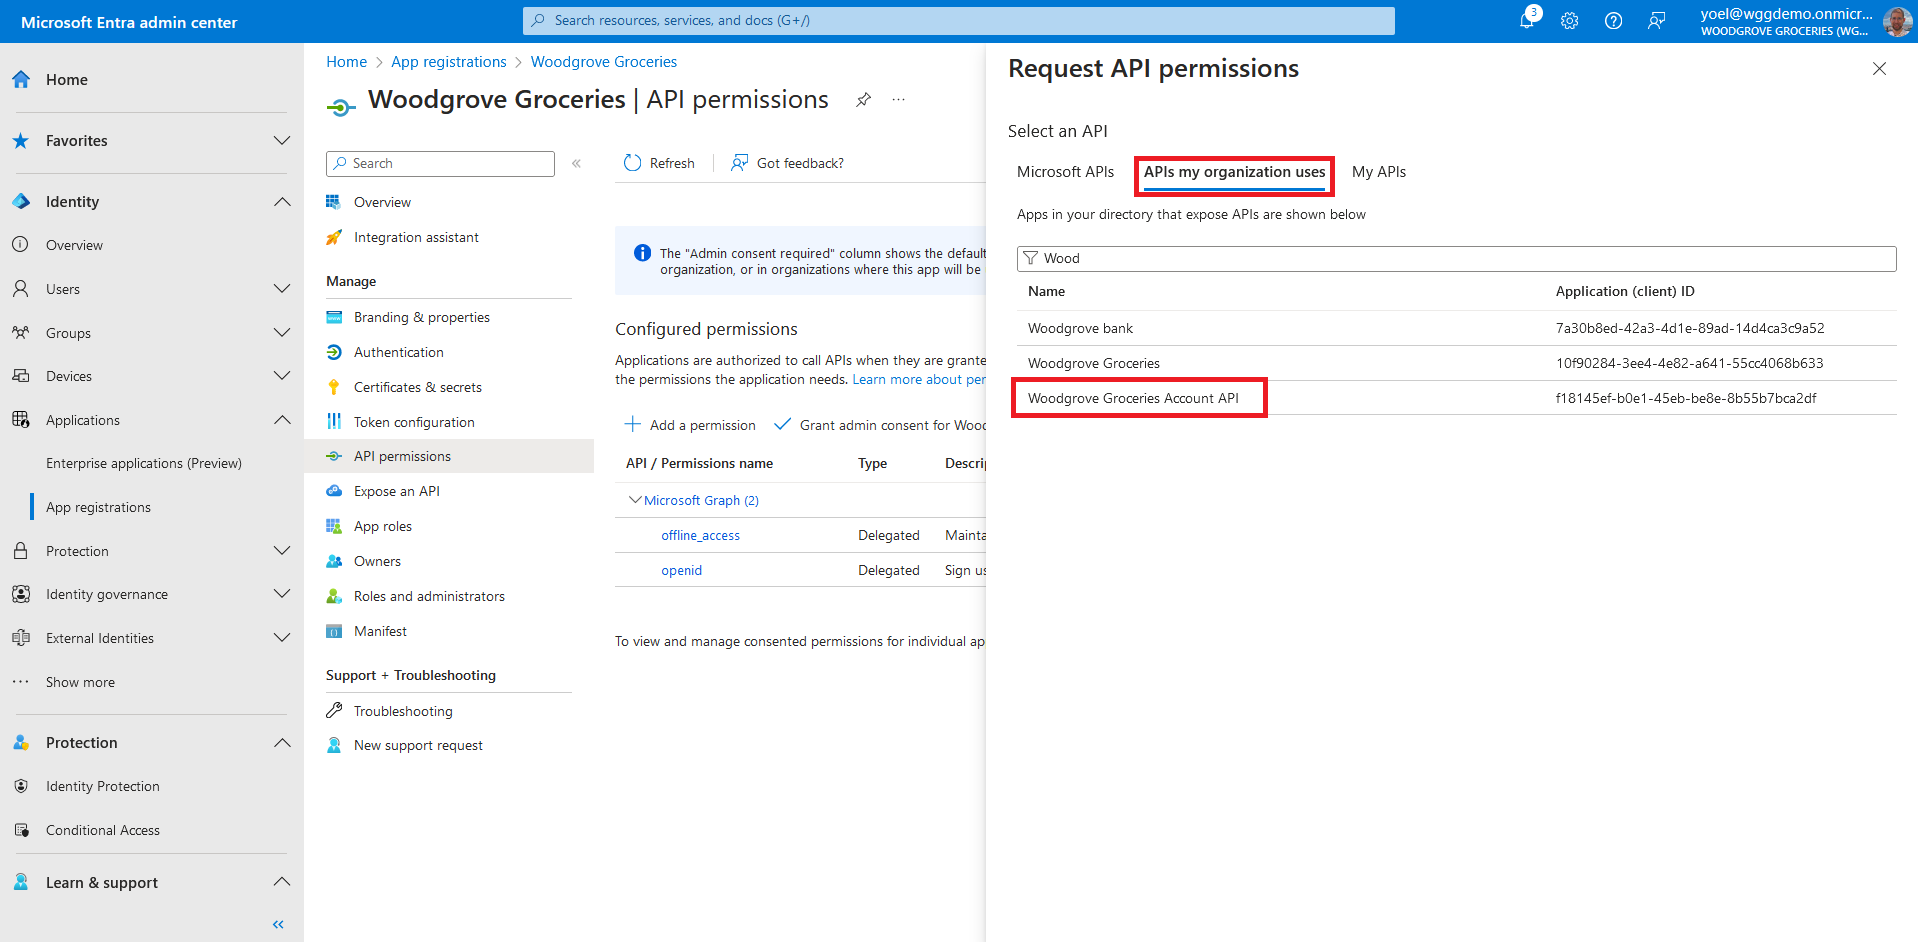
Select APIs my organization uses, then select the web API application registration you created.
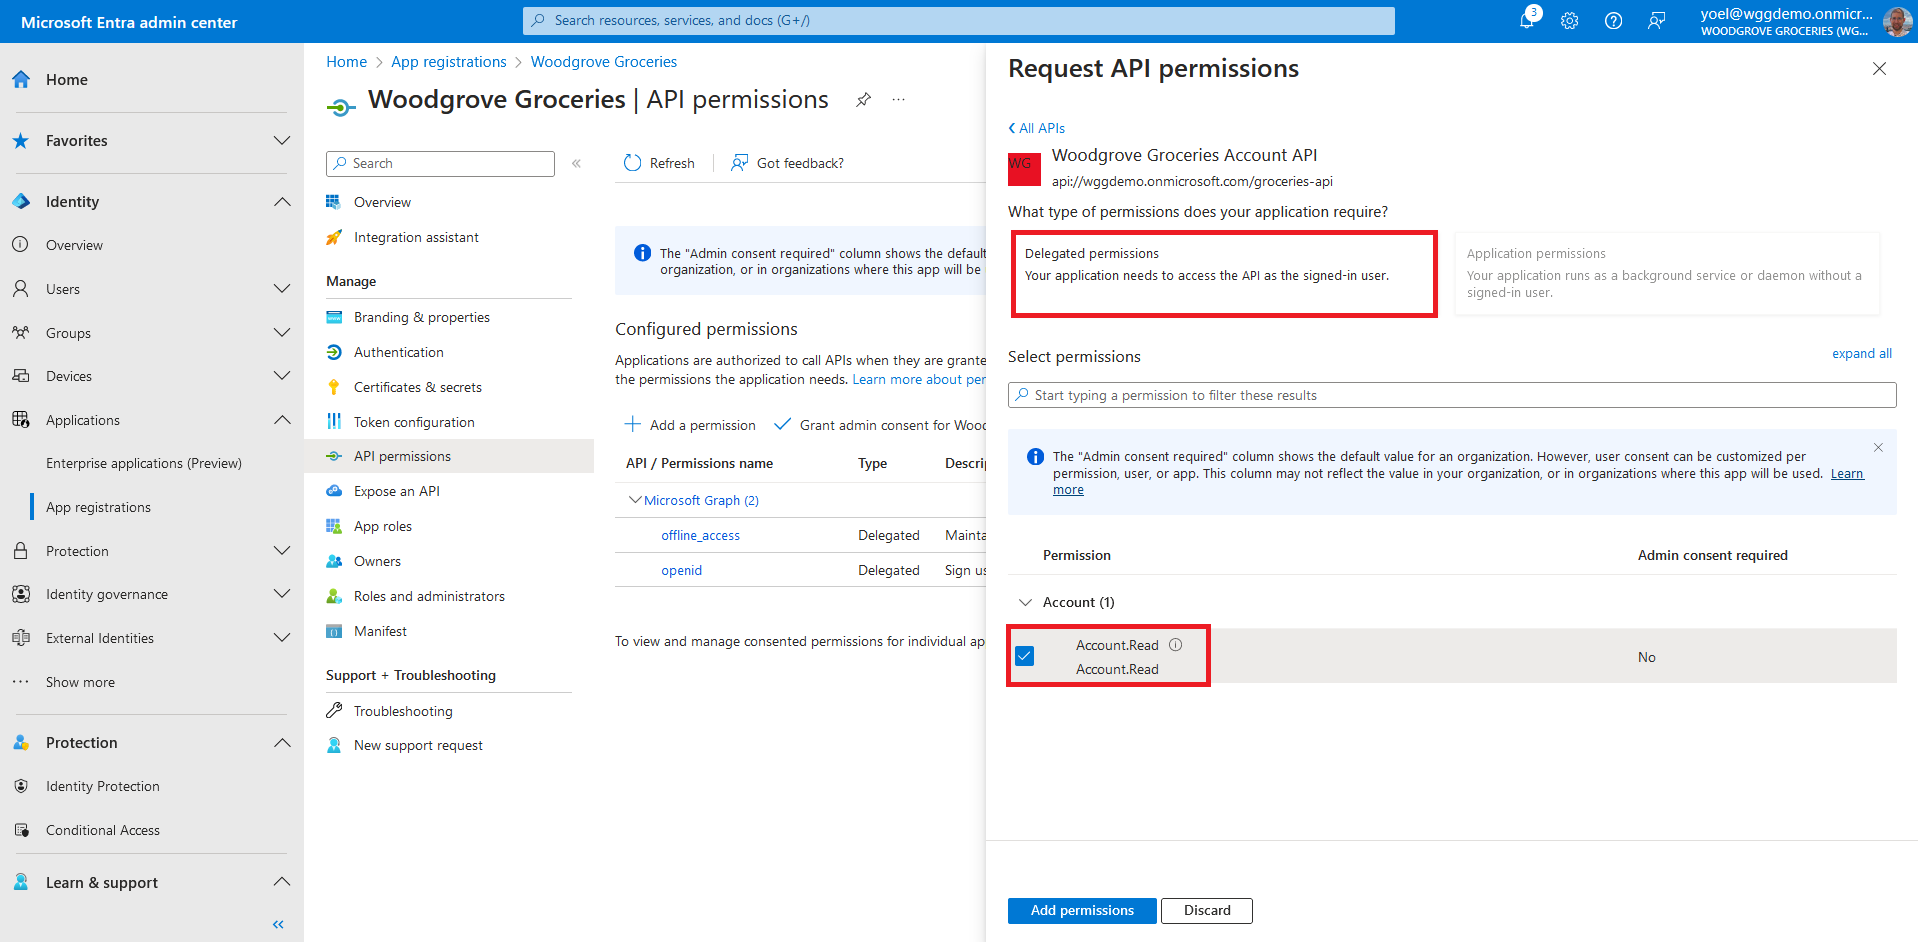
Select Delegated permission, then select the permission you created.
Well done!
Now your application is ready to use.
If your application needs to call a downstream web API (Payment web API). Repeat the process:
- Register the downstream web API (Payment web API).
- Add application ID URI, and add the scopes of the downstream API.
- This time go to the first API (Account web API, not your web or mobile app) and grant permissions to the downstream API (Payment web API).
Dependencies
- Web or mobile app registration
Register a web API
To register a web APIs, use the following Microsoft Graph. Replace the displayName with your app displayed name. For example, Woodgrove Groceries Account API.
POST https://graph.microsoft.com/v1.0/applications
{
    "displayName": "Woodgrove Groceries Account API",
    "description": "Woodgrove Groceries Account REST API",
    "identifierUris": [
        "api://woodgrovelive.onmicrosoft.com/groceries-api1"
    ],
    "signInAudience": "AzureADMyOrg",
    "api": {
        "acceptMappedClaims": true,
        "requestedAccessTokenVersion": 2
    },
    "appRoles": [],
    "parentalControlSettings": {
        "countriesBlockedForMinors": [],
        "legalAgeGroupRule": "Allow"
    },
    "requiredResourceAccess": [
        {
            "resourceAppId": "00000003-0000-0000-c000-000000000000",
            "resourceAccess": [
                {
                    "id": "e1fe6dd8-ba31-4d61-89e7-88639da4683d",
                    "type": "Scope"
                }
            ]
        }
    ]
}
Create a service principal for your application
After you registered your web API, create a service principal. The following Microsoft Graph creates a service principal. Replace the {app-ID} with the app ID from the previous call (not the object ID).
POST https://graph.microsoft.com/v1.0/servicePrincipals
{
    "appId": "{app-ID}"
}
Add application scope
To add the scopes to the web API, you need to update your application registration. Replace the {app-ID} with the app ID from the previous call (not the object ID).
PATCH https://graph.microsoft.com/v1.0/applications(appId='{app-Id}')
{
    "api": {
        "acceptMappedClaims": true,
        "requestedAccessTokenVersion": 2,
        "oauth2PermissionScopes": [
            {
                "adminConsentDescription": "Allows users to manage their own account",
                "adminConsentDisplayName": "Account.Read",
                "isEnabled": true,
                "type": "User",
                "userConsentDescription": null,
                "userConsentDisplayName": null,
                "value": "Account.Read"
            }
        ],
        "preAuthorizedApplications": []
    }
}
Add permission to your web or mobile application
To grant the web or mobile application with permissions to the web API, update your application registration.
Replace the following placehoders:
- {app-ID} with the app ID (not the object ID) of your web or mobile application.
- {web-api-app-id} with the application ID of the web API you created in the previous step (Woodgrove Groceries Account API).
- {web-api-scope-id} with the scope you created. You can get the ID from the application manifest using GET https://graph.microsoft.com/v1.0/applications(appId='{app-Id}') query.
PATCH https://graph.microsoft.com/v1.0/applications(appId='{app-Id}')
{
    "requiredResourceAccess": [
        {
            "resourceAppId": "{web-api-app-id}",
            "resourceAccess": [
                {
                    "id": "{web-api-scope-id}",
                    "type": "Scope"
                }
            ]
        },
        {
            "resourceAppId": "00000003-0000-0000-c000-000000000000",
            "resourceAccess": [
                {
                    "id": "7427e0e9-2fba-42fe-b0c0-848c9e6a8182",
                    "type": "Scope"
                },
                {
                    "id": "37f7f235-527c-4136-accd-4a02d197296e",
                    "type": "Scope"
                },
                {
                    "id": "e1fe6dd8-ba31-4d61-89e7-88639da4683d",
                    "type": "Scope"
                }
            ]
        }
    ]
}
Consent to the required permissions
Since the tenant is a customer's tenant, the consumer users themselves can't consent to these permissions. You as the admin must consent to these permissions on behalf of all the users in the tenant. Replace the following placehoders:
- {service-principal-id} with the service-principal ID of your web or mobile application .
- {web-api-service-principal-id}} with the service-principal ID of the web API you created in the previous step (Woodgrove Groceries Account API).
POST https://graph.microsoft.com/v1.0/oauth2PermissionGrants
{
    "clientId": "{service-principal-id}",
    "consentType": "AllPrincipals",
    "resourceId": "{web-api-service-principal-id}",
    "scope": "Account.Read"
}