Add claims to security tokens from a REST API
When a user authenticates to an application, a custom claims provider can be used to add claims into the token. A custom claims provider is made up of a custom authentication extension that calls an external REST API to fetch claims from external systems. In this demo shows how you can add custom claims from Woodgrove REST API into security tokens. Including the loyaltyNumber, loyaltySince, and loyaltyTier claims. These claims return by a custom authentication extension REST API with some random values.
Prerequisites
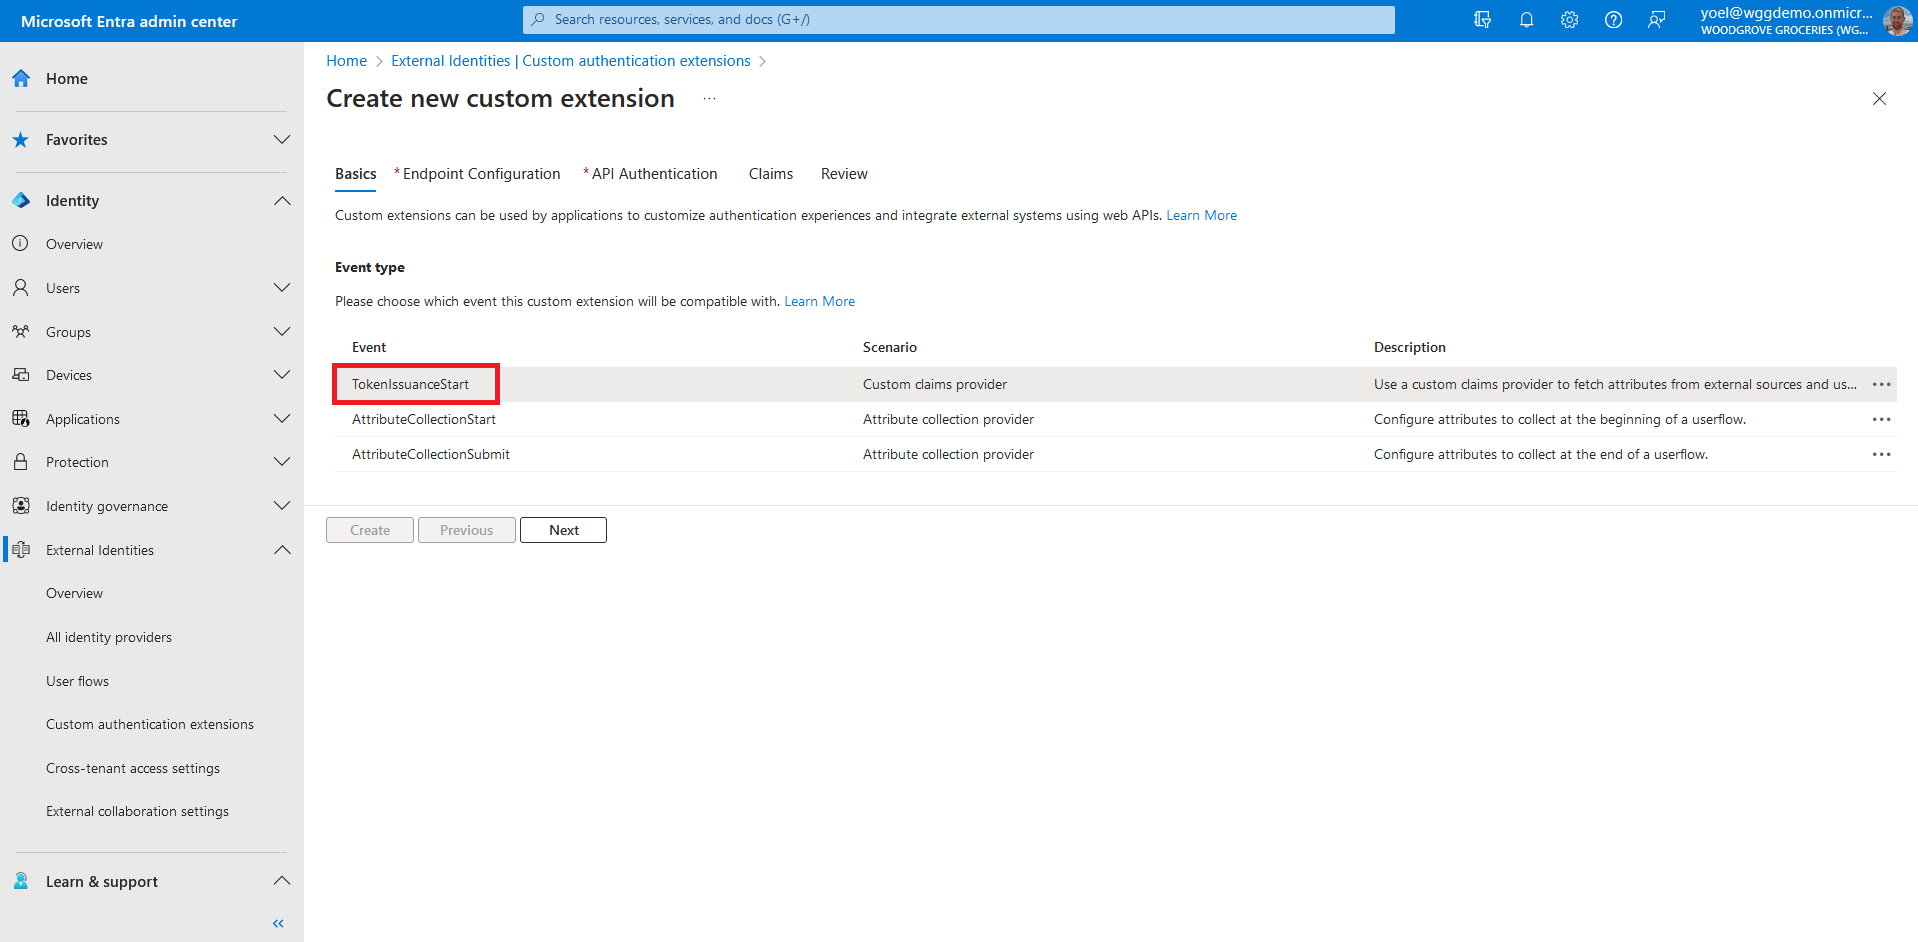
Before you start make sure you have configured the following:To add a custom authentication extension, sign in to the Microsoft Entra admin center and browse to External Identities > Custom authentication extensions . Note, you can also browse to Applications > Enterprise applications > Custom authentication extensions . From the Custom authentication extensions page, select Create a custom extension.

In Basics, select the TokenIssuanceStart event type and select Next.
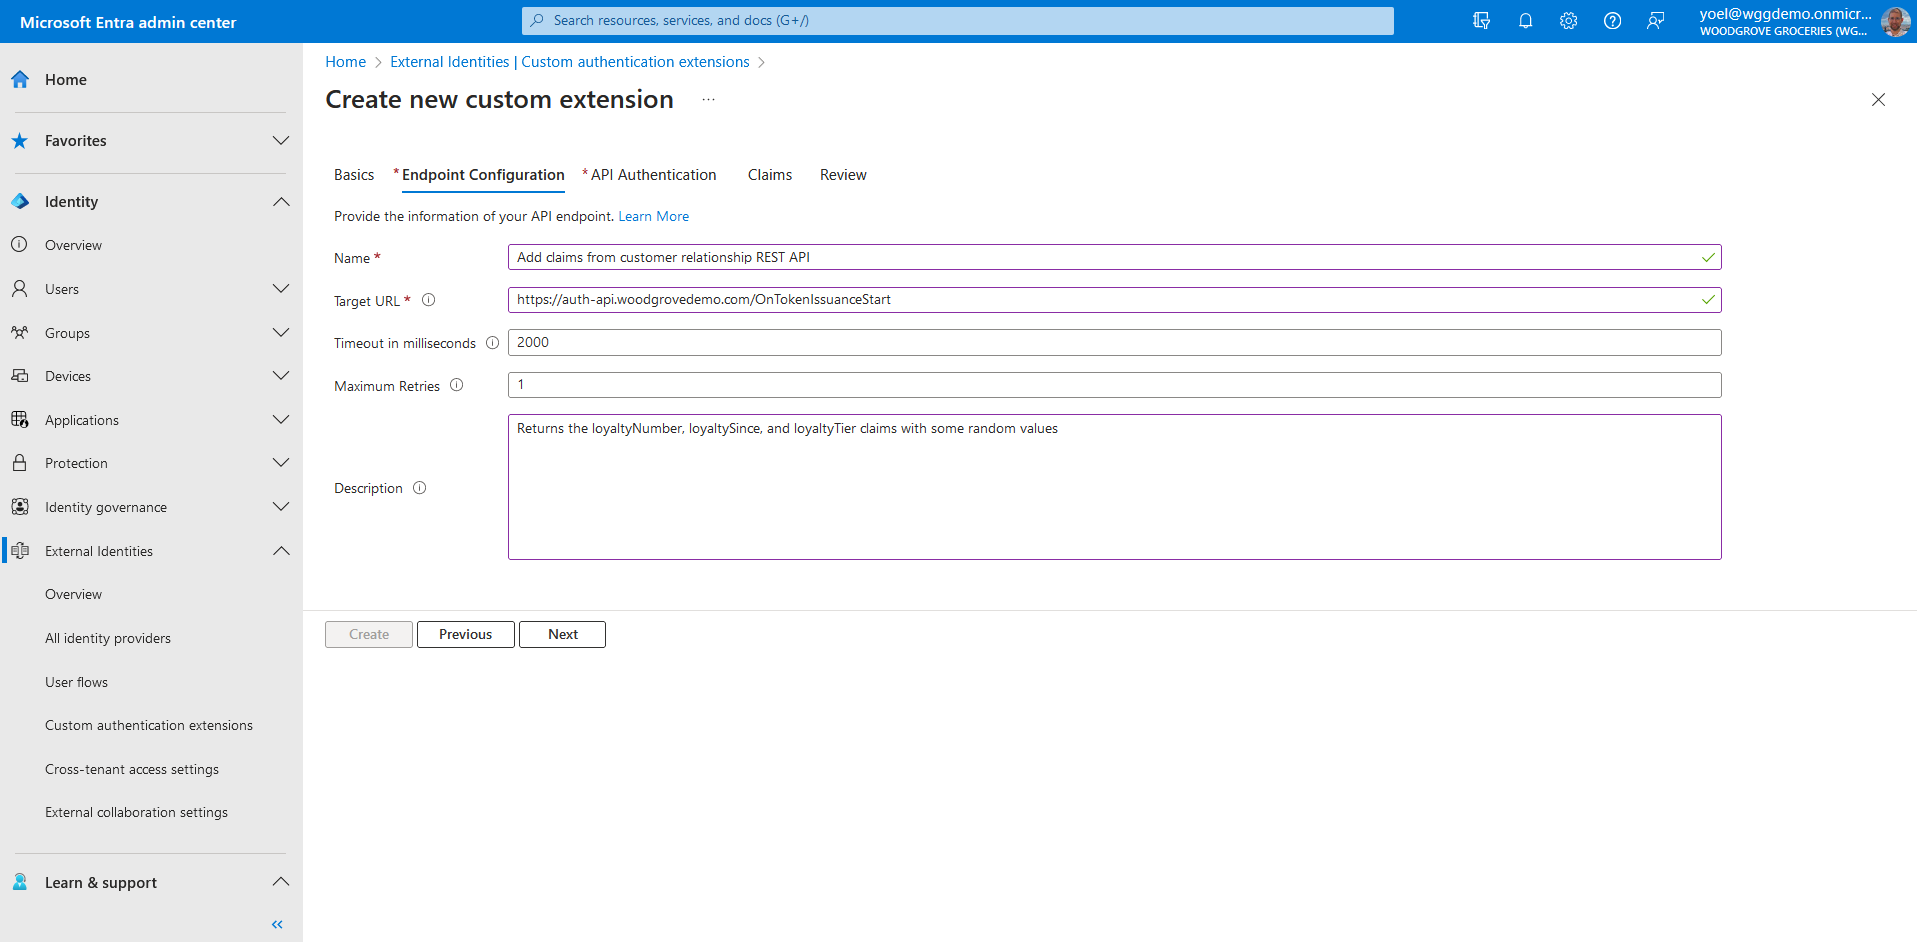
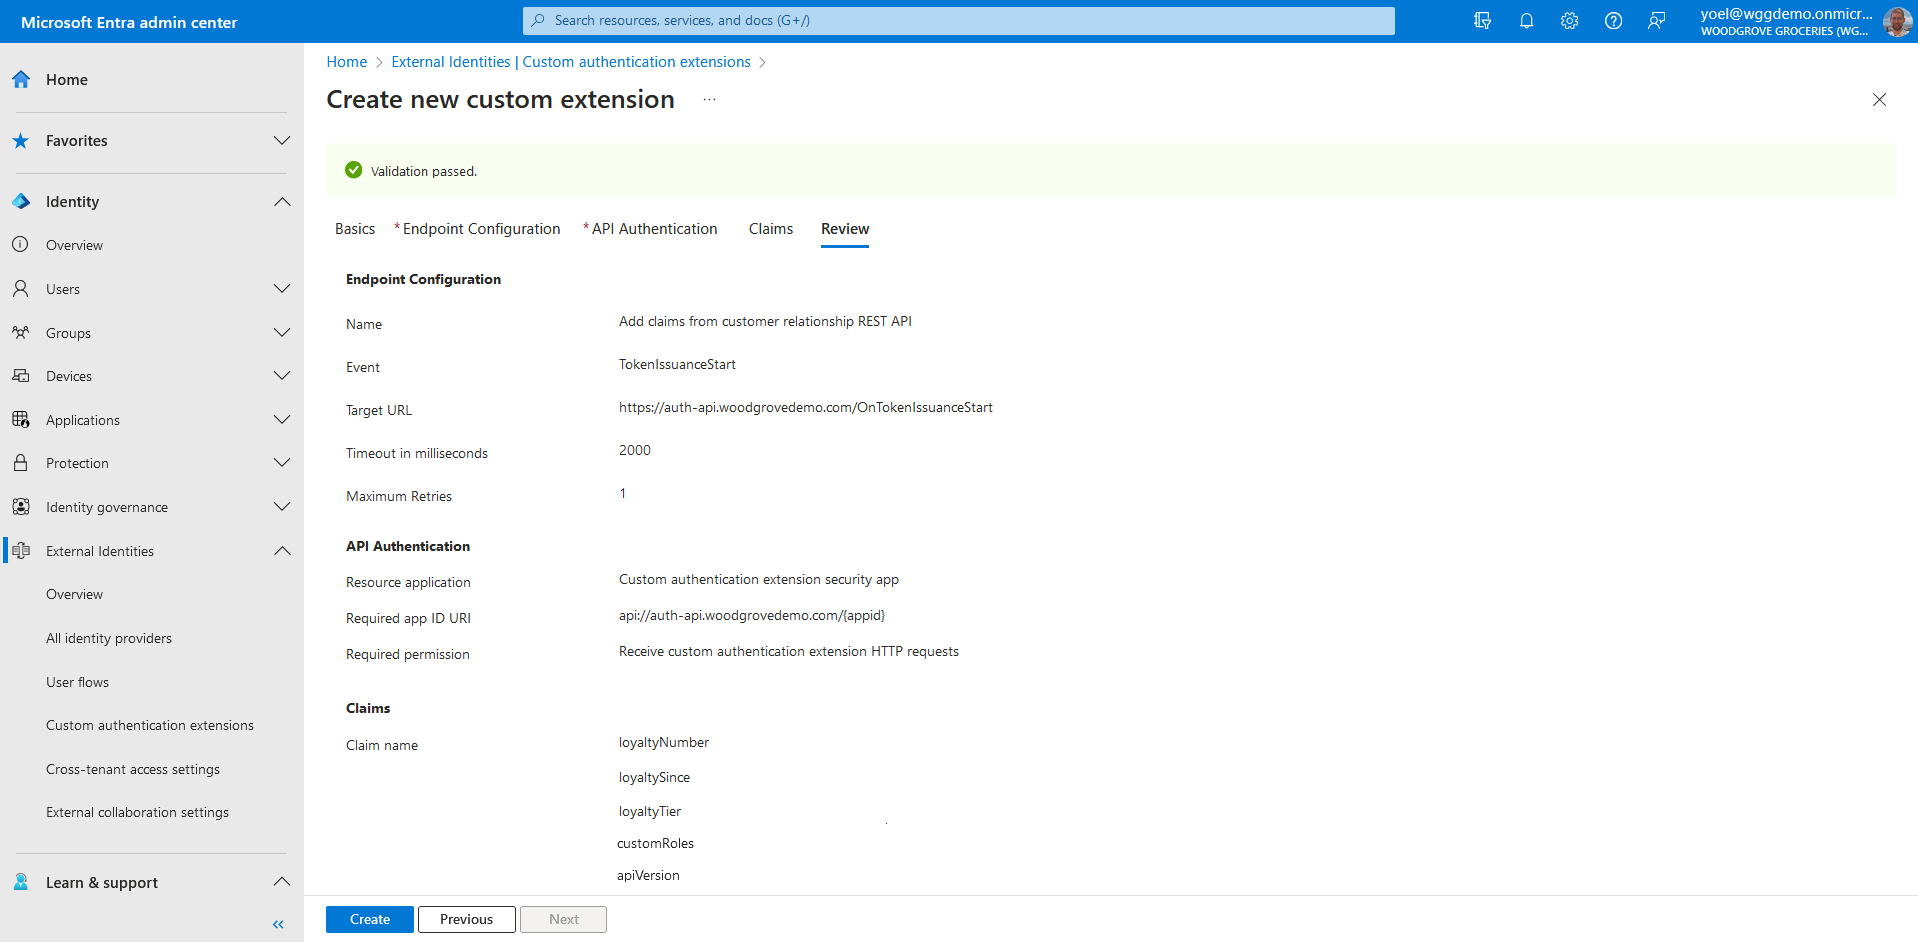
- Name - A name for your custom authentication extension. For example, Add claims from customer relationship REST API.
- Target URL - The URL of your REST API.
- Timeout in milliseconds - The maximum number of retries the API endpoint will be called in case of failure. If empty, will default to service default.
- Maximum Retries - The maximum number of retries the API endpoint will be called in case of failure. If empty, will default to service default..
- Description - A description for your custom authentication extensions.
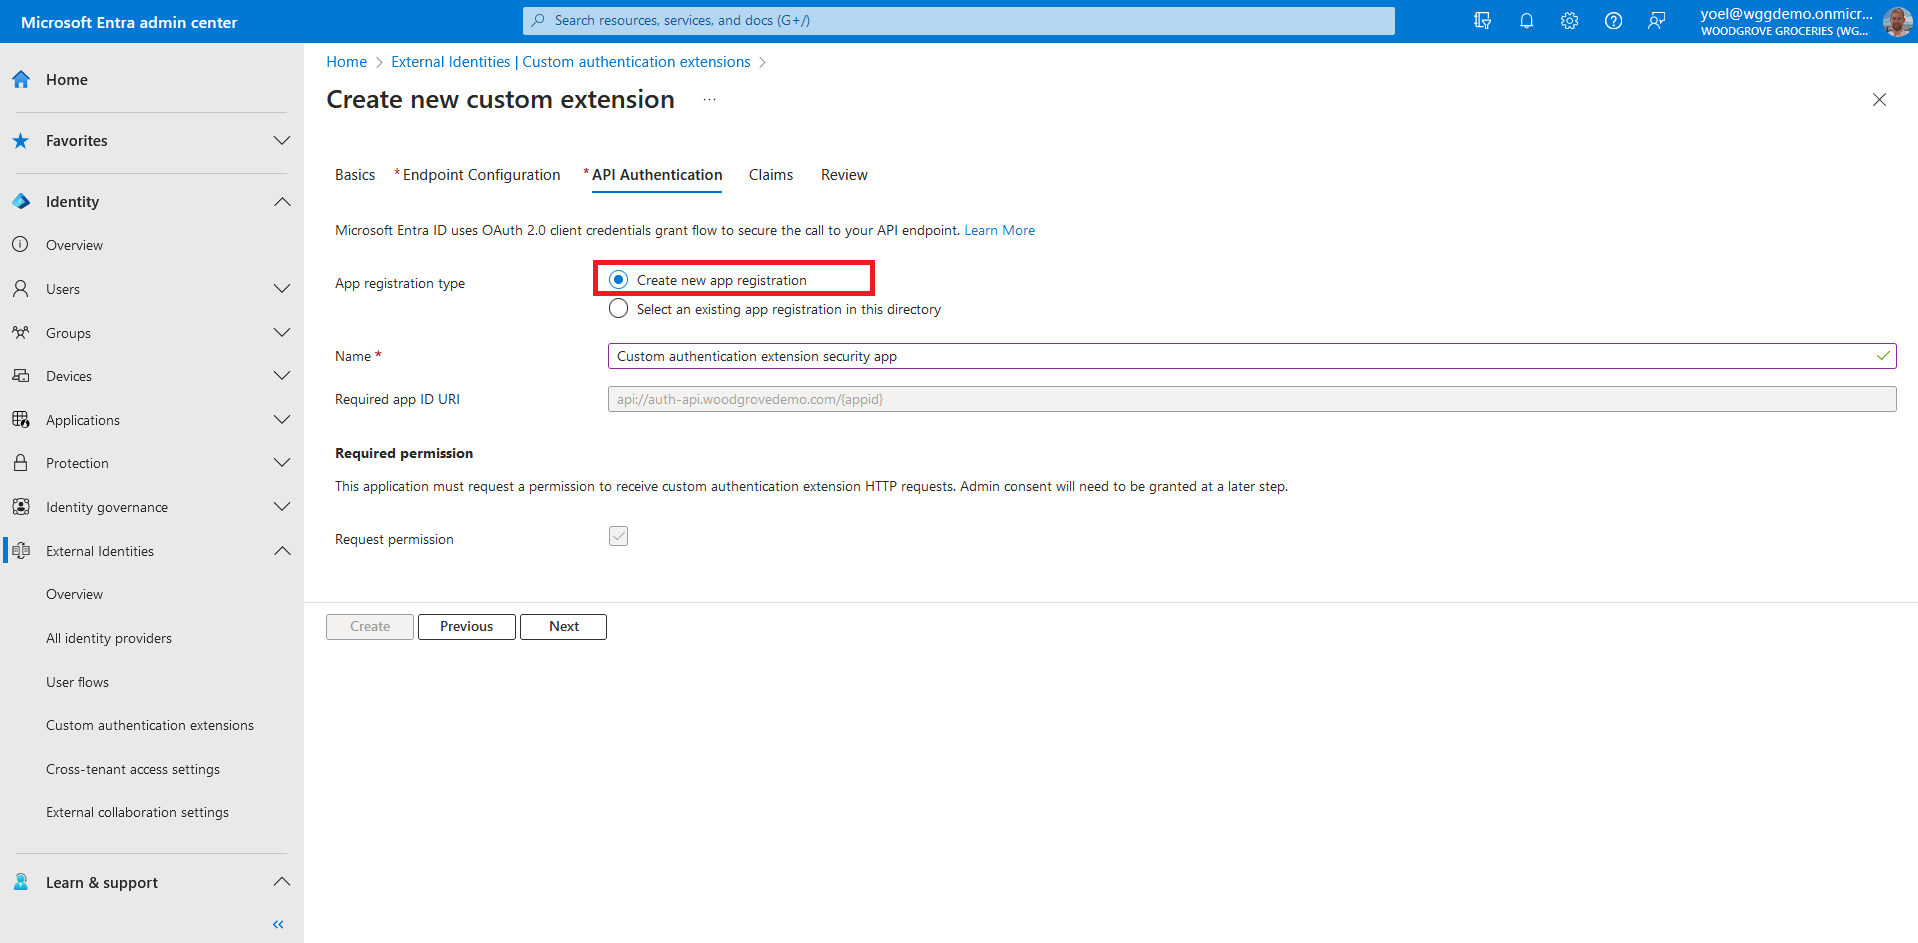
To ensure the communications between the custom authentication extension and your REST API are secured appropriately, multiple security controls must be applied. The first step is to create or choose an application that Microsoft Entra ID uses the OAuth 2.0 client credentials grant flow to secure the call to your API endpoint.
If this is your first custom authentication extension (if not, scroll down), in API Authentication, select the Create new app registration option to create an app registration that represents your REST API. Give the app a name, for example Custom authentication extension security app and select Next.
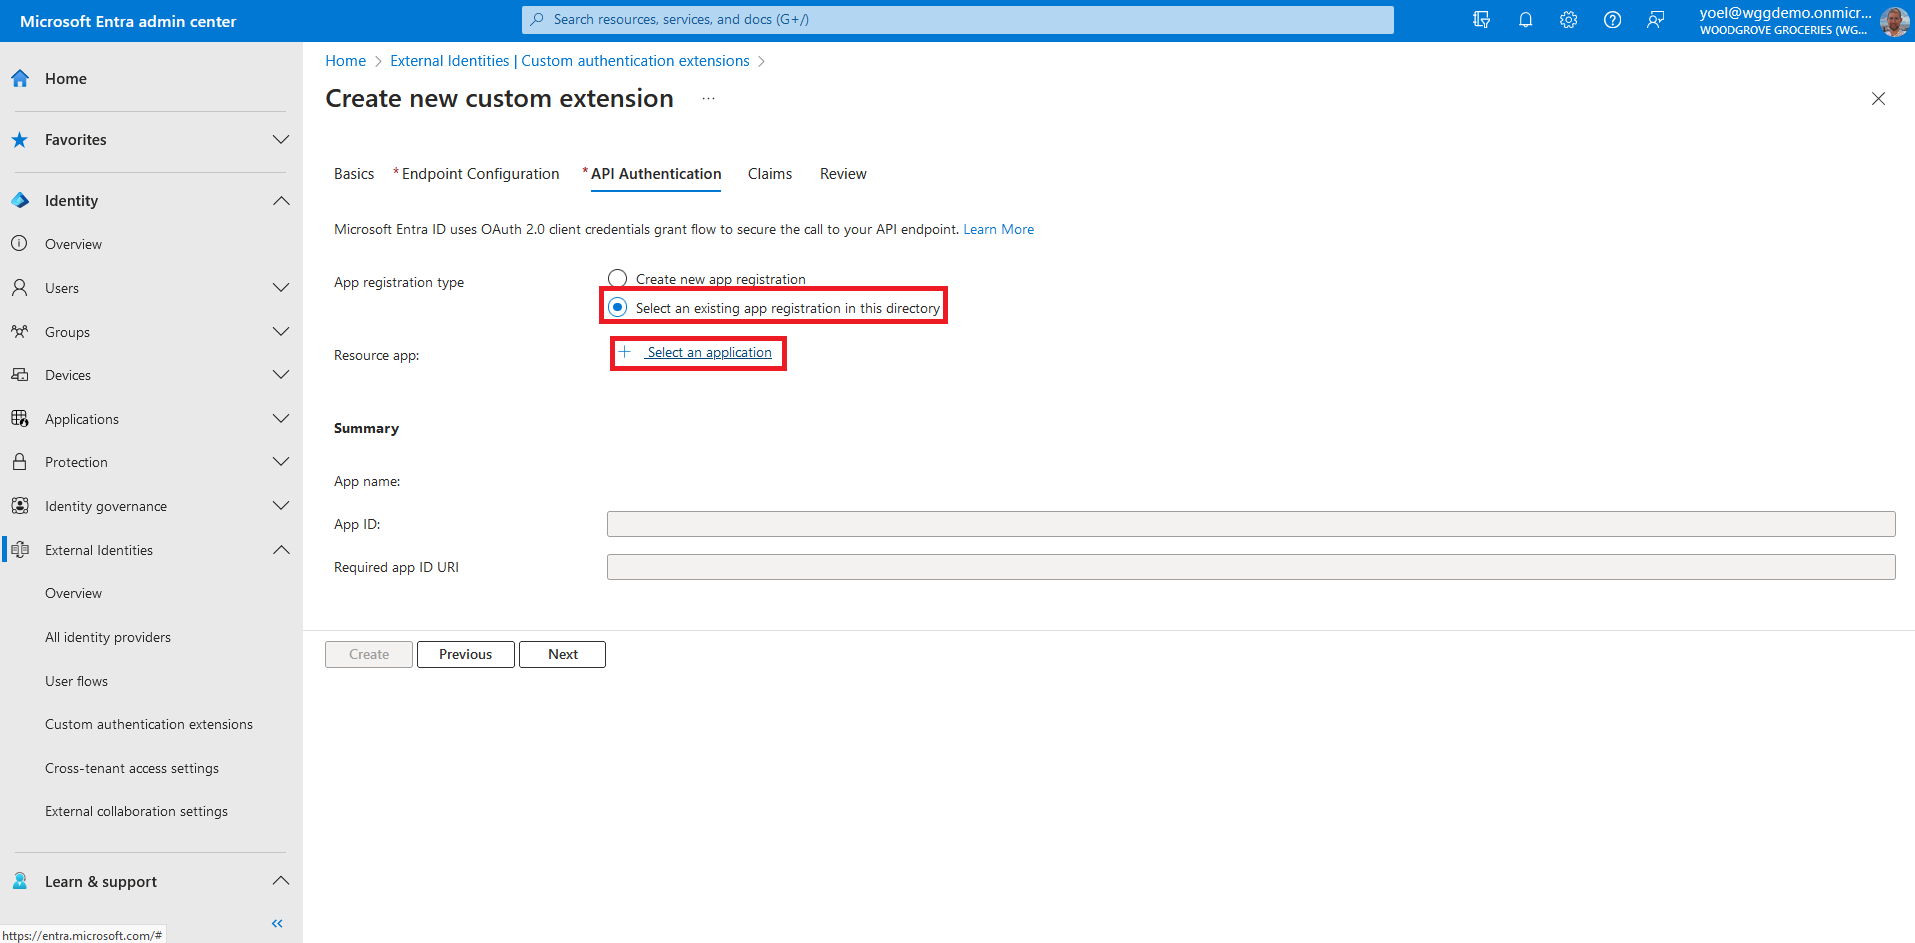
If you have already configured a custom authentication extension, in API Authentication, select the Select an existing app registration in this directory option, and select the application you configured for the other custom authentication extensions.
In Claims, enter the attributes that you expect your custom authentication extension to parse from your REST API and will be merged into the token. Then, to continue select Next.

Review your configuration and select Create, which registers the custom authentication extension and the associated application registration you selected or choose to create.
If earlier you choose the Create new app registration option, after your custom authentication extension is created, you need to grant permissions to the API. Open the Overview page of your new custom authentication extension. Under API Authentication, select Grant permission. A new window opens, and once signed in, it requests permissions to receive custom authentication extension HTTP requests. This allows the custom authentication extension to authenticate to your API. Select Accept.
Take a note of the App ID under API Authentication, as it will be needed when you configure your REST API access token validation.

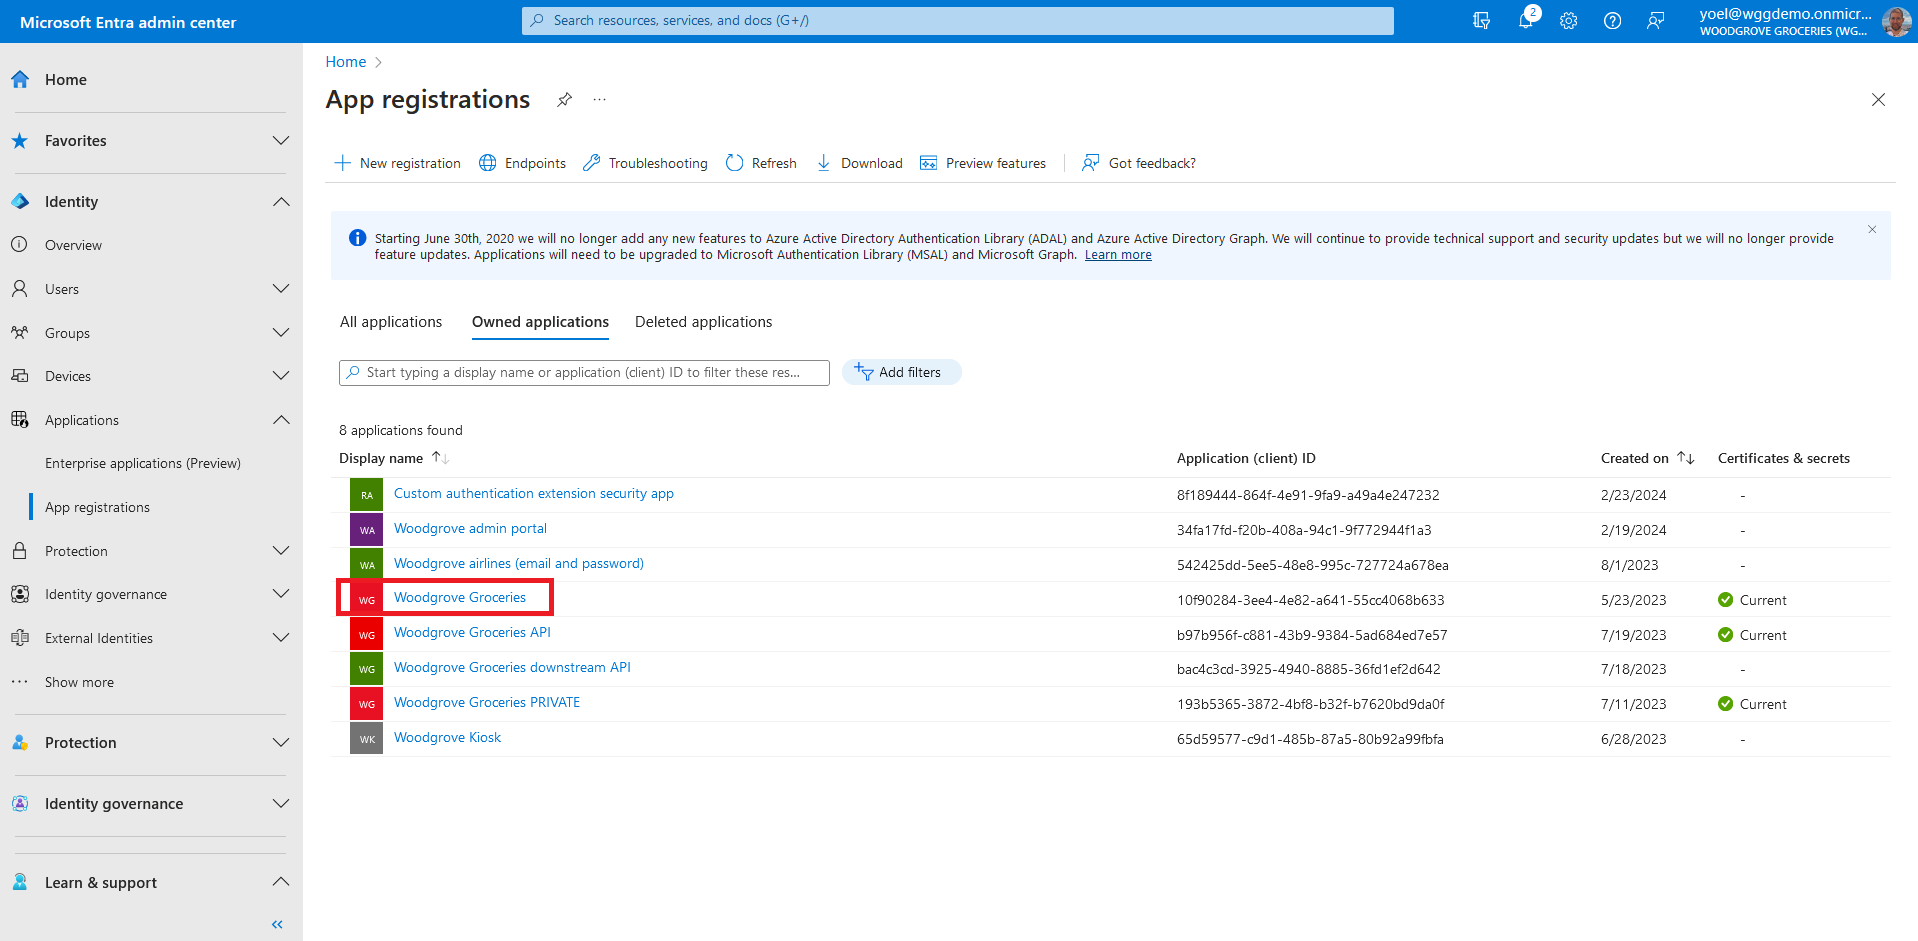
At this point your custom authentication extension is configured but is not associated with any application. In the next few steps you will configure your application to add the attributes returned from the custom authentication extension mapped into the security tokens. From the menu, select App registrations and select your application. In this example we select the Woodgrove Groceries application.
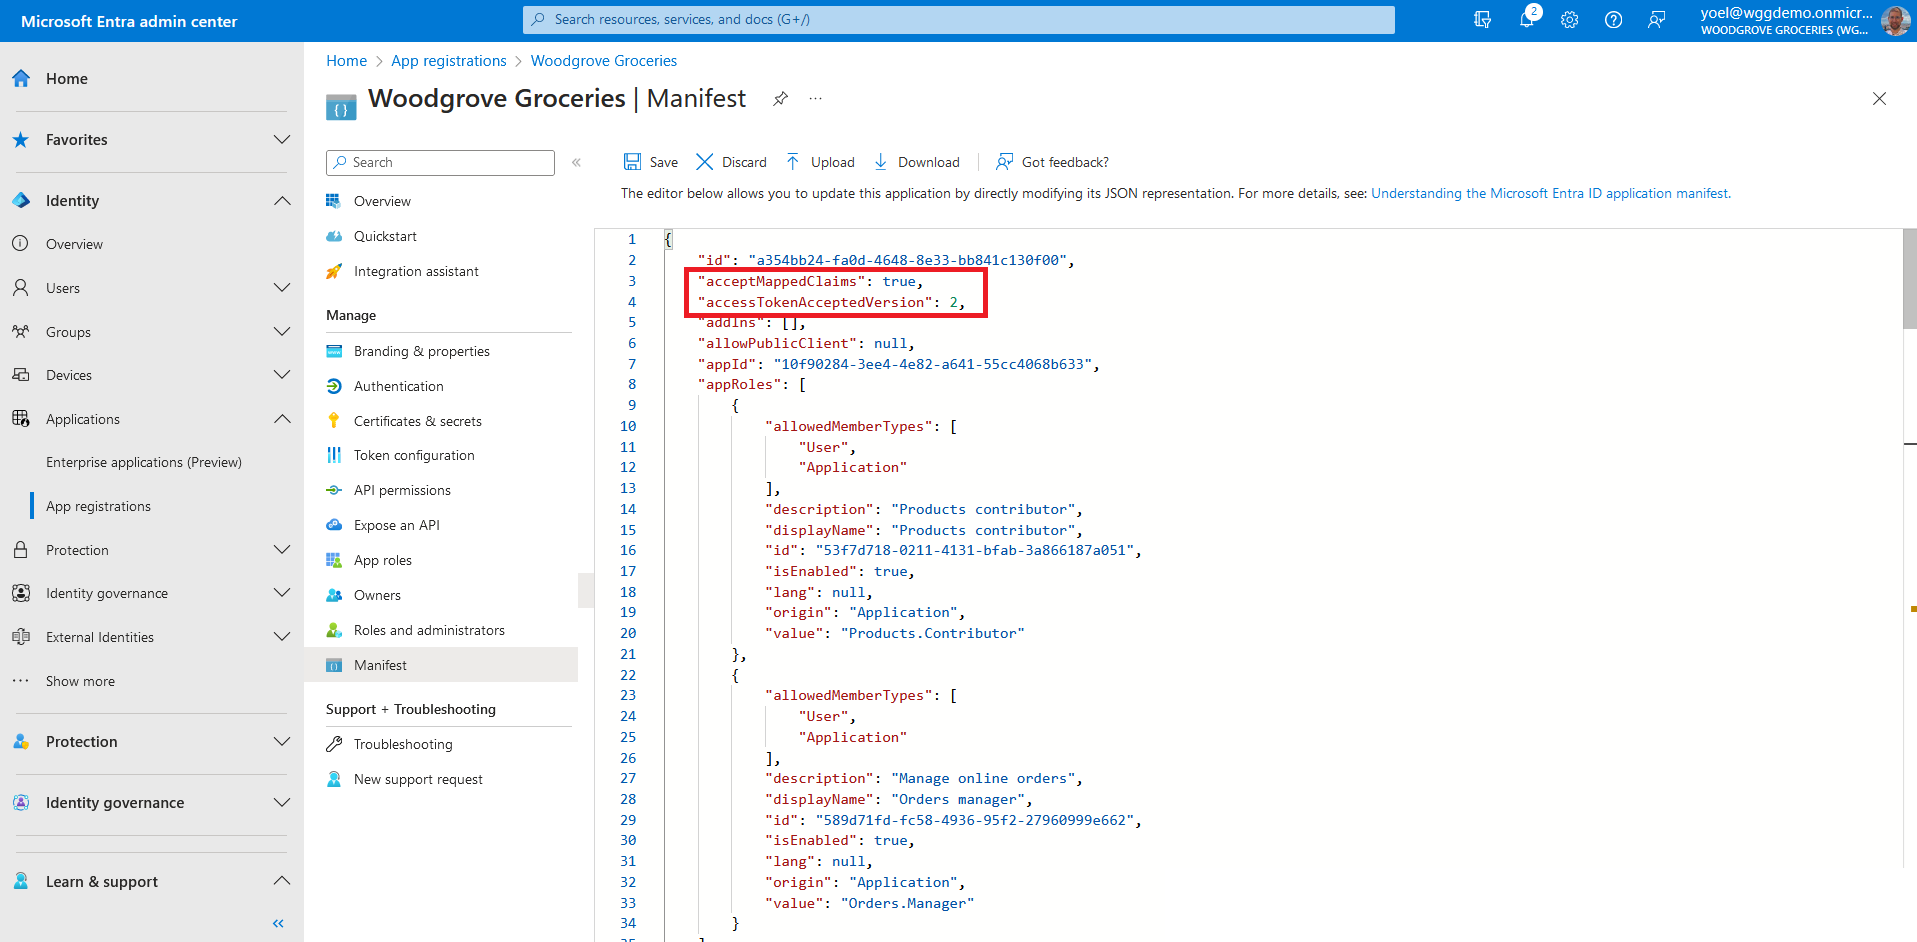
In your application registration, under Manage, select Manifest. A web-based manifest editor opens, allowing you to edit the manifest. In the manifest, locate the acceptMappedClaims attribute, and set the value to true. Set the accessTokenAcceptedVersion to 2. Select Save to save the changes.
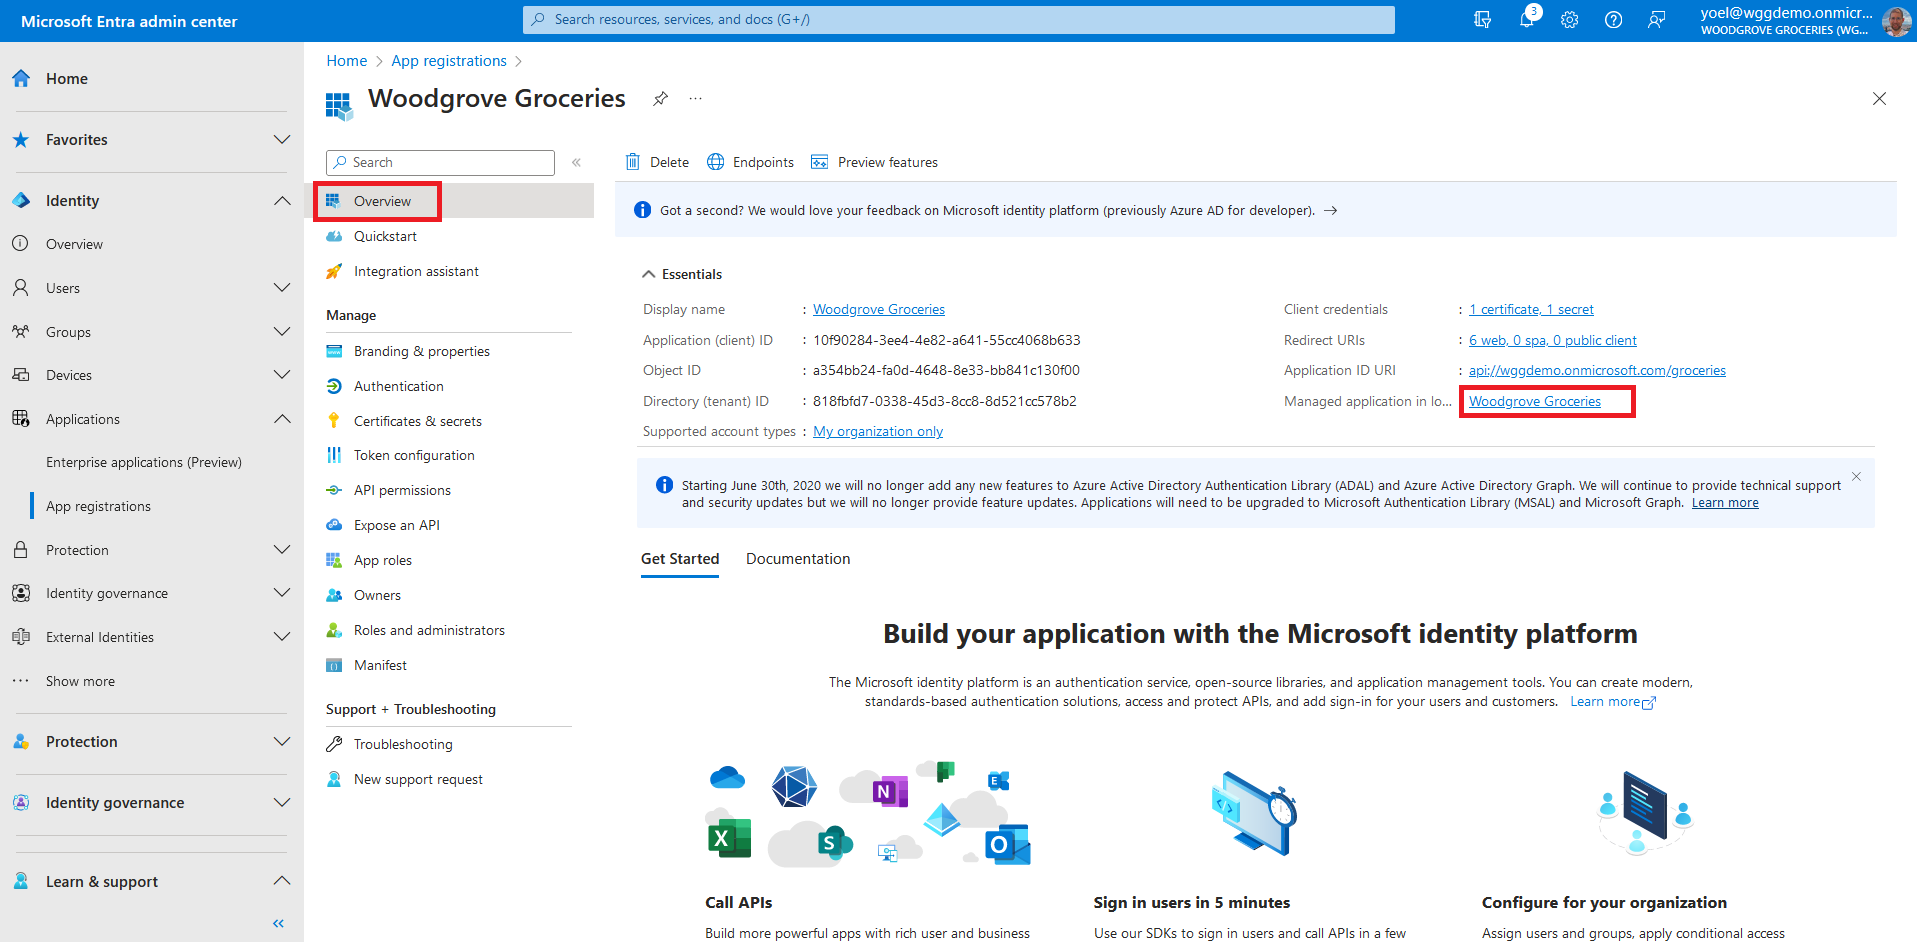
To assign the custom authentication extension as a custom claims provider source, from the app Overview page, select the link next to Managed application in local directory. Note, you can also browse to Enterprise applications, then under Manage, select All applications, and then select your application from the list.
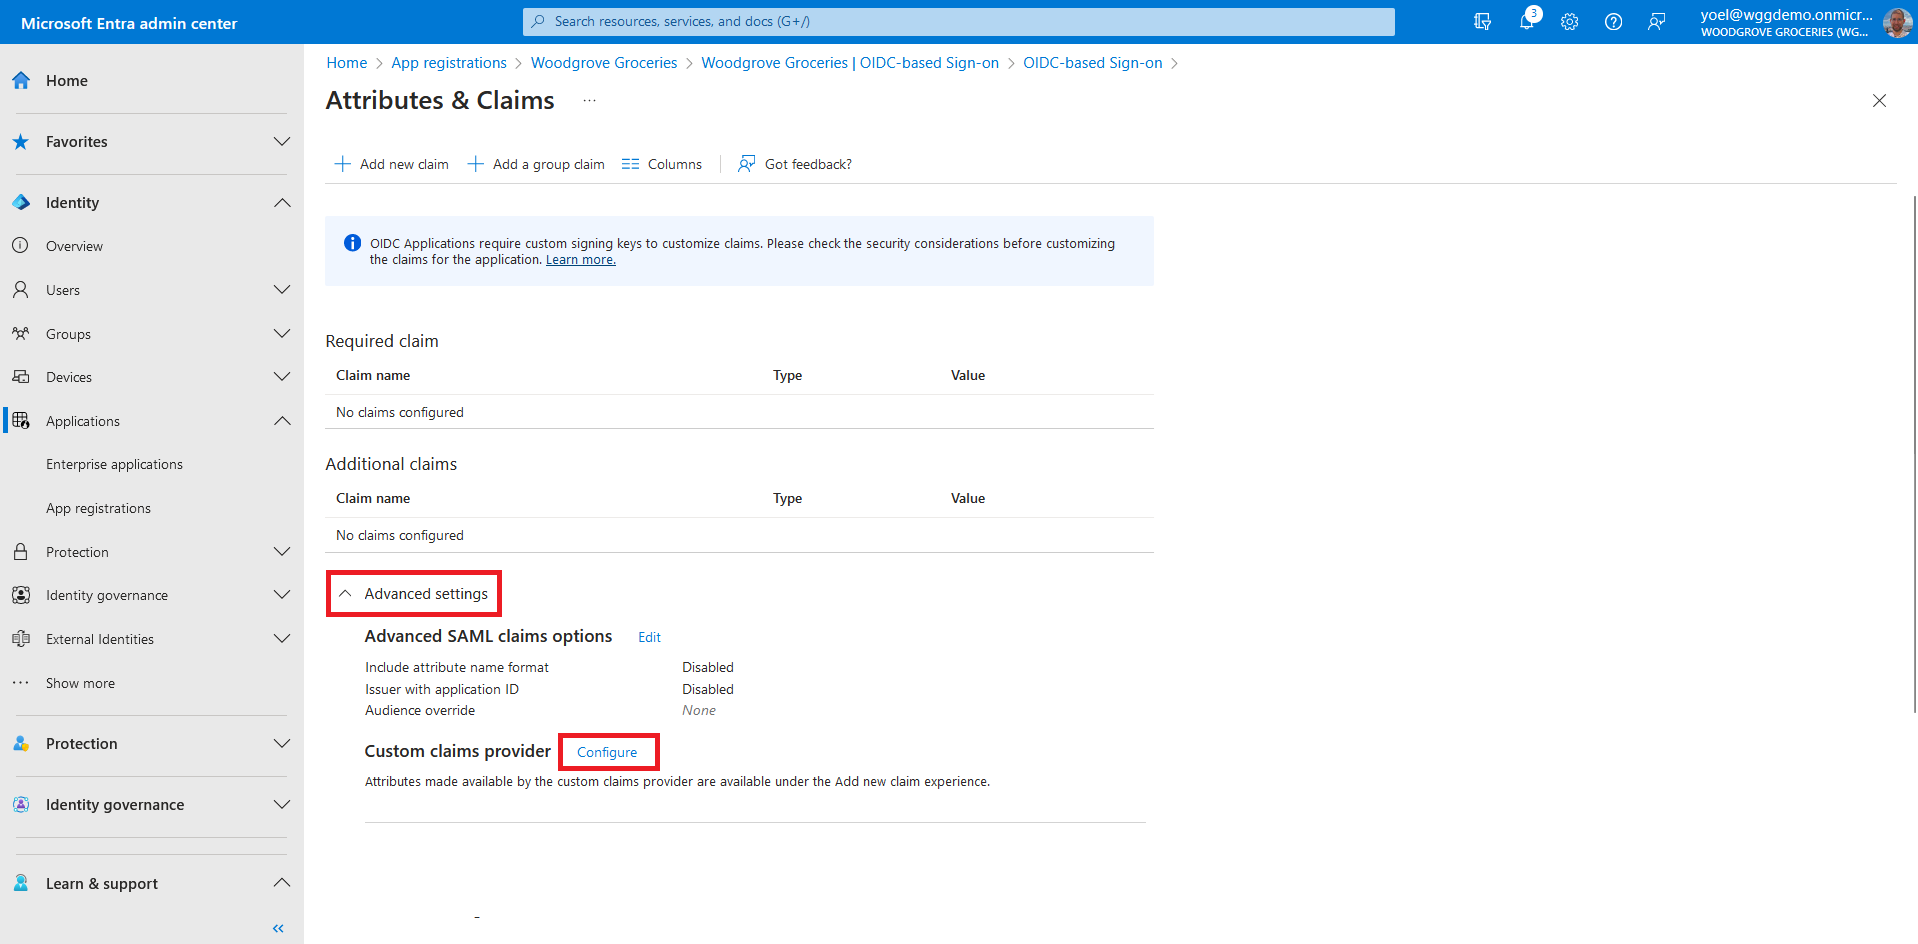
From the menue, select Single sign-on. Then, under Attributes & Claims, select Edit.

Expand the Advanced settings menu. Next to Custom claims provider, select Configure.
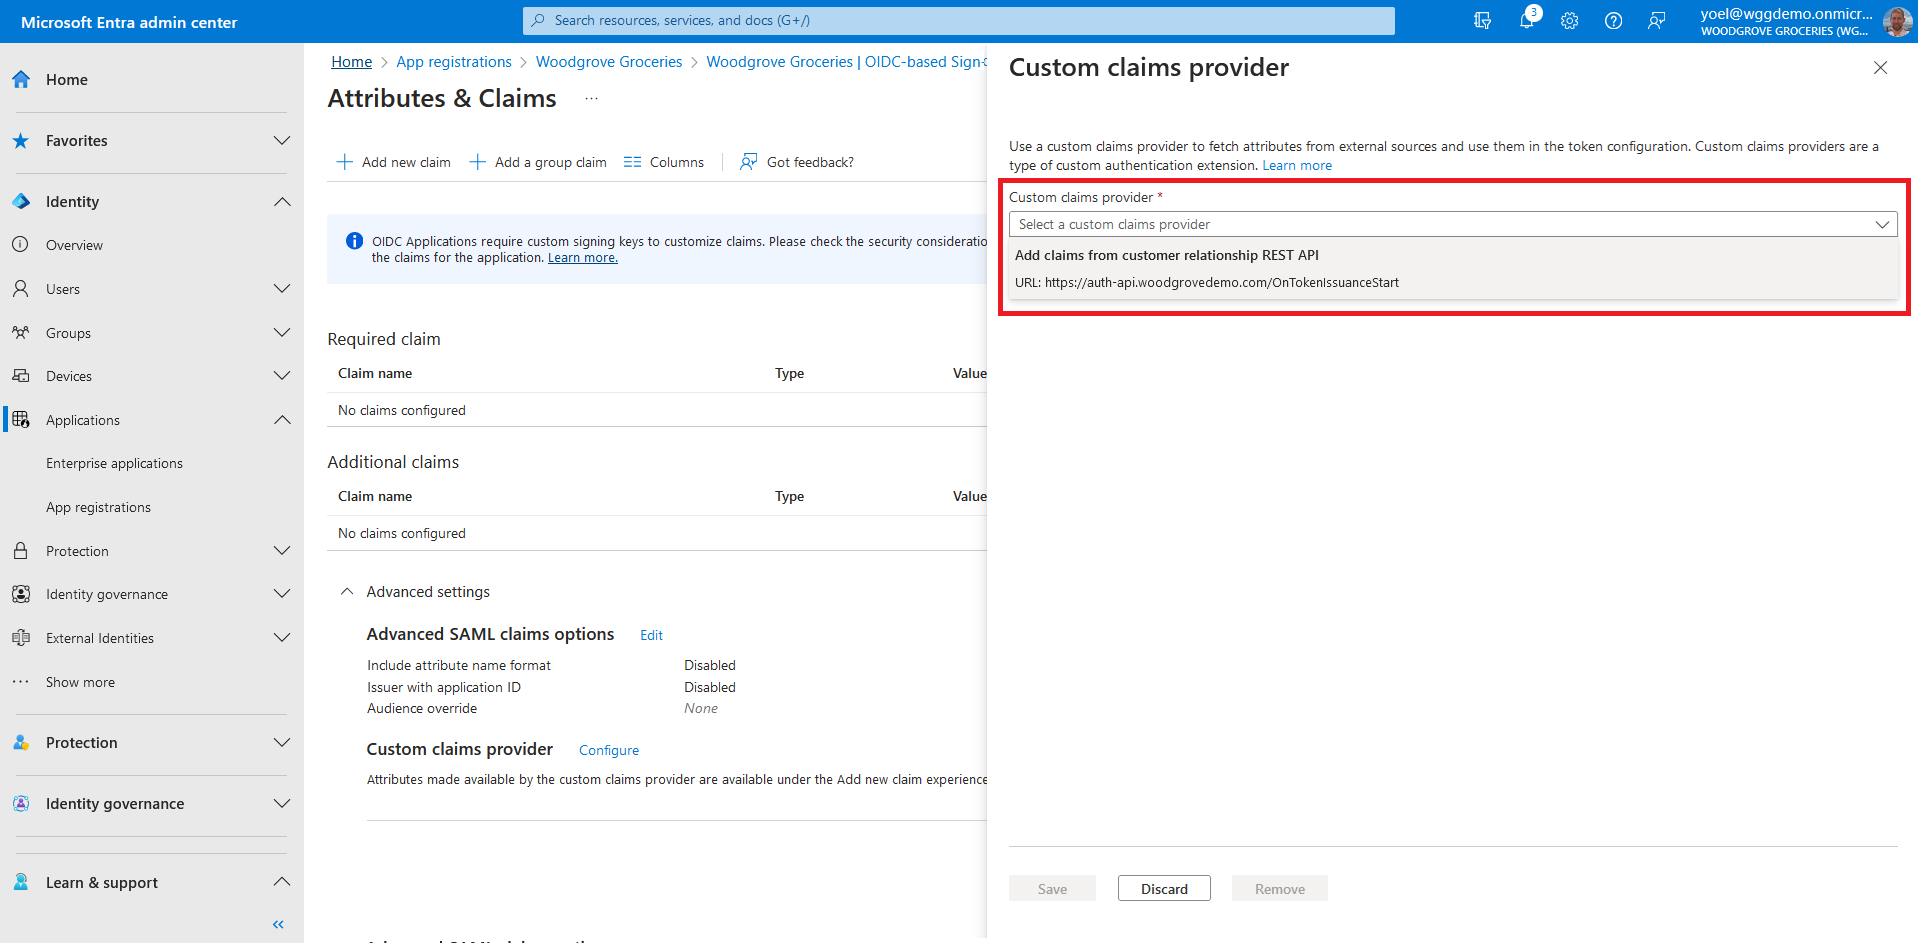
Expand the Custom claims provider drop-down box, and select the Token issuance event you created earlier. Select Save to save the changes.
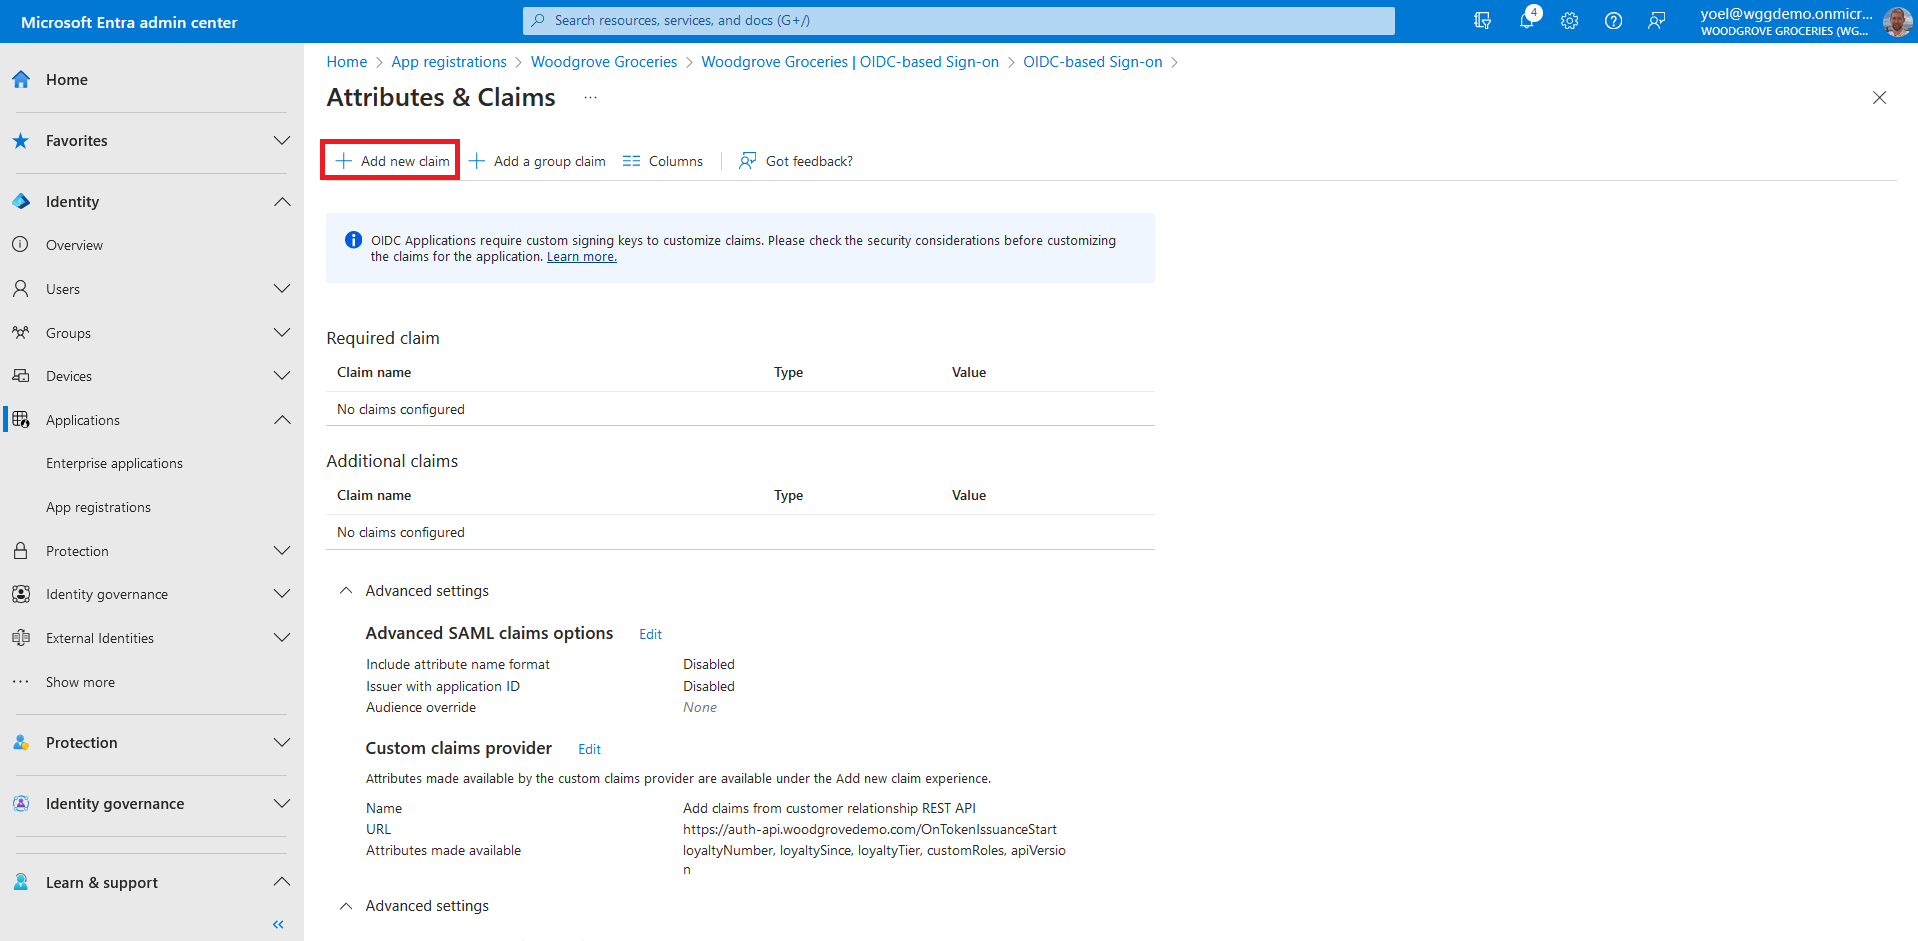
Next, assign the attributes from the custom claims provider, which should be issued into the token as claims: Select Add new claim to add a new claim.
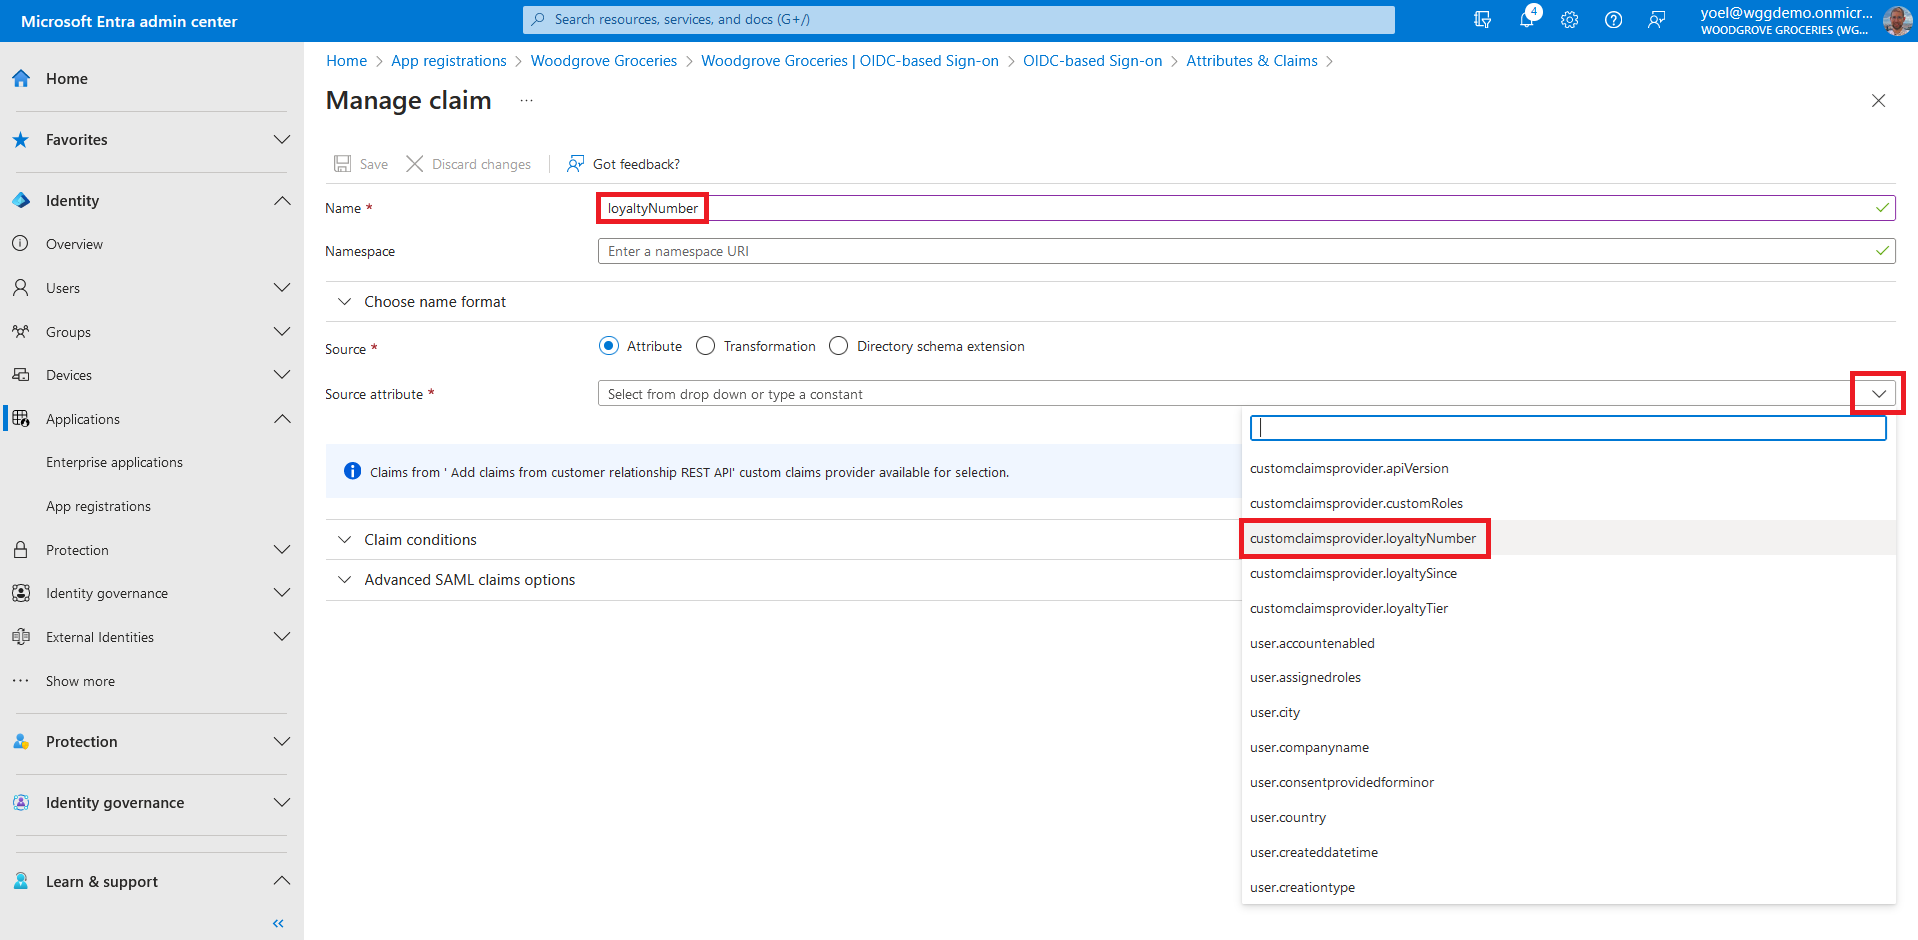
Provide a name to the claim you want to be issued, for example loyaltyNumber. Under Source, select Attribute, and choose customClaimsProvider.loyaltyNumber from the Source attribute drop-down box. Note, the name can be differed from the source. For example, the name can be CustomerNumber, while the source must be one from the list.
Well done!
Your custom authentication extension is configured, and claims that it returns will be included in the access token for your application.
Dependencies
- Application registers
1. Register custom authentication extension application
To register a web application, use the following Microsoft Graph. The name of the application will be Custom authentication extension security app.
POST https://graph.microsoft.com/v1.0/applications
{
    "displayName": "Custom authentication extension security app",
    "description": "Ensure the communications between the custom authentication extension and your REST API are secured",
    "signInAudience": "AzureADMyOrg",
        "tags": [
        "HideApp"
    ],
    "api": {
        "acceptMappedClaims": null,
        "requestedAccessTokenVersion": 2
    },
    "requiredResourceAccess": [
        {
            "resourceAppId": "00000003-0000-0000-c000-000000000000",
            "resourceAccess": [
                {
                    "id": "214e810f-fda8-4fd7-a475-29461495eb00",
                    "type": "Role"
                }
            ]
        }
    ]
}
1.1 Copy the application ID
From the response, copy the value of the appId. For example:
{
    "@odata.context": "https://graph.microsoft.com/v1.0/$metadata#applications/$entity",
    "id": "12345678-0000-0000-0000-000000000000",
    "appId": "22222222-0000-0000-0000-000000000000",
    "displayName": "Custom authentication extension security app",
    "description": "Ensure the communications between the custom authentication extension and your REST API are secured",
    ...
}
1.2 Update the application identifier URI
After you register you registered your application, Update the application's' identifier URI. Replace the {app-ID} with the app ID from the previous call (not the object ID). Replace the {REST-API-domain} with your rest API domain name.
PATCH https://graph.microsoft.com/v1.0/applications(appId='{app-ID}')
{
    "identifierUris": [
        "api://{REST-API-domain}/{app-ID}"
    ]
}
Show example
PATCH https://graph.microsoft.com/v1.0/applications(appId='12345678-1234-1234-1234-000000000000')
{
       "identifierUris": [
        "api://auth-api.woodgrovedemo.com/12345678-1234-1234-1234-000000000000"
    ]
}
1.3 Create a service principal for your application
After you register you registered your application, create a service principal. The following Microsoft Graph creates a service principal. Replace the {app-ID} with the app ID from the previous call (not the object ID).
POST https://graph.microsoft.com/v1.0/servicePrincipals
{
    "appId": "{app-ID}"
}
Show example
POST https://graph.microsoft.com/v1.0/servicePrincipals
{
    "appId": "12345678-1234-1234-1234-000000000000"
}
1.4 Copy the service principal ID
From the response, copy the value of the id. For example:
{
    "@odata.context": "https://graph.microsoft.com/v1.0/$metadata#servicePrincipals/$entity",
    "id": "77777777-0000-0000-0000-000000000000",
    "appDisplayName": "Custom authentication extension security app",
    "appDescription": "Ensure the communications between the custom authentication extension and your REST API are secured",
    "appId": "12345678-1234-1234-1234-000000000000",
}
1.5 Get the Microsoft Graph's service principal ID
Run the following GET request and cope the id from the response:
GET https://graph.microsoft.com/v1.0/servicePrincipals(appId='00000003-0000-0000-c000-000000000000')
{
    "id": "66666666-0000-0000-0000-000000000000"
    "appDisplayName": "Microsoft Graph",
    "appId": "00000003-0000-0000-c000-000000000000",
}
1.6 Consent to the required permissions
Since the tenant is a customer's tenant, the consumer users themselves can't consent to these permissions. You as the admin must consent to these permissions on behalf of all the users in the tenant: Replace the {service-principal-id} with the service-principal ID you created in the previous step. Replace the {graph-service-principal-id} with the service-principal id you copied in the last step.
Note, in the following JSON snippet, the 214e810f-fda8-4fd7-a475-29461495eb00 ID is the CustomAuthenticationExtension.Receive.Payload application role.
POST https://graph.microsoft.com/v1.0/servicePrincipals/{service-principal-id}/appRoleAssignments
{
    "principalId": "{service-principal-id}",
    "resourceId": "{graph-service-principal-id}",
    "appRoleId": "214e810f-fda8-4fd7-a475-29461495eb00"
}
2. Register a custom authentication extension
Next, you register the custom authentication extension. You register the custom authentication extension by associating it with the Custom authentication extension security app you created, and to your REST API endpoint. Replace:
- {app-ID} with the app ID from the previous call Custom authentication extension security app.
- {REST-API-domain}with your rest API domain name
- {Endpoint-URL} - with the RUL of your REST API endpoint
- claimsForTokenConfiguration - Collection of attribute your REST API returns
POST https://graph.microsoft.com/beta/identity/customAuthenticationExtensions
{
    "@odata.type": "#microsoft.graph.onTokenIssuanceStartCustomExtension",
    "displayName": " Add claims from customer relationship REST API",
    "description": "Returns the loyaltyNumber, loyaltySince, and loyaltyTier claims with some random values",
    "behaviorOnError": null,
    "authenticationConfiguration": {
        "@odata.type": "#microsoft.graph.azureAdTokenAuthentication",
        "resourceId": "api://{REST-API-domain}/{app-ID}"
    },
    "endpointConfiguration": {
        "@odata.type": "#microsoft.graph.httpRequestEndpoint",
        "targetUrl": "{Endpoint-URL}"
    },
    "clientConfiguration": {
        "timeoutInMilliseconds": null,
        "maximumRetries": null
    },
    "claimsForTokenConfiguration": [
        {
            "claimIdInApiResponse": "loyaltyNumber"
        },
        {
            "claimIdInApiResponse": "customRoles"
        },
        {
            "claimIdInApiResponse": "apiVersion"
        },
        {
            "claimIdInApiResponse": "correlationId"
        },
        {
            "claimIdInApiResponse": "loyaltySince"
        },
        {
            "claimIdInApiResponse": "loyaltyTier"
        }
    ]
}
Show example
POST https://graph.microsoft.com/beta/identity/customAuthenticationExtensions
{
    "@odata.type": "#microsoft.graph.onTokenIssuanceStartCustomExtension",
    "displayName": " Add claims from customer relationship REST API",
    "description": "Returns the loyaltyNumber, loyaltySince, and loyaltyTier claims with some random values",
    "behaviorOnError": null,
    "authenticationConfiguration": {
        "@odata.type": "#microsoft.graph.azureAdTokenAuthentication",
        "resourceId": "api://auth-api.woodgrovedemo.com/12345678-1234-1234-1234-000000000000"
    },
    "endpointConfiguration": {
        "@odata.type": "#microsoft.graph.httpRequestEndpoint",
        "targetUrl": "https://auth-api.woodgrovedemo.com/OnTokenIssuanceStart"
    },
    "clientConfiguration": {
        "timeoutInMilliseconds": null,
        "maximumRetries": null
    },
    "claimsForTokenConfiguration": [
        {
            "claimIdInApiResponse": "loyaltyNumber"
        },
        {
            "claimIdInApiResponse": "customRoles"
        },
        {
            "claimIdInApiResponse": "apiVersion"
        },
        {
            "claimIdInApiResponse": "correlationId"
        },
        {
            "claimIdInApiResponse": "loyaltySince"
        },
        {
            "claimIdInApiResponse": "loyaltyTier"
        }
    ]
}
2.1 Copy the custom authentication extension ID
From the response, copy the value of the id. For example:
{
    "@odata.context": "https://graph.microsoft.com/beta/$metadata#identity/customAuthenticationExtensions/$entity",
    "@odata.type": "#microsoft.graph.onTokenIssuanceStartCustomExtension",
    "id": "22222222-2222-3333-3333-444444444444",
    "displayName": " Add claims from customer relationship REST API",
    "description": "Returns the loyaltyNumber, loyaltySince, and loyaltyTier claims with some random values",
}
2.2 Create authentication event listener
After you register you registered your custom authentication extension, create authentication event listener. In the next JSON, replace:
- {web-or-mobile-app-ID} with your web or mobile application. Not the Custom authentication extension security app. It's a collection, you can add more apps as needed.
- {Custom-auth-extension-ID} with the custom authentication extension you just created.
POST https://graph.microsoft.com/beta/identity/authenticationEventListeners
{
    "@odata.type": "#microsoft.graph.onTokenIssuanceStartListener",
    "conditions": {
        "applications": {
            "includeAllApplications": false,
            "includeApplications": [
                {
                    "appId": "{web-or-mobile-app-ID}"
                }
            ]
        }
    },
    "priority": 500,
    "handler": {
        "@odata.type": "#microsoft.graph.onTokenIssuanceStartCustomExtensionHandler",
        "customExtension": {
            "id": "{Custom-auth-extension-ID}"
        }
    }
}
Show example
POST https://graph.microsoft.com/beta/identity/authenticationEventListeners
{
    "@odata.type": "#microsoft.graph.onTokenIssuanceStartListener",
    "conditions": {
        "applications": {
            "includeAllApplications": false,
            "includeApplications": [
                {
                    "appId": "722f9405-d07c-4980-baed-4717ce4ec710"
                },
                {
                    "appId": "c92b6a8a-d591-4234-bd51-6929d07d90aa"
                }
            ]
        }
    },
    "priority": 500,
    "handler": {
        "@odata.type": "#microsoft.graph.onTokenIssuanceStartCustomExtensionHandler",
        "customExtension": {
            "id": "22222222-2222-3333-3333-444444444444"
        }
    }
}
3. Update your applications' manifest
Configure your web or mobile application metadata's acceptMappedClaims attribute to true. Also, the accessTokenAcceptedVersion to 2. Replace the {app-ID} with your web or mobile application. If you have more than one application, repeat this step.
PATCH https://graph.microsoft.com/v1.0/applications(appId='{app-ID}')
{
    "api": {
        "acceptMappedClaims": true,
        "requestedAccessTokenVersion": 2
    }
}